DevOps for embedded (part 2)
Intro
Note: This is the first post of the DevOps for Embedded series. Here you can find part 1 and part 3.
In the previous post, I’ve explained how to use Packer and Ansible to create a Docker CDE (common development environment) image and use it on your host OS to build and flash your code for a simple STM32F103 project. This docker image was then pushed to the docker hub repository and then I’ve shown how you can create a gitlab-ci pipeline that triggers on repo code changes, pulls the docker CDE image and then builds the code, runs tests and finally export the artifact to the gitlab repo.
This is the most common case of a CI/CD pipeline in an embedded project. What was not demonstrated was the testing on the real hardware, which I’ll leave for the next post.
In this post, I’ll show how you can use a cloud service and specifically AWS to perform the same task as the previous post and create a cloud VM that builds the code as either a CDE or as a part of s CI/CD pipeline. I’ll also show a couple of different architectures for doing this and discuss what are the pros and cons for each one. So, let’s dive into it.
Install aws CLI
In order to use the aws services you need first to install the aws CLI tool. The time this post is written, there is the version 1 of the aws and there’s also a new version 2, which is preview for evaluating and testing. Therefore, I’ll use version 1 for this post. There’s a guide here on how to install the aws CLI, but it’s easy and you just need python3 and use pip:
1
pip3 install awscli --upgrade --user
After that you can test the installation by running aws --version:
1
2
$ aws --version
aws-cli/1.16.281 Python/3.6.9 Linux/5.3.0-22-generic botocore/1.13.17
So, the version I’ll be using in this post is 1.16.281.
It’s important to know that if you get errors while following this guide then you need to be sure that you use the same versions for each software that is used. The reason is that Packer and Ansible for example are getting updated quite often and sometimes the newer versions are not backwards compatible.
Create key pairs for AWS
This will be needed later in order to run an instance from the created AMI. When an instance is created you need somehow to connect to it. This instance will get a public IP and the easiest way to connect to is by SSH. For security reasons you need to either create a pair of private/public key on the AWS EC2 MC (MC = Management Console) or create one locally on your host and then upload the public key to AWS. Both solutions are fine, but they have some differences and here you’ll find the documentation for this.
If you use the MC to create the keys then your browser will download a pem file, which you can use to connect to any instance that uses this pair. You can store this pem file in a safe place, distribute it or do whatever you like. If you create your keys that way, then you trust CM backend for the key creation, which I assume is fine, but in case you have a better random generator or you want full control, then you may don’t want the CM to create the keys.
The other way is to create your keys on your side if you prefer. I assume that you would need that for two reasons, one is to re-use an existing ssh pair that you already have or you may prefer use your random generator. In any case, AWS supports to import external keys, so just create the keys and upload them in your CM in the Network & Security -> Key Pairs tab.
In this example, I’m using my host’s key pair which is in my user’s ~/.ssh so if you haven’t created ssh keys to your host then just run this command:
1
ssh-keygen -t rsa -C "your_email@example.com"
Of course, you need to change the dummy email with yours. When you run this command it will create two files (id_rsa and id_rsa.pub ) in your ~/.ssh folder. Have a look in there, just to be sure.
Now that you have your keys, open to your AWS EC2 CM and upload you public ~/.ssh/id_rsa.pub key in the Network & Security -> Key Pairs tab.
Creating a security group
Another thing that you’ll need later is a security group for your AMI. This is just some firewall rules grouped in a tag that you can use when you create new instances. Then the new instance will get those rules and apply them to the instance. The most usual case is that you need to allow only ssh inbound connections and allow all the outbound connections from the image.
To create a new group of rules, go to your AWS EC2 management console and click on the NETWORK & SECURITY -> Security Groups tab. Then clink on the Create Security Group button and then on the new dialog, type ssh-22-only for the Security group name, write your own description and then in the inbound tab press Add Rule button and then select SSH in the type column, select Customin the Source column and type 0.0.0.0/0. Apply the changes and you’ll see your new ssh-22-only rule in the list.
Creating an AWS EC2 AMI
In the repo that I’ve used in the previous post to build the docker image with Packer, there’s also a json file to build the AWS EC2 AMI. AMI stands for Amazon Machine Image and it’s just a containerized image with a special format that Amazon uses for their purposes and infrastructure.
Before proceeding with the post you need to make sure that you have at least a free tier AWS account and you’ve created you credentials.
To build the EC2 image you need to make sure that you have a folder named .aws in your user’s home and inside there are the configand credentialfiles. If you don’t have this, then that means that you need to configure aws using the CLI. To do this, run the following command in your host’s terminal
1
aws configure
When this runs, you’ll need to fill in your AWS Access Key ID and the AWS Secret Access Key that you got when you’ve created your credentials. Also you need to select your region, which is the location that you want to store your AMI. This selection is depending on your geo-location and there’s a list to choose the proper name depending where you’re located. The list is in this link. In my case, because I’m staying in Berlin it makes sense to choose eu-central-1 which is located in Frankfurt.
After you run the configuration, the ~/.aws folder and the needed files should be there. You can also verify it by cat the files in the shell.
1
cat ~/.aws/{config,credentials}
The config file contains information about the region andthe credentials file contains your AWS Access Key ID and the AWS Secret Access Key. Normally, you don’t want those keys flapping around in text mode and you should use some kind of vault service, but let’s skip this step for now.
If you haven’t cloned the repo I’ve used in the previous post already, then this is the repo you need to clone:
https://github.com/dimtass/stm32f103-cmake-template
Have a look in the stm32-cde-aws.json file. I’ll also paste it here:
1
2
3
4
5
6
7
8
9
10
11
12
13
14
15
16
17
18
19
20
21
22
23
24
25
26
27
28
29
30
31
32
33
34
35
{
    "_comment": "Build an AWS EC2 image for STM32 CDE",
    "_author": "Dimitris Tassopoulos <dimtass@gmail.com>",
    "variables": {
      "aws_access_key": "",
      "aws_secret_key": "",
      "cde_version": "0.1",
      "build_user": "stm32"
    },
    "builders": [{
      "type": "amazon-ebs",
      "access_key": "",
      "secret_key": "",
      "region": "eu-central-1",
      "source_ami": "ami-050a22b7e0cf85dd0",
      "instance_type": "t2.micro",
      "ssh_username": "ubuntu",
      "ami_name": "stm32-cde-image- ",
      "ssh_interface": "public_ip"
    }],
    "provisioners":[{
        "type": "shell",
        "inline": [
          "sleep 20"
        ]
      },
      {
        "type": "ansible",
        "user": "ubuntu",
        "playbook_file": "provisioning/setup-cde.yml",
        "extra_arguments": [
          "-e env_build_user="
        ]
    }]
  }
There you see the variables section and in that section there are two important variables which are the aws_access_key and the aws_secret_key and both are empty in the json file. In our case that we have configured the aws CLI that’s no problem, because Packer will use the aws CLI with our user’s credentials. Nevertheless, this is something that you need to take care if the Packer build runs on a VM in a CI/CD pipeline, because in this case you’ll need to provide those credentials somehow and usually you do this either by hard-encoding the keys which is not recommended or having the keys to your environment which is better than have them hard-coded but not ideal from the security aspect, or by using a safe vault that stores those keys and the builder can retrieve the keys from there and use them in a safe way. In this example, since the variables are empty, Packer expects to find those in the host environment.
Next, in the builders section you see that I’ve selected the amazon-ebs type (which is documented here). There you see the keys that are pulled from the host environment (which in this case is the ~./aws). The region, as you can see in this case is hard-coded in the json, so you need to change this depending your location.
The source_amifield is also important as it points to the base AWS image that it’s going to be used as a basis to create the custom CDE image. When you run the build function of Packer, then in the background Packer will create a new instance from the source_ami and the instance will be set with the configuration inside the builders block in the stm32-cde-aws.json file. All the supported configuration parameters that you can use with packer are listed here. In this case, the instance will be a t2.micro which has 1 vCPU and the default snapshot will have 8GB of storage. After the instance is created and then Packer will run the provisioners scripts and then it will create a new AMI from this instance and name it by the ami_name that you’ve chosen in the json file.
You can verify this behavior later by running the packer build function and having your EC2 management console open in your browser. There you will see that while Packer is running it will create a temporary instance from the source_ami do it’s stuff in there, then it will create the new AMI and it will terminate the temporary instance. It’s important to know what each instance state means. Terminated means that the instance is gone and it can’t be used anymore and also its storage is gone, too. If you need to keep your storage after an instance is terminated then you need to create a block volume and mount it in your image, it’s not important for us now, but you can have a look in the documentation of AWS and packer how to do that.
Let’s go back on how to find the image you want to use. This is a bit cumbersome and imho it could be better, because as it is now it’s a bit hard to figure it out. To do that there are two ways, one is to use the aws-cli tool and list all the available images, but this is almost useless as it returns a huge json file with all the images. For example:
1
2
aws ec2 describe-images > ~/Downloads/ami-images.json
cat ~/Downloads/ami-images.json
Of course, you can use some filters if you like and limit the results, but still that’s not an easy way to do it. For example, to get all the official amazon ebs images, then you can run this command:
1
aws ec2 describe-images --owners amazon > ~/Downloads/images.json
For more about filtering the results run this command to read the help:
1
aws ec2 describe-images help
There’s a bit better way to do this from your aws web console, though but it’s a bit hidden and not easy to find. To do that first go to your aws console here. Then you’ll see a button named Launch instance and if you press that then a new page will open and where you can search for available AMIs. The good thing with the web search is that you can also easily see if the image you need is Free tier eligible, which means that you can use it with your free subscription with no extra cost. In our case the image is the ami-050a22b7e0cf85dd0, which is an ubuntu 16.04 x86_64 base image.
Next field in the json file is the instance_type for now it’s important to set it to t2.micro. You can find out more about the instance types here. The t2.micro instance for the ami-050a22b7e0cf85dd0 AMI is free tier eligible. You can find which instances are fee tier eligible when you select the image in the web interface and press Next to proceed to the next step in which you select the instance type and you can see which of them are in the free tier. Have in mind that free tier instance type are depending the source_ami.
The ssh_username in the json, is the name that you need to use when you ssh in the image and the ami_name is the name of the new image that is going to be created. In this case you can see that this name is dynamic as it depends on the cde_version and the timestamp. The timestamp and clean_ami_name are created by Packer.
The provisioners section, like in the previous post, uses Ansible to configure the image; but as you can see there are two additional provisioning steps. The first is a shell script that sleeps for 20 secs and this is an important step because you need a delay in order to wait for the image to boot and then be able to ssh to it. If Ansible tries to connect before the instance is up and running and be able to accept SSH connections, then the image build will fail. Also, some times even if you don’t have enough delay then even it’s get connected via SSH the apt packager may fail, so always use a delay.
The next provisioning step uses a shell sudo command (inside the instance) to update the APT repos and install python. This step also wasn’t needed in the case of the docker image creation with Packer. As I’ve mentioned in the previous post, although the base images from different providers are quite the same, they do have differences and in this case the AWS Ubuntu image doesn’t have Python installed and Python is needed on the target for Ansible, even if it’s connected remotely via SSH.
To build the AWS image, just run this command in your host terminal.
1
packer build stm32-cde-aws.json
After running the above command you should see an output like this:
1
2
3
4
5
6
7
8
9
10
11
12
13
14
15
16
17
18
19
20
21
22
23
24
25
26
27
28
29
30
31
32
33
34
35
36
37
38
$ packer build stm32-cde-aws.json
amazon-ebs output will be in this color.

==> amazon-ebs: Prevalidating AMI Name: stm32-cde-image-0.1 1575473402
    amazon-ebs: Found Image ID: ami-050a22b7e0cf85dd0
==> amazon-ebs: Creating temporary keypair: packer_5de7d0fb-33e1-1465-13e0-fa53cf8f7eb5
==> amazon-ebs: Creating temporary security group for this instance: packer_5de7d0fd-b64c-ea24-b0e4-116e34b0bbf3
==> amazon-ebs: Authorizing access to port 22 from [0.0.0.0/0] in the temporary security groups...
==> amazon-ebs: Launching a source AWS instance...
==> amazon-ebs: Adding tags to source instance
    amazon-ebs: Adding tag: "Name": "Packer Builder"
    amazon-ebs: Instance ID: i-01e0fd352782b1be3
==> amazon-ebs: Waiting for instance (i-01e0fd352782b1be3) to become ready...
==> amazon-ebs: Using ssh communicator to connect: 3.122.192.45
==> amazon-ebs: Waiting for SSH to become available...
==> amazon-ebs: Connected to SSH!
==> amazon-ebs: Provisioning with shell script: /tmp/packer-shell622070440
==> amazon-ebs: Provisioning with shell script: /tmp/packer-shell792469849
...
==> amazon-ebs: Provisioning with Ansible...
==> amazon-ebs: Executing Ansible: ansible-playbook --extra-vars packer_build_name=amazon-ebs packer_builder_type=amazon-ebs -o IdentitiesOnly=yes -i /tmp/packer-provisioner-ansible661166803 /.../stm32-cde-template/provisioning/setup-cde.yml -e ansible_ssh_private_key_file=/tmp/ansible-key093516356
...
==> amazon-ebs: Stopping the source instance...
    amazon-ebs: Stopping instance
==> amazon-ebs: Waiting for the instance to stop...
==> amazon-ebs: Creating AMI stm32-cde-image-0.1 1575473402 from instance i-01e0fd352782b1be3
    amazon-ebs: AMI: ami-07362049ac21dd92c
==> amazon-ebs: Waiting for AMI to become ready...
==> amazon-ebs: Terminating the source AWS instance...
==> amazon-ebs: Cleaning up any extra volumes...
==> amazon-ebs: No volumes to clean up, skipping
==> amazon-ebs: Deleting temporary security group...
==> amazon-ebs: Deleting temporary keypair...
Build 'amazon-ebs' finished.

==> Builds finished. The artifacts of successful builds are:
--> amazon-ebs: AMIs were created:
eu-central-1: ami-07362049ac21dd92c
That means that Packer created a new AMI in the eu-central-1 regional server. To verify the AMI creation you can also connect to your EC2 Management Console and view the AMI tab. In my case I got this:

Some clarifications now. This is just an AMI, it’s not a running instance and you can see from the image that the status is set to available. This means that the image is ready to be used and you can create/run an instance from this. So let’s try to do this and test if it works.
Create an AWS EC2 instance
Now that you have your AMI you can create instances. To create instances there several ways, like using your EC2 management console web interface or the CLI interface or even use Vagrant that simplifies things a lot. I prefer using Vagrant, but let me explain why I thunk Vagrant is a good option by mentioning why the other options are not that good. First, it should be obvious why using the web interface to start/stop instances is not your best option. If not then, just think what you need to do this every time you need to build your code. You need to open your browser, connect to your management console, then perform several clicks to create the instance, then open your terminal and connect to the instance and after finishing your build, stop the instance again from the web interface. That takes time and it’s almost a labor work…
Next option would be the CLI interface. That’s not that bad actually, but the shell command would be a long train of options and then you would need a shell script and also you would had to deal with the CLI too much, which is not ideal in any case.
Finally, you can use Vagrant. With vagrant the only thing you need is a file named Vagrantfile which is a ruby script file and that contains the configuration of the instance you want to create from a given AMI. In there, you can also define several other options and most important, since this file it’s just a text file, it can be pushed in a git repo and benefit from the versioning and re-usability git provides. Therefore let’s see how to use Vagrant for this.
Installing Vagrant
To install vagrant you just need to download the binary from here. Then you can copy this file somewhere to your path, e.g. ~/.local/bin. To check if everything is ok then run this:
1
vagrant version
In my case it returns:
1
2
Installed Version: 2.2.6
Latest Version: 2.2.6
Now you need to install a plugin called vagrant-aws.
1
vagrant plugin install vagrant-aws
Because Vagrant works with boxes, you need to install a special dummy box that wraps the AWS EC2 functionality and it’s actually a proxy or gateway box to the AWS service
1
vagrant box add aws-dummy https://github.com/mitchellh/vagrant-aws/raw/master/dummy.box
Now inside the stm32-cde-template git repo that you’ve cloned, create a symlink of Vagrantfile_aws to Vagrantfile like this.
1
ls -sf Vagrantfile_aws Vagrantfile
This will create a symlink that you can override at any point as I’ll show later on this post.
Using Vagrant to launch an instance
Before you proceed with creating an instance with Vagrant you need first to fill the configuration parameters in the vagrant-aws-settings.yml. The only thing that this files does, is to store the variables values so the Vagrantfile remains dynamic and portable. Having a Vagrantfile which is portable is very convenient, because you can just copy/paste the file between your git repos and only edit the vagrant-aws-settings.yml file and put the proper values for your AMI.
Therefore, open vagrant-aws-settings.yml with your editor and fill the proper values in there.
aws_regionis the region that you want your instance to be created.aws_keypair_nameis the key pair that you’ve created earlier in your AWS EC2 MC. Use the name that you used in the MC, not the filename of the key in your host!aws_ami_namethis is the AMI name of the instance. You’ll get that in yourIMAGES -> AMIstab in your MC. Just copy the string in theAMI IDcolumn and paste it in the settings yaml file. Note that the AMI name will be also printed in the end of thepacker buildcommand.aws_instance_typethat’s the instance type, as we’ve saidt2.microis eligible for free tier accounts.aws_security_groupsthe security group you’ve created earlier for allowing ssh inbound connections (e.g. thessh-22-onlywe’ve created earlier).ssh_usernamethe AMI username. Each base AMI has a default username and all the AMI that Packer builds inherits that username. See the full list of default usernames here. In our case it’subuntu.ssh_private_key_paththe path of the public ssh key that the instance will use.
When you fill the proper values, then in the root folder of the git repo run this command:
1
vagrant up
Then you’ll see Vagrant starting to create the new instance with the given configuration. The output should like similar to this:
1
2
3
4
5
6
7
8
9
10
11
12
13
14
15
16
17
18
19
20
21
22
$ vagrant up
Bringing machine 'default' up with 'aws' provider...
==> default: Warning! The AWS provider doesn't support any of the Vagrant
==> default: high-level network configurations (`config.vm.network`). They
==> default: will be silently ignored.
==> default: Launching an instance with the following settings...
==> default:  -- Type: t2.micro
==> default:  -- AMI: ami-04928c5fa611e89b4
==> default:  -- Region: eu-central-1
==> default:  -- Keypair: id_rsa_laptop_lux
==> default:  -- Security Groups: ["ssh-22-only"]
==> default:  -- Block Device Mapping: []
==> default:  -- Terminate On Shutdown: false
==> default:  -- Monitoring: false
==> default:  -- EBS optimized: false
==> default:  -- Source Destination check:
==> default:  -- Assigning a public IP address in a VPC: false
==> default:  -- VPC tenancy specification: default
==> default: Waiting for instance to become "ready"...
==> default: Waiting for SSH to become available...
==> default: Machine is booted and ready for use!
==> default: Rsyncing folder: /home/.../stm32-cde-template/ => /vagrant
You’ll notice that you’re again in the prompt in your terminal, so what happened? Well, Vagrant just created a new instance from our custom Packer AMI and left it in running state. You can check in your MC and verify that the new instance is in running state. Therefore, now it’s up and running and all you need to do is to connect there and start executing commands.
To connect, there are two options. One is to use any SSH client and connect as the ubuntu user in the machine. To get the ip of the running instance just click on the instance in the INSTANCES -> Instances tab in your CM and then on the bottom area you’ll see this Public DNS:. The string after this, is the public DNS string. Copy that and then connect via ssh.
The other way, which is the easiest if to use Vagrant and just type:
1
vagrant ssh
This will automatically connect you to the instance, so you don’t need to find the DNS name or even connect to your CM.
Building your code
Now that you’re inside your instance’s terminal, after running vagrant ssh you can build the STM32 template code like this:
1
2
3
git clone --depth 1 --recursive https://github.com/dimtass/stm32f103-cmake-template.git
cd stm32f103-cmake-template
time TOOLCHAIN_DIR=/opt/toolchains/gcc-arm-none-eabi-9-2019-q4-major CLEANBUILD=true USE_STDPERIPH_DRIVER=ON SRC=src_stdperiph ./build.sh
I’ve used the time command to build the firmware in order to benchmark the build time. The result on my AWS instance is:
1
2
3
4
5
6
7
8
9
10
11
12
13
14
15
16
Building the project in Linux environment
...
[ 95%] Linking C executable stm32-cmake-template.elf
   text	   data	    bss	    dec	    hex	filename
  14924	    856	   1144	  16924	   421c	stm32-cmake-template.elf
[ 95%] Built target stm32-cmake-template.elf
Scanning dependencies of target stm32-cmake-template.bin
Scanning dependencies of target stm32-cmake-template.hex
[ 97%] Generating stm32-cmake-template.bin
[100%] Generating stm32-cmake-template.hex
[100%] Built target stm32-cmake-template.hex
[100%] Built target stm32-cmake-template.bin

real	0m5.318s
user	0m4.304s
sys	0m0.372s
So the code builds fine! Checking the firmware size with the previous post, you’ll see it’s the same. Therefore, what happened is that we’ve managed to create a CDE image for our project on the AWS cloud, started an instance, ssh to it and then build the code using the same toolchain and almost identical environment as the previous post. This is great.
Now, every developer that has this Vagrantfile can create an instance from the same AMI and build the code. You can have as many instances you like or you can have one and multiple developers connect on the same instance. In the last case, though, multiple developers can connect to the instance using an SSH client and not the vagrant ssh.
Now there’s a question, though. What happens with the instance after you finish? Well, you can just type exit in the instance console and the SSH connection will close and you’ll be back to your host’s terminal. At that point the instance is still running in the AWS cloud. You can leave it running or destroy the instance by running this command on your host:
1
vagrant destroy
This command will terminate the instance and you can verify this to your AWS EC2 CM.
Note: When you destroy the instance then everything will disappear, so you’ll lose any work you’ve done, also the firmware binaries will destroyed and you won’t be able to revert the change, unless you’ve created a volume and mounted it in to your instance or upload the artifacts somewhere else.
Now let’s see a few more details about proper cleaning up your instances and images.
Cleaning up properly
When building an AMI with Packer you don’t pay for this as it uses a t2.micro instance which is a free tier and when it finishes it cleans up properly also any storage that was used.
The AMI that has being built also occupies some space. If you think about it, it’s a full blown OS, with rootfs and also some storage and this needs to be stored somewhere. When the AMI is built, it occupies a storage space which is called snapshot and every new instance that runs from this AMI is actually starting from this snapshot (think like forking in git) and a new snapshot is created which stores all the changes compared to the original snapshot. Therefore, more space is needed.
This storage though is not free, well the first 30GB of elastic block storage (=EBS which is the one that is used to store the EC2 volumes and snapshots) are free, but then you pay depending on how much more you use. Therefore, if you have an AMI with 8GB storage then it’s free. Then if you create a couple of instances more, then if you exceed the current 30GB storage limit then you’ll need to pay for the extra storage, per month. Don’t be afraid, though as the cost will be like 1 cent per snapshot, so it’s not that much at all.
EBS is not the same storage as the Amazon simple storage service (S3). S3 in the free-tier accounts is limited to 5GB and this is the bucket storage you can use to save your data or meta-data. For the rest of he post, we’re only using EBS not S3.
You can see how much EBS storage you’re using in the ELASTIC BLOCK STORE tab in your EC2 AWS CM. In there, there are two other tabs, Volumes and Snapshots. The Volume lists the storage that your snapshot uses. You AMI also uses some drive space though and this points to a snapshot.If you click on your AMI in the CM you’ll see that the block device points to a snapshot. Now click on the snapshots tab and verify that the snapshot of the instance is there.
What happens when you run vagrant up is that a new Volume is created for the instance that derives from the AMI’s snapshot. Any changes you do there they have affect only on the volume not the AMI’s snapshot! When you run vagrant destroy then the volume that is mounted in that instance is deleted and the AMI’s snapshot is still there for the next instance.
Therefore, each instance you run it will have a volume and until the instance is destroyed/terminated you’ll pay for the storage (if it exceeds the 30GB). The amount is negligible, but still you need to have this in mind.
Regarding the snapshot billing you can see here.
Just have in mind that if you don’t want to get charged about anything then just terminate your instances, delete your AMIs, the volumes and the snapshots and you’re fine. Otherwise, you need to always have in mind not to exceed the 30GB limit.
Finally, the 30GB of EBS is the current limit the date I’m writing this post. This may change at any time in the future, so always check that.
Code build benchmarks
I can’t help it, I love benchmarks. So, before move on let’s see how the current solutions we’ve seen so far performing when build the STM32 firmware. I’ll compare my laptop (which is a i7-8750, 12x cores @ 2.2 and 16GB), my workstation (Ryzen 2700X & 32GB RAM),the gitlab-ci and the AWS EC2 AMI we just build. There are the results using the time command:
| 2700X | Laptop | GitLab-CI | AWS (t2.micro) | |
|---|---|---|---|---|
| Build (secs) | 1.046 | 3.547s | 5.971s | 5.318s |
I remind you that this is just a template project, so no much code to build, but still the results are quite impressive. My laptop that uses 12 threads needs 3.5 secs and the cloud instances need around 5-6 secs. Not bad, right? Nevertheless, I wouldn’t compare that much gitlab-ci and aws instances as this is just a single run and the build time one each might change also during the day and the servers load (I guess). The important thing is that the difference is not huge, at least for this scenario. For a more complicated project (e.g. a Yocto build), you should expect that the difference will be significant.
Using AWS in your CI/CD pipeline
Like in the previous post, I’ll show you how to use this AMI that you created with Packer into your CI/CD. This is where the things are getting a bit more complicated and I’ll try to explain why. Let’s see how the CI/CD pipeline actually works. You make some changes in the code and then push the changes. Then gitlab-ci is triggered automatically and peaks a gitlab-runner from the list with the compatible runners and sends all the settings to that runner to build the code.
By default those runners in gitlab are always running and poll the main gitlab-ci service for waiting builds, so gitlab-ci doesn’t initiate the communication, the runner does. Although gitlab provides a number of free to use runners, you have a limit on the actual free time that you can use them. Of course this limitation applies only when using gitlab.org and not a local gitlab installation. gitlab allows you to use your own gitlab-runner even when you use the gitlab.org service, though. It doesn’t matter if the runner is your laptop, a baremetal server or cloud instance. All you need is to run the gitlab-runenr client that you can download from here (see the instructions in the link) and then do some configuration in your gitlab source code repo where your .gitlab-ci.yml is.
The following image shows the simple architecture of this scenario.
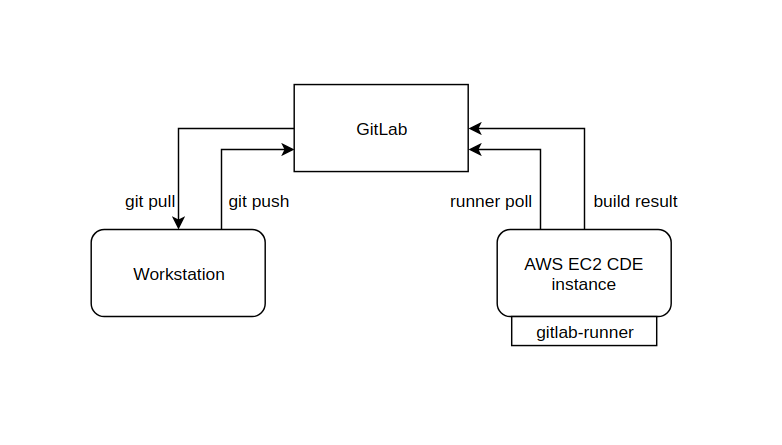
In the above example gitlab is hosting the repo and the repo has a gitlab-ci pipeline. The developer pulls the code, makes changes and pushes back in the repo. Then the AWS EC2 CDE instance will poll the gitlab-ci service and when a tagged build is available it will pick the job, run the CI/CD pipeline and then return the result (including any artifacts).
There are two problems here, though. The first is how the AWS CDE builder knows which build to execute and doesn’t execute other builds from other repos. The second is that as you’ve probably noticed, the builder needs to always running in order to poll the gitlab-ci service and peak the builds! That means that the cost starting adding up even if the builder is idle and doesn’t execute builds.
For now, let’s see how to create an instance that is running the gitlab-runner.
What is an AWS EC2 gitlab-runner?
We can use Packer and Ansible to create an AMI that runs a gitlab-runner. There are a few things that we need to consider though and implement an architecture that is scalable and can be used in more that one projects and also it will be easy to create as many runner instances you need without further configuration.
The gitlab-runner needs a couple of settings in order to work properly. First it needs to know the domain that will poll for new jobs. As I’ve mentioned earlier, in gitlab, the runner is polling the server in pre-configred intervals and asks for pending jobs.
Then the gitlab-runner needs to know which jobs is able/allowed to run. This makes sense, because if you think about it, a gitlab-runner is an OS image and it’s coming with specific libraries and tools. Therefore, if the job needs libraries that are not included in the runner’s environment, then the build will fail. Later in this post I’ll explain what are the available architectures that you can use.
Anyway, for now the runner needs to be aware of the project that it can run and this is handled with a unique token per project that you can create in the gitlab project settings. When you create this token, then gitlab-ci will forward your project’s builds only to runners that are registered with this token.
Before proceed further let’s see the architecture approach.
gitlab-runner images architecture approach
The gitlab-runner can be a few different things. One is having a generic runner (or image instance when it comes to the cloud) with no dependencies and use the build pipeline to configure the running instance and install all the needed libraries and tools just before the build stage. An other approach is having multiple images that are only meant to build specific projects and only include specific dependencies. And finally you can have a generic image that supports docker and can use other docker containers which have the needed dependencies installed to build the source code.
Which of the the above scenarios sounds better for your case? Let’s have a look at the pros/cons of each solution.
| Single generic image (no installed dependencies) | |
|---|---|
| + | Easy to maintain your image as it’s only one (or just very few) |
| + | Less storage space needed (either for AWS snapshots or docker repos) |
| – | On every build the code repo needs to prepare the environment |
| – | If the build environment is very complex, then creating it will be time consuming and each build will take a lot of time |
| – | Increased network traffic on every build |
| Multiple images with integrated dependencies | |
|---|---|
| + | Builds are fast, because the environment is already configured |
| + | Source code pipeline is agnostic to the environment (.gitlab-ci.yml) |
| – | A lot of storage needed for all images, which may increase maintenance costs |
| Generic image that supports docker | |
|---|---|
| + | Easy to maintain the image |
| +/- | Multiple docker images need space and maintenance but the maintenance is easy |
| – | The image instance will always have to download a docker container on every different stage of build (remember previous post?) |
| – | The build takes more time |
From my perspective, tbh it’s not very clear which architecture is overall better. All of them have their strengths and weaknesses. I guess this is something that you need to decide when you have your project specs and you know exactly what you need and what you expect from your infrastructure and what other people (like devs) expect for their workflow. You may even decide to mix architectures in order to have fast developer builds and more automated backbone infrastructure.
For our example I’ll go with the multiple image approach that includes the dependencies. So, I’ll build a specific image for this purpose and then run instances from this image, that will act as gitlab-runners which they have the proper environment to build the code themselves.
Building the gitlab-runner AWS AMI
As I’ve mentioned earlier, I’ll go with the strategy to create an AWS image that contains the STM32 CDE and also runs a gitlab-runner. This is a more compact solution as the AMI won’t have to run docker and download a docker image to build the firmware and also the firmware build will be a lot faster.
Note that the instance will have to always run in order to be able to pick jobs from the gitlab-ci server. Therefore, using docker or not (which makes the build slower) doesn’t really affect the running costs, but it only affects the time that the runner will be available again for the next job, which is also important. So, it’s not about running costs, so much but for better performance and faster availability.
Again you’ll need this repo here:
https://bitbucket.org/dimtass/stm32-cde-template/src/master/
In the repo you’ll find several different packer json image configurations. The one that we’re interested in is the the stm32-cde-aws-gitlab-runner.json which will build an AWS AMI that includes the CDE and also has a gitlab-runner installed. There is a change that you need to do in the json, because the configuration doesn’t know the token of your gitlab project. Therefore, you need to go to your gitlab projects Settings -> CI/CD -> Runners and then copy the registration token from that page and paste it in the gitlab_runner_token in the json file.
Then you need to build the image with Packer:
1
packer build stm32-cde-aws-gitlab-runner.json
This command will start building the AWS AMI and in the meantime you can see the progress to your AWS EC2 Management Console (MC). In the end you will see something like this in your host console
1
2
3
4
5
6
7
8
9
10
11
12
13
14
15
16
==> amazon-ebs: Stopping the source instance...
    amazon-ebs: Stopping instance
==> amazon-ebs: Waiting for the instance to stop...
==> amazon-ebs: Creating AMI stm32-cde-image-gitlab-runner-0.1 1575670554 from instance i-038028cdda29c419e
    amazon-ebs: AMI: ami-0771050a755ad82ea
==> amazon-ebs: Waiting for AMI to become ready...
==> amazon-ebs: Terminating the source AWS instance...
==> amazon-ebs: Cleaning up any extra volumes...
==> amazon-ebs: No volumes to clean up, skipping
==> amazon-ebs: Deleting temporary security group...
==> amazon-ebs: Deleting temporary keypair...
Build 'amazon-ebs' finished.

==> Builds finished. The artifacts of successful builds are:
--> amazon-ebs: AMIs were created:
eu-central-1: ami-0771050a755ad82ea
Note in the 4th line, the AMI name in this case is stm32-cde-image-gitlab-runner-0.1 and not stm32-cde-image-0.1 like the previous post.
Now we’ll use Vagrant again to run an instance of the built AMI in the AWS and verify that the gitlab-runner in the instance works properly and connects and gets jobs from the gitlab-ci.
Before run Vagrant make sure that you edit the vagrant-aws-settings.yml file and place the proper aws_keypair_name and aws_ami_name. You’ll find the new AMI name in the AWS EC2 MC in the IMAGES -> AMIs tab in the AMI ID column. After using the proper values then run these commands:
1
2
3
4
5
ln -sf Vagrantfile_aws Vagrantfile
vagrant up
vagrant shh
ps -A | grep gitlab
exit
Normally you’ve seen that the ps command shown a running instance of gitlab-ruuner. You can also verify in your gitlab project inSettings -> CI/CD -> Runners, that the runner is connected. In my case this is what ps returns:
1
2
ubuntu@ip-xx-xx-34-51:~$ ps -A | grep gitlab
 1165 ?        00:00:00 gitlab-runner
That means the gitlab-runner runs, but let’s also see the configuration to be sure:
1
2
3
4
5
6
7
8
9
10
11
12
13
14
15
16
17
ubuntu@ip-xx-xx-34-x51:~$ sudo cat /etc/gitlab-runner/config.toml
concurrent = 1
check_interval = 0

[session_server]
  session_timeout = 1800

[[runners]]
  name = "runner-20191206T224300"
  limit = 1
  url = "https://gitlab.com"
  token = "w_xchoJGszqGzCPd55y9"
  executor = "shell"
  [runners.custom_build_dir]
  [runners.cache]
    [runners.cache.s3]
    [runners.cache.gcs]
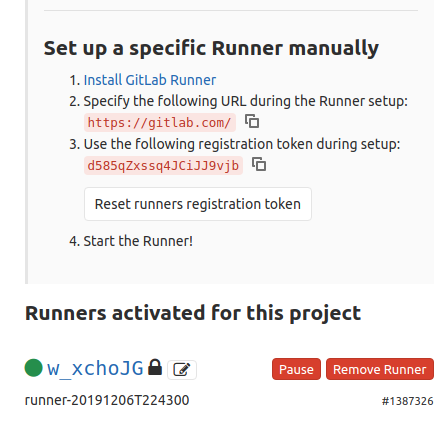
The token you see now in the config.toml is the token of the source code project repo, but the token of the runner! Therefore, don’t think that’s an error. So in this case the token is w_xchoJGszqGzCPd55y9 and if you go to your gitlab’s Settings -> CI/CD -> Runner web page you’ll see something similar to this:
You see that the connected runner is the w_xchoJG, so the gitlab-runner that runs on the AWS AMI we’ve just built seems to be working fine. But’s lets build the code to be sure that the AWS gitlab-runner works. To do that just go to your repo in the CI/CD -> Pipelines and trigger a manual build and then click on the build icon to get into the gitlab’s console output. In my case this is the output
1
2
3
4
5
6
7
8
9
10
11
12
13
14
15
16
17
18
19
20
21
22
23
24
25
26
27
28
29
30
31
32
1 Running with gitlab-runner 12.5.0 (577f813d)
2   on runner-20191206T232941 jL5AyaAe
3 Using Shell executor... 00:00
5 Running on ip-172-31-32-40... 00:00
7 Fetching changes with git depth set to 50...
8 Initialized empty Git repository in /home/gitlab-runner/builds/jL5AyaAe/0/dimtass/stm32f103-cmake-template/.git/
9 Created fresh repository.
10 From https://gitlab.com/dimtass/stm32f103-cmake-template
...
126 [ 95%] Linking C executable stm32-cmake-template.elf
127    text	   data	    bss	    dec	    hex	filename
128   14924	    856	   1144	  16924	   421c	stm32-cmake-template.elf
129 [ 95%] Built target stm32-cmake-template.elf
130 Scanning dependencies of target stm32-cmake-template.hex
131 Scanning dependencies of target stm32-cmake-template.bin
132 [ 97%] Generating stm32-cmake-template.bin
133 [100%] Generating stm32-cmake-template.hex
134 [100%] Built target stm32-cmake-template.bin
135 [100%] Built target stm32-cmake-template.hex
136 real	0m6.030s
137 user	0m4.372s
138 sys	0m0.444s
139 Creating cache build-cache... 00:00
140 Runtime platform                                    arch=amd64 os=linux pid=2486 revision=577f813d version=12.5.0
141 build-stm32/src_stdperiph: found 54 matching files
142 No URL provided, cache will be not uploaded to shared cache server. Cache will be stored only locally.
143 Created cache
144 Uploading artifacts... 00:02
145 Runtime platform                                    arch=amd64 os=linux pid=2518 revision=577f813d version=12.5.0
146 build-stm32/src_stdperiph/stm32-cmake-template.bin: found 1 matching files
147 Uploading artifacts to coordinator... ok            id=372257848 responseStatus=201 Created token=r3k6HRr8
148 Job succeeded
Success! Do you see the ip-172-31-32-40? This is the AWS instance. The AWS instance managed to build the code and also uploaded the built artifact back in the gitlab-ci. Therefore we managed to use packer to build an AWS EC2 AMI that we can use for building the code.
Although it seems that everything is fine, there is something that you need to consider as this solution has a significant drawback that needs to be resolved. The problem is that the gitlab-runner is registering to the gitlab-ci server when the AMI image is build. Therefore, any instance that is running from this image will have the same runner token and that’s a problem. That means that you can either run only a single instance from this image, therefore build several almost identical images with different tokens. Or have a way to re-register the runner every time that a new instance is running.
To fix this, then you need to use a startup script that re-registers a new gitlab-runner every time the instance runs. There is a documentation about how to use the user_data do this in here. In this case because I’m using Vagrant, all I have to do is to edit the vagrant-aws-settings.yml file and add the register-gitlab-runner.sh name in the aws_startup_script: line, like this:
1
aws_startup_script: register-gitlab-runner.sh
What will happen now is that Vagrant will pass the content of this script file to AWS and when an instance is running then the instance will register as a new gitlab-runner.
Also another thing you need to do is to comment out the two last lines in the provisioning/roles/gitlab-runner/tasks/main.yml file, in order to disable registering a runner by default while the image is created.
1
2
# - name: Register GitLab Runner
#   import_tasks: gitlab-runner-register.yml
Then re-build the Packer image and run Vagrant again.
1
2
packer build stm32-cde-aws-gitlab-runner.json
vagrant up
In this case, the Packer image won’t register a runner while building and then the vagrant up script will pass the aws_startup_script which is defined in the vagrant-aws-settings.yml file and the gitlab-runner will registered when the instance is running.
One last thing that remains is to automate the gitlab-runner un-registration. In this case with AWS you need to add your custom scipt in the /etc/ec2-termination as it’s described in here. For my example that’s not convenient to do that now, but you should be aware of this and implement it probably in your Ansible provision while building the image.
Therefore, with the current AMI, you’ll have to remove the outdated gitlab-runners from the gitlab web interface in your project’s Settings -> CI/CD -> Runners page.
Using docker as the gitlab-runner (Vagrant)
In the same repo you may have noticed two more files, stm32-cde-docker-gitlab-runner.json and Vagrantfile_docker. Probably, you’ve guessed right… Those two files can be used to build a docker image with the CDE including the gitlab-runner and the vagrant file to run a container of this image. To do this run the following commands on your host:
1
2
3
4
5
ln -sf Vagrantfile_docker Vagrantfile
vagrant up --provider=docker
vagrant ssh
ps -A | grep gitlab
exit
With those commands you’ll build the image using vagrant and then run the instance, connect to it and verify that gitlab-runner is running. Also check again your gitlab project to verify this and then re-run the pipeline to verify that the docker instance picks up the build. In this case, I’ve used my workstation which is a Ryzen 2700X with 32GB RAM and an NVME drive. Again, this time my workstation registered as a runner in the project and it worked fine. This is the result in the giltab-ci output.
1
2
3
4
5
6
7
8
9
10
11
12
13
14
15
16
17
18
19
20
21
22
23
24
25
26
27
28
29
30
31
32
1 Running with gitlab-runner 12.5.0 (577f813d)
2   on runner-20191207T183544 scBgCx85
3 Using Shell executor... 00:00
5 Running on stm32-builder.dev... 00:00
7 Fetching changes with git depth set to 50...
8 Initialized empty Git repository in /home/gitlab-runner/builds/scBgCx85/0/dimtass/stm32f103-cmake-template/.git/
9 Created fresh repository.
10 From https://gitlab.com/dimtass/stm32f103-cmake-template
...
126 [ 95%] Linking C executable stm32-cmake-template.elf
127    text	   data	    bss	    dec	    hex	filename
128   14924	    856	   1144	  16924	   421c	stm32-cmake-template.elf
129 [ 95%] Built target stm32-cmake-template.elf
130 Scanning dependencies of target stm32-cmake-template.bin
131 Scanning dependencies of target stm32-cmake-template.hex
132 [100%] Generating stm32-cmake-template.hex
133 [100%] Generating stm32-cmake-template.bin
134 [100%] Built target stm32-cmake-template.hex
135 [100%] Built target stm32-cmake-template.bin
136 real	0m1.744s
137 user	0m4.697s
138 sys	0m1.046s
139 Creating cache build-cache... 00:00
140 Runtime platform                                    arch=amd64 os=linux pid=14639 revision=577f813d version=12.5.0
141 build-stm32/src_stdperiph: found 54 matching files
142 No URL provided, cache will be not uploaded to shared cache server. Cache will be stored only locally.
143 Created cache
144 Uploading artifacts... 00:03
145 Runtime platform                                    arch=amd64 os=linux pid=14679 revision=577f813d version=12.5.0
146 build-stm32/src_stdperiph/stm32-cmake-template.bin: found 1 matching files
147 Uploading artifacts to coordinator... ok            id=372524980 responseStatus=201 Created token=KAc2ebBj
148 Job succeeded
It’s obvious that the runner now is more powerful because the build only lasted 1.7 secs. Of course, that’s a negligible difference compared to the gitlab-ci built in runners and also the AWS EC2 instances.
The important thing to keep in mind in this case is that when you run vagrant up then the container instance is not terminated after the Ansible provisioning is running! That means that the container runs in the background just after ansible ends, therefore that’s the reason that the gitlab-runner is running when you connect in the image using vagrant ssh. This is a significant difference with using other methods to run the docker container as we see in the next example.
Using docker as the gitlab-runner (Packer)
Finally, you can also use the packer json file to build the image and push it to your docker hub repository (if you like) and then use your console to run a docker container from this image. In this case, though; you need to manually run the gitlab-runner when you create a container from the docker image, because no background services are running on the container when it starts, unless you run them manually when you create the container or have an entry-point script that runs those services (e.g. the gitlab runner).
Let’s see the simple case first that you need to start a container with bash as an entry.
1
docker run -it dimtass/stm32-cde-image-gitlab-runner:0.1 -c "/bin/bash"
If you’ve built your own image then you need to replace it to the above command. After you run this command you’ll end up inside the container and then if you try to run ps -A you’ll find that there’s pretty much nothing running in the background, including the gitlab-runner. Therefore, the current running container is like running CDE image we’ve build in the previous post. That means that this image can be used as CDE as also a gitlab-runner container! That’s important to have in mind and you can take advantage of this default behavior of docker containers.
Now in the container terminal run this:
1
gitlab-runner run
This command will run gitlab-runner in the container, which in turn will use the config in /etc/gitlab-runner/config.toml that Ansible installed. Then you can run the gitlab pipeline again to build using this runner. It’s good during your tests to run only a single runner for your project so it’s always the one that picks the job. I won’t paste the result again, but trust me it works the same way as before.
The other way you can use the packer image is that instead of running the container using /bin/bash as entry-point, yes you’ve guessed right, use the gitlab-runner run as entry point. That way you can use the image for doing automations. To test this stop any previous running containers and run this command:
1
docker run -it dimtass/stm32-cde-image-gitlab-runner:0.1 -c "/usr/bin/gitlab-runner run"
This command will run the gitlab-runner in the container and the terminal will block until you exit or quit. This here is also an important thing to be careful! gitlab-runner supports also to run a background service, by running this like that.
1
docker run -it dimtass/stm32-cde-image-gitlab-runner:0.1 -c "/usr/bin/gitlab-runner start"
This won’t work! Docker by design will exit when the command is exits and it will return the exit status. Therefore, if you don’t want to block in your terminal when running the gitlab-runner run command, then you need to run the container as a detached container. To do this, run this command:
1
docker run -d -it dimtass/stm32-cde-image-gitlab-runner:0.1 -c "/usr/bin/gitlab-runner run"
This command will return by printing the hash of the running container, but the container will keep running in the background as a detached container. Therefore, your runner will keep running. You can always use the docker ps -a command to verify which containers are running and which are exited.
If you think that you can just spawn 10 of these containers now, then don’t get excited because this can’t be done. You see, the runner was registered during the Ansible provisioning state, so at that point the runner got a token, that you can verify by comparing the /etc/gitlab-runner/config.toml configuration and your project’s gitlab web interface in the Settings -> CI/CD -> Runners. Therefore, if you start running multiple containers then all of them will have the same token.
The above thing means that you have to deal with this somehow, otherwise you would need to build a new image every time you need a runner. Well, no worries this can be done with a simple script like the AWS case previously, which it may it may seem a bit ugly, but it’s fine to use. Again there are many ways to do that. I’ll explain two of them.
One way is to add an entry script in the docker image and then you point to that as an entry point when you run a new container. BUT that means that you need to store the token in the image, which is not great and also that means that this image will be only valid to use with that specific gitlab repo. That doesn’t sound great, right?
The other way is to have a script on your host and then run a new container by mounting that script and run it in the entry-point. That way you keep the token on the host and also you can have a git hosted and versioned script that you can store on a different git repo (which brings several good things and helps automation). So, let’s see how to do this.
First have a look in the git repo (stm32-cde-template) and open the register-gitlab-runner.sh file. In this file you need to add your token from your repo (stm32f103-cmake-template in our case) or you can add the token in the command line in your automation, but for this example just enter the token in the file.
What the script does is that first un-registers any previous local (in the container not globally) runner and then registers a new runner and runs it. So simple. The only simple thing is the weird command you need to execute in order to run a new container which is:
1
2
3
4
docker run -d \
  -v $(pwd)/docker-entry-gitlab-runner.sh:/docker-entry-gitlab-runner.sh \
  dimtass/stm32-cde-image-gitlab-runner:0.1 \
  -c "/bin/bash /docker-entry-gitlab-runner.sh"
Note, that you need to run this command on the top level directory of the stm32-cde-template repo. What that command does is that it creates a detached container, mounts the host’s local docker-entry-gitlab-runner.sh script and then it executes that script in the container entry. Ugly command, but what it does it’s quite simple.
What to do now? Just run that command multiple times! 5-6 times will do. Now run docker ps -a to your host and also see your repos Runners in the settings. This is my repo after running this command.
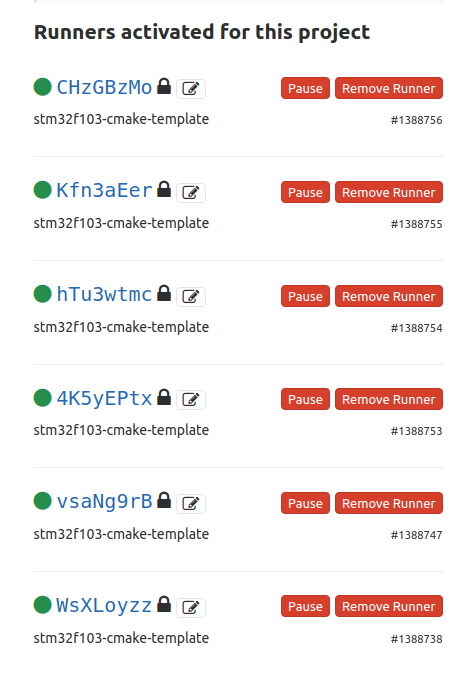
Cool right? I have 6 gitlab runners, running on my workstation that can share 16 cores. OK, enough with that, now stop all the containers and remove them using docker stop and docker rm.
Conclusions
With this post we’ve done with the simple ways of creating a common development environment (CDE) image that we can use for building a firmware for the STM32. This image can be used also to create gitlab-runners that will build the firmware in a pipeline. You’ve noticed that there are many ways to achieve the same result and each way is better in some things and worse that the other ways. It’s up to you to decide the best and more simple approach to solve your problem and base your CI/CD architecture.
You need to experiment at least once with each case and document the pros and cons of each method yourself. Pretty much the same thing that I’ve done in the last two posts, but you need to do it yourself, because you may have other needs and get deeper in aspects that I didn’t go myself. Actually, there are so many different projects and each project has it’s own specifications and needs, so it’s hard to tell which is the best solution for any case.
In the next post, I’ll get deeper in creating pipelines with testing farms for building the firmware, flashing and testing. You’ll see that there are cheap ways you can use to create small farms and that these can be used in many different ways. You need to keep in mind that those posts are just introduction to the DevOps for embedded and only scratch the surface of this huge topic. Eventually, you may find that these examples in these posts are enough for the most cases you might need as not all projects are complicated, but still it just scratching the surface when it comes to large scale projects, where things are much more complicated. But in any case, even in large scale projects you start simple and then get deeper step-by-step. Until the next post…
Have fun!
Comments powered by Disqus.