DevOps for embedded (part 1)
Intro
Note: This is the first post of the DevOps for Embedded series. Here you can find part 2 and part 3.
Wow, it’s being some time since the last post. A lot happened since then, but now it’s time to come back with a new series of posts around DevOps and embedded. Of course, embedded is a vast domain (as also DevOps), so I’ll start with a stupid project (of course) that just builds the code of a small MCU and then I’ll probably get into a small embedded Linux project with Yocto, because there are significant differences in the approach and strategies you need to use on each case. Although, the tools are pretty much the same. One thing that you’ll realize when you get familiar with the tools and the DevOps domain, is that you can achieve the same result by using different methodologies and architectures, but what it matters in the end of the day is to find a solution which is simple for everyone to understand, it’s re-usable, it has scalability and it makes maintenance easy.
Oh, btw this article is not meant for DevOps engineers as they’re already familiar with these basic tools and the architecture of CI/CD pipelines . Maybe what’s interesting for DevOps, especially those that are coming from the Web/Cloud/DB domain, are the problems that embedded engineers have and the tools that they’re using.
Note: the host OS used in the article is Ubuntu 18.04.3 LTS, therefore the commands and tools installation procedure is for this OS, but it should be quite similar for any OS.
What is DevOps?
Actually, there is a lot of discussion around DevOps and what exactly it is. I’ll try to describe it in a simple way. The word is an abbreviation and it means Development/Operations and according to wikipedia:
DevOps is a set of practices that combines software development (Dev) and information-technology operations (Ops) which aims to shorten the systems development life cycle and provide continuous delivery with high software quality.
To put it other words is all about automation. Automate everything. Automate all the stages of development (+deployment/delivery) and every detail of the procedure. Ideally, a successful DevOps architecture would achieve this: if the building is burned down to the ground, then if you just buy new equipment, then you can have your infrastructure back within a couple hours. If your infrastructure is in the cloud, then you can have it back within minutes. The automation, ideally starts from people’s access key-cards for the building and ends up to the product that clients gets into their hands. Some would argue that also the coffee machine should be also included in the automation process, in this case if it has a CPU and a debug port, then it’s doable.
If you have to keep something from this post, is that DevOps is about providing simple and scalable solutions to the problems that arise while you trying to fully automate your infrastructure.
Why DevOps?
It should be obvious by now that having everything automated not only saves you a lot of time (e.g. having your infrastructure back in case it dies on a bizarre gardening accident [SpinalTap pun]), but if it’s done right then it also makes it easier to track problematic changes in your infrastructure and revert them or fix them fast, so it minimizes failures and hard-to-find issues. Also, because normally you will automate your infrastructure gradually, you will have to architecture this automation in steps, which makes you understand your infrastructure better and deal more efficient with issues and problems. This understanding of the core of your infrastructure is useful and it’s a nice opportunity to also question your current infrastructure architecture and processes and therefore make changes that will help those processes in future developments.
It’s not necessary to automate the 100% of your infrastructure, but it is at least important to automate procedures that are repeated and they are prone to frequent errors or issues that add delays in the development cycle. Usually those are the things that are altered by many people at the same time, for example code. In this case you need to have a basic framework and workflow that protects you from spending a lot of time in debugging and try to fix issues rather adding new functionality.
What DevOps isn’t.
DevOps isn’t about the tools! There are so many tools, frameworks, platforms, languages, abbreviations and acronyms in DevOps, that you’ll definitely get lost. There are tons of them! And to make it even worse there are new things coming out almost every week. Of course, trying to integrate all the new trends to your automation infrastructure doesn’t make sense and this shouldn’t be your objective. Each of these tools, has its usage and you need to know exactly what you need. If you have time for research, then do your evaluation, but not force your self to use something because it’s hype.
In DevOps and automation in general you can achieve the same result with numerous different ways and tools. There’s not a single or right way for doing something. It’s up to you to understand your problem well, know at least a few available tools and provide a simple solution. What’s important here, is always to provide simple solutions. Simple enough for everyone in the team to understand and it’s easy to test, troubleshoot and debug.
So forget about that you have to use Kubernetes or Jenkins or whatever, because others do. You need only to find the simplest solution for your problem.
DevOps and embedded
Usually DevOps are found in cloud services. That means that most of the web servers and databases on the internet are based on the DevOps practices, which makes a lot of sense, since you wouldn’t like your web page or corporate online platform to be offline for hours or days if something goes wrong. Everything needs to be automated and actually there’s a special branch of DevOps called Site Reliability Engineering (SRE) that hardens even more the infrastructure up to the point, in some cases, to survive even catastrophic global events. This blog for example is running on a VPS (virtual private server) on the cloud, but tbh honest I don’t think that my host service may survive a global catastrophic event, but also if that happens, who cares about a blog.
So, what about embedded? How would you use DevOps to your embedded workflow and infrastructure. Well, that’s easy, actually. Just think how would you automate everything you do, so that if you loose everything tomorrow (except you code, of course), then you can be back on track in a few minutes or hours. For example, all your developers get new laptops and are able to start working in a few minutes and all the tools, SDKs, toolchains have the same versions and the development environment is the same for everyone. Also, your build servers are back online and you start your continuous integration, continuous delivery (CI/CD) in minutes.
How does this sound? Cool, right?
Well, it’s doable, of course, but there are many steps in the between and the most important is to be able to understand what are the problems you need to solve to get there, what are your expectations in time, cost and resources and how to architect such a solution in a simple and robust way. What makes embedded interesting also, is that most of the times you have a hardware product that you need to flash the firmware on the various MCUs, FPGAs and DSPs and then start running automated tests and verify that everything works properly. If your project is large, you may even have farms with the specific hardware running and use them in your CI/CD pipeline.
Although, it’s too early in the article, I’ll put a link from a presentation that BMW did a few years ago. They managed to automate a large scale embedded project for an automotive head unit. This is the YouTube presentation and this is the PDF document. I repeat that this is a large scale project with hundreds of developers and also complicated in many aspect. Nevertheless, they successfully managed to automate the full process (at least that’s the claim).
Have in mind that the more you reading about this domain, many times, instead of DevOps you’ll find that alternative phrases like CI/CD or CI pipeline are used instead. Actually, CD/CD is considered part of the DevOps domain and it’s not an alternative abbreviation for DevOps, but if you know this then you won’t get confused while reading. You’ll also find many other abbreviations like IaC or IaaS, which you probably used more on cloud computing, but still the target is the same. Automate everything.
How to start?
So, now it should be quite clear what DevOps is and how it can help your project and if you’re interested, then you’re probably wondering, how to start?
Wait… Before getting into details, let’s define a very basic and simple embedded project in which you need to develop a firmware for a small MCU (e.g. STM32). In this case, you need to write the code, compile it, flash it on the target, test it and if everything works as expected then integrate the changes to the release branch and ship it. Although, that’s a very basic project, there are many different ways to automate the whole pipeline and some ways may be better than others depending the case. The important thing is to understand that each case is different and the challenge is to find the simplest and optimal solution for your specific problem and do not over-engineer your solution.
As you realize, whatever follows in this series of articles is not necessarily the best solution to every problem. It’s just one of the ways to do solve this particular problem. Because the tools and the ways to do something are so many, I won’t get into details for all of them (I don’t even know all of the available tools out there as they are too many, so there might be a simpler solution than the one I’m using).
Although, there’s not a single answer that covers all the possible scenarios there are a couple of things that need to be done in most of the cases. Therefore, I’ll list those things here and start to analyze a few of them and make examples during the process. So, this is the list:
- Common development environment
- Continuous integration
- Using distributed version control systems (e.g. git)
- Automated builds
- Automated tests
- Deployment
Note that not all of these steps can be fully automated. For example, the testing may involve some manual tests and also most of the times the automated user acceptance it’s difficult to achieve in embedded projects that may have various electronics around.
Finally, this is not a comprehensive list, but it’s a basic skeleton for most of the projects. Let’s now see some of the above items.
Common development environment (CDE)
It’s very important to have a common development environment shared from all the developers and that’s also easy to reproduce, test, deploy and deliver itself. This is actually one of the most important things you need apply to your workflow in early stages, because it will save you from a lot of troubles down the path.
So, what’s CDE? The assumption was that we’re going to develop a firmware on an STM32 MCU. In this case, CDE is all those things that are needed to compile your code. That includes your OS version, your system libraries, the toolchain, the compiler and linker flags and the way you build the firmware. What’s not important in this case is the IDE that you’re using, which makes sense if you think about it and it’s also preferable and convenient as developers can use their favorite editor to write code (including their favorite plugins). It is important though, that each of those IDEs won’t pollute the project environment with unnecessary custom configuration and files, so precaution actions needed there, too (git makes that easy, though).
Why using a CDE is important? I’ll write a real project case, recently I was working in a company that instead of my recommendations, developers refused to integrate a CDE in their development workflow. I already had created a CDE for building a quite complex Yocto distro and nobody ever used it and I couldn’t also enforce its use because in flat hierarchies the majority can make also bad choices. Eventually, developers were using their own workstation environment to build the Linux distro, which in the end led to a chaotic situation that the image wasn’t building in all workstations in the same way and on some workstation it was even failing to build and at the same time it was building on others. As you can imagine this is not sustainable and it makes development really hard and chaotic. At some point I just gave up on even try to build the distro as it needed too much time to solve issues rather building it. Having a CDE ensures that your project will build the same way wherever it runs, which is robust and there is consistency. This only reason actually it should be enough for everyone to consider adopting a CDE in the development workflow.
So how can you do this? Well, there are a few ways, but it is important to be able to have an automated way to reproduce a versioned CDE. This is usually done by using a Virtual Machine (or virtual OS image) that is provisioned to include all the needed tools. There are quite a few virtualization solutions like VMWare, VirtualBox, Docker, cloud VPS (Virtual Private Server) like AWS, Azure, e.t.c. Some of them are free, but others cost per usage or you need to buy a license. Which one is best for you it’s something that you need to decide. Usually, if you don’t have any experience you will probably need to buy support even for a free product, just to play safe.
Therefore, in our project example the CDE will be a VM (or virtual OS) that includes all those tools and can be shared between developers that they may even use different OS as their base system on their workstation. See? This is also very useful because the CDE will be OS independent.
Since there are many virtualization technologies, you need to first decide which one suits your needs. VMWare and VirtualBox are virtual machine solutions, which means that they run a software machine on top of your host OS. This is a sandboxed machine that uses your hardware’s shared resources, therefore you can assign a number of CPUs, RAM and storage from your host system to the VM. As you can imagine, the performance of this setup is not that great and you may need more resources compared to other solutions.
An other solution is using a containerized image, like Docker, that uses all your hardware resources without a virtual machine layer in between. It’s still isolated (not 100% though) and since it’s containerized it can be transferred and re-used, too (like the VM solution). This solution has better performance compared to VMs, but it’s underground technology implementation is different depending the host OS, therefore; in case of a Linux host, Docker performs great, but in case of a Windows host it’s actually implemented as a VM.
Then there are solutions like working on remote VPS (virtual private servers), which they are either baremetal or cloud servers (in your premises or on a remote location). These servers are running an OS and host the CDE that you use to build your code, therefore you edit your code locally on your host OS with your favorite IDE and then build the code remotely on the VPS. The benefit of this solution is that the VPS can be faster than your laptop/workstation and can be shared also among other developers. The disadvantage is that you need a network connection and this may become a problem if the produced build artifacts that you need to test are large in size and the network connection is not fast (e.g. if the image is a 30+ GB Linux distro that’s a lot of data to download even on fast networks).
What’s important though, is that whatever solution you choose, to apply the IaC (infrastructure as code) concept, which means that the infrastructure will be managed and provisioned through scripts, code or config files.
Now, let’s examine our specific case. Since we’re interested on building a baremetal firmware on the STM32 it’s obvious that we don’t need a lot of resources and a powerful builder. Even if the project has a lot of code, the build may take 1-2 mins, which is a fair time for a large code base. If the code is not that large then it may be just a few seconds. Of course, if the build is running on a host that can run a parallel build and compile many source files at the same time, then the build will also be faster. So in this case, which solution is preferred?
Well, all the solutions that I’ve mentioned earlier are suitable for this case; therefore, you can use VirtualBox and Docker (which are free) or use a VPS like AWS, which is not free but it doesn’t cost that much (especially for a company or organization) and also saves you time, money, energy from running your own infrastructure 24/7, as you pay only for your image running time.
Because all these solutions seems to be suitable, there’s another question. How can you evaluate all of these and decide? Or even better, how can you achieve having an alternative solution, that won’t cost you a lot of time and money, when you decide to change from one solution to another? Well, as you guess there are tools for this, like Packer or Vagrant, that can simplify the process of creating different type of images with the same configuration. Although those two tools seem similar, they’re actually a bit different and it’s always a good idea to read more about those in the previous links. You can use both to create CDEs, but Packer is better for creating images (or boxes that can be used also from Vagrant) and this can be done by using a single configuration file that builds images for different providers at the same time. Providers in this context are Docker, Vagrant, AWS e.t.c. Also, both tools support provisioning tools that allow you to customize your image.
There are many provisioning tools like Puppet, Chef, Ansible and even shell scripts. Pretty much Packer and Vagrant can use the same provisioners (link1 and link2). I won’t get into the details for each one of them, but although seemingly the most simple provisioning seems to be using shell scripts, it’s not really. In this article series I’ll use Ansible.
Why Ansible? That’s because it’s more flexible, makes easier to handle more complex cases and it comes with a ton of ready to use examples, modules and roles (roles are just pre-defined and tested scripts for popular packages). That makes it better compared to use shell scripts. Compared to Puppet and Chef, Ansible is better in our case, because it’s able to connect via SSH to the target and configure it remotely, instead of having to run the provisioner on the target itself.
Another problem with using shell scripts is that they may get too complicated in case you want to cover all cases. For example, let’s assume that you want to create a directory on the target image, then you need to use mkdir command and create it. But if this directory already exists, then the script will fail, unless you check first if the directory already exists before you execute the command. Ansible does exactly that, first checks the change that it needs to make and if the status is already the wanted one, then it doesn’t apply the change.
Since we decided to create a Docker and AWS EC2 AMI image, which have almost the similar configuration, then Packer seems a suitable solution for this. You could also use Vagrant, but let’s go with Packer, for now. In both cases, you need to have a Docker and AWS account in order to proceed with the rest of the examples, as you’ll need to push those images to a remote server. If you don’t care about cloud and pushing an image to the cloud then you can still use Packer to create only the Docker image, which can be pushed to your local repository on your computer, but in this case maybe go with Vagrant as it provider a more user friendly way to build, run and use the image, without having to deal with the docker cli.
I won’t get into details here on how to create your AWS account and credentials, as this would need a lot of time and writing. You can find this information though in the AWS EC2 documentation, which explains things much better than me. Therefore, from now on I assume that you already have at least a free AWS account and your credentials (access and secret key).
In these article, we’re going to use these repos here:
- https://bitbucket.org/dimtass/stm32-cde-template/src/master/
- https://bitbucket.org/dimtass/stm32f103-cmake-template/src/master/
In the first repo you’ll find the files that Packer will use to build the image and the second repo is just a small STM32 template code sample that I use every time I start a new project for the STM32F103.
Before continuing building the image, let’s have a look at the environment that we need inside this image. By having a look at the source code it’s obvious that we need CMake and an ARM GCC toolchain. Therefore, the image needs to include these and we do that by using Ansible as the provisioner during the image build. Ansible uses playbooks and roles for provisioning targets. Again, I won’t get into the details of how to use Ansible in this article and you can find more information in the online documentation here.
Installing Packer
To install Packer, download the pre-compiled binary for your architecture here. For Ubuntu 18.04 that would be the Linux 64-bit. Then copy this to your /usr/bin (using sudo). You can also just copy it to your ~/.local/bin folder and if you’re the only user that will use Packer.
To test if everything is ok, run:
1
packer -v
In my case it returns version 1.4.5.
Installing Ansible
To install Ansible in Ubuntu 18.04 you need to add an external repo and install it from there following the following commands:
1
2
3
sudo apt-add-repository ppa:ansible/ansible
sudo apt-get update
sudo apt-get install ansible -y
This is the official ppa repo, so it’s ok to use that. If you trust nobody, then you can see other installation methods here (you can also just use the git repo).
To test that everything is ok, run:
1
ansible --version
In my case the version is 2.9.1. Have in mind that since those tools are under constant development they’re updated regularly and you need always to use the documentation depending your version.
Registering to docker and creating a repository
In this example we’ll use the docker hub and create a repository for this image and store it there. The reason for this is that the image will be accessible from anywhere and any docker host will have access to it. Of course, in case you don’t want to publish your image you can just create either a local repository on your workstation or have a local server in the network that stores the docker images.
In this case, I’ll use docker hub. So you need to create an account there and then create a repository with the name stm32-cde-image. In this case your image will be in the
Now that you have your repo, you need to go to your user account settings and create a token in order to be able to push images to your repositories. You can do this in Account Settings -> Security -> Access Tokensand follow the instructions there and create a token, run a shell command and use your username and the token to create your credentials locally on your system. After that, you can just push images to your account, so Packer can also do the same.
Finally, in the stm32-cde-docker.jsonand stm32-cde-images.jsonfiles, you need to change the repository name in the docker post-processor and use yours, otherwise the image build will fail.
Create the CDE images
Now that you have all the tools you need, open your terminal to the packer repo you cloned earlier and have a look at the stm32-cde-images.json, stm32-cde-aws.json and stm32-cde-docker.json files. These files are the configuration files that packer will use to create the images. The stm32-cde-images.jsonfile contains the configuration for both docker and aws ec2 images and then the other two files are for each image (docker, aws).
In part-1 I’ll only explain how to build and use the docker image, so forget about anything related to AWS for now. In the stm32-cde-images.json and stm32-cde-docker.json files there is a builder type which is for Docker. In this case, all it matters is to choose the imagefrom any repository. In this case, I’ve chosen the ubuntu:16.04 as a base image which is from the official docker repository and it’s quite similar to the amazon’s EC2 image (there are significant differences though). The base image is actually an official docker image, that the docker client in your host OS will fetch from the docker hub and use as a base to create another image on top of that. This official image is a strip down ubuntu image, on which you can install whatever packages, tools and libraries you need on top, which means the more you add the size will get larger. Therefore, the base ubuntu:16.04 image may be just 123MB, but this can easily grow up to a GB and even more.
As I’ve noted earlier, although you can use Packer to build images from various different builder types, this doesn’t mean that all the base images from all the sources will be the same and there might be some insignificant differences between them. Nevertheless, using a provisioner like Ansible will handle this without issues, as it will only apply changes that are not existed in the image and that’s the reason that Ansible is better than a generic shell script, as a script may fail in an specific image and not on another. Of course, there’s a chance that you’re using shell commands in your Ansible configuration, therefore in this case you just need to test that everything works as expected.
To create the docker image you need to clone this repo:
https://bitbucket.org/dimtass/stm32-cde-template/src
And use packer to build the stm32-cde-docker.json like this:
1
2
3
git clone https://dimtass@bitbucket.org/dimtass/stm32-cde-template.git
cd stm32-cde-template
packer build stm32-cde-docker.json
Note: before run the build command, you need to change the
docker_repovariable and put your docker repo, that you’ve created and also you need to have created a token for docker to be able to push the image.
If everything goes fine, the you’ll see something like this:
1
2
3
4
5
6
7
8
9
10
11
12
13
14
15
16
17
==> docker: Creating a temporary directory for sharing data...
==> docker: Pulling Docker image: ubuntu:16.04
...
==> docker: Using docker communicator to connect: 172.17.0.2
==> docker: Provisioning with shell script: /tmp/packer-shell909138989
...
==> docker: Provisioning with Ansible...
...
==> docker: Committing the container
...
==> docker: Killing the container: 84a9c7842a090521f8dc9bd70c39bd99b6ce46b0d409da3cdf68b05404484b0f
==> docker: Running post-processor: docker-tag
    docker (docker-tag): Tagging image: sha256:0126157afb61d7b4dff8124fcc06a776425ac6c08eeb1866322a63fa1c3d3921
    docker (docker-tag): Repository: dimtass/stm32-cde-image:0.1
==> docker: Running post-processor: docker-push
...
Build 'docker' finished.
That means that you image was build without errors and its also pushed to the docker hub repository.
Using the Docker CDE image
OK, now we an image, what do we do with this?
Here we need to make clear that this image is just the CDE. It’s not yet used in any way and it’s just available to be used in any way you like. This image can be used in different ways, of course. For example, developers can use the image to build their code locally on their workstation or remotely, but the same image can be used to build the code during a continuous integration pipeline. The same image also can be used for testing, though in this case, as you’ll see you need to use the provisioner to add more tools and packages in there (which is actually done already). Therefore, this image is the base image that we can use in our whole pipeline workflow.
Note that these images were created by only using configuration files, which are versioned and stored in a git repo. This is nice, because that way you can create branches to test your changes, add more tools and also keep a history log of all the changes so you can track and debug any issues that were introduced. I hope it’s clear how convenient that is.
Depending the kind of image you build there’s a bit different way to use it. For example, if you have a VirtualBox VM then you need to launch VBox and then start the image, or if you’ve used Vagrant (regardless if the Vagrant box is a VirtualBox or a Docker image), then you need to start the image again using vagrant up and vagrant ssh to connect to the image. If you’re using docker, then you need to run a new container from the image, attach to it, do your job and then stop/destroy the container (or leave it stopped and re-use it later). For AWS AMIs it’s a bit different procedure. Therefore, each tool and way you’ve used to create the image, defines how to use the image. What happens in the background is pretty much the same in most cases (e.g. in case of Docker, it doesn’t matter if you use Vagrant or the docker command line (cli), the result in the background is the same).
In this post I’ll only explain how to use the Docker image and I’ll explain how to use the Vagrant and AWS EC2 AMI in a next post.
So, let’s start with the docker image. Again, I won’t go into the details of the cli command, but I’ll just list them and explain the result. For more details you need to consult the docker cli reference manual.
In the previous steps we created the docker image and pushed it to our docker.io hub repository. Although, I’ll use my repo image name, you need to change that to yours, but also my repo for testing is fine. The test repo we’re going to use to build the code is that one here:
https://bitbucket.org/dimtass/stm32f103-cmake-template/src/master/
Therefore, the objective is to create a docker container from our new image and then clone the code repo and build it inside the docker container.
1
2
cd ~
docker run -it dimtass/stm32-cde-image:0.1 -c "/bin/bash"
This will create a new container, run it and attach to it’s bash terminal, so you should find your terminal’s prompt inside the running container. Now, to test if that the container has all the tools that are needed and also build the firmware, then all you have to do is to git clone the stm32 firmware repo in the container and build it, like this:
1
2
3
4
cd /root
git clone https://dimtass@bitbucket.org/dimtass/stm32f103-cmake-template.git
cd stm32f103-cmake-template
TOOLCHAIN_DIR=/opt/toolchains/gcc-arm-none-eabi-9-2019-q4-major CLEANBUILD=true USE_STDPERIPH_DRIVER=ON SRC=src_stdperiph ./build.sh
The above commands should be run inside the docker container. So, first you change dir in /root and then clone and build the template repo. In the build command (the last one), you need to pass the toolchain path, which in this case we’ve used Packer and Ansible to install the toolchain in /opt/toolchains/gcc-arm-none-eabi-9-2019-q4-major. Then you need to pass a few other parameters that are explained in the stm32f103-cmake-template repo, as you can build also a FreeRTOS template project or use libopencm3 instead of ST standard peripheral library.
The result of the build command in my case was:
1
2
3
4
5
6
7
8
9
10
[ 95%] Linking C executable stm32-cmake-template.elf
   text	   data	    bss	    dec	    hex	filename
  14924	    856	   1144	  16924	   421c	stm32-cmake-template.elf
[ 95%] Built target stm32-cmake-template.elf
Scanning dependencies of target stm32-cmake-template.bin
Scanning dependencies of target stm32-cmake-template.hex
[100%] Generating stm32-cmake-template.hex
[100%] Generating stm32-cmake-template.bin
[100%] Built target stm32-cmake-template.bin
[100%] Built target stm32-cmake-template.hex
That means that our CMake project for the STM32 was built fine and now we have a hex file that we can use. But, wait…. how can you test this firmware? This is how you develop? How do you make code changes and build them? Well, there are many options here. To flash the image from inside the container you can expose the USB st-link programmer to docker by using the --device option in docker when creating the container using docker run -it command. You can a look how to use this option here. We’ll get to that later.
The most important thing now, though, is how a developer can use an IDE to make changes in the code and then build the firmware. The option for this is to share your drive with the container using volumes. That way you can have a folder that is mounted to the container and then you can clone the repo inside this folder. The result is the the repo will be cloned to your local folder, therefore you can use your IDE in your OS to open the code and make edits. Then build the code inside the container.
To do that, let’s first clean the previous container. To do that, run this command to your OS terminal (not the docker container) which will list the current stopped or running containers.
1
docker ps -a
An example of this output may be:
1
2
CONTAINER ID        IMAGE                           COMMAND                  CREATED             STATUS                     PORTS               NAMES
166f2ef0ff7d        dimtass/stm32-cde-image:0.1     "/bin/sh -c /bin/bash"   2 minutes ago       Up 2 minutes                                   admiring_jepsen
The above output means that there is a container running using the dimtass/stm32-cde-image. That’s the one that I’ve started earlier, so now I need to stop it, if it’s running and then remove it, like this:
1
2
docker stop 166f2ef0ff7d
docker rm 166f2ef0ff7d
Note that 166f2ef0ff7d is the container’s ID which is unique for this container and you can use docker cli tool to do actions on this specific container. The above commands will just stop and then remove the container.
Now, you need to run a new container and this time mount a local folder from your OS filesystem to the docker container. To do that run these commands:
1
2
3
4
cd ~/Downloads
mkdir -p testing-docker-image/shared
cd testing-docker-image
docker run -v $(pwd)/shared:/home/stm32/shared -it dimtass/stm32-cde-image:0.1 -c "/bin/bash"
The last command will end up inside the container’s bash. Then you need to change to the stm32 user and repeat the git clone.
1
2
3
4
5
cd /home/stm32
su stm32
git clone --recursive https://dimtass@bitbucket.org/dimtass/stm32f103-cmake-template.git
cd stm32f103-cmake-template
TOOLCHAIN_DIR=/opt/toolchains/gcc-arm-none-eabi-9-2019-q4-major CLEANBUILD=true USE_STDPERIPH_DRIVER=ON SRC=src_stdperiph ./build.sh
There’s a trap here, though! For this to work, your OS user needs to have the same uid and gid as the stm32 user in the container (or the opposite). Therefore, if your user has uid/gid = 1000/1000, then the same needs to be for the stm32 user in the container. If that’s not the case for you, then you need to create a user in the container that has the same uid/gid. If these are not the same, then the permissions will be different and you won’t be able to create/edit files.
For example if your OS uid/gid is 1001 and the stm32 user in the container is 1000, then while the container is running run this command in the terminal inside the docker container:
1
usermod -u 1001 stm32
The above command will change the uid/gid of the stm32 user inside the container from 1000 to 1001.
Let’s now assume that the permissions are OK and the uid/gid are the same for both users in your OS and container. That means that you can use your favorite IDE and open the git project, do your changes and at the same time running the docker container in the background and build the source when you like. Have in mind that the build will be a manual procedure and you won’t be able to press a button to your IDE to build the source in the container. Of course, you can achieve this functionality, if you wish, as there are a few ways, but let’s not focus on this right now.
Finally, you’ve managed to create an image that is your common development environment and that contains all the needed tools in order to build you code and test it. At any time that you need to add more tools in your image, then you can use the Ansible provisioning files and add more packages or roles in there. Then all the developers will automatically get the last updates when they create a new container to build the firmware. For this reason, it’s good to use the latest tag in the docker image and the repository, so the devs get automatically the latest image.
Flashing the firmware
To flash the firmware that was build with the docker image, there are two ways. One is use your OS and have installed the st-link tool, but this means that you need to find the tool for your OS and install it. Also if some developers have different OSes and workstation with different architectures, then probably they will have also different versions of the tool and even not the same tool. Therefore, having the st-flash tool in the docker image helps to distribute also the same flasher to all developers. In this case, there’s an Ansible role that installs st-flash in the image, so it’s there and you can use it for flashing.
As mentioned earlier, though; that’s not enough because the docker image needs to have access to the USB st-link device. That’s not a problem using docker though. So in my case, as I’m running on Ubuntu it’s easy to find the USB device path. Just, run the lsusb command on a terminal and get the description, so in my case it’s:
1
Bus 001 Device 006: ID 0483:3748 STMicroelectronics ST-LINK/V2
That means that the ST-LINK V2 device was enumerated in bus 001 and it’s device ID 006. For Linux and docker that means that if you mount the /dev/bus/usb/001/ path in the docker image then you’ll be able to use the st-link device. One thing to note here is that this trick will always expect the programmer to be connected on the same port. Usually this is not a problem for a developer machine, but in case that you want to generalize this you can mount /dev/bus/usb and docker will be able to have access to any usb device that is registered. But that’s a bad practice, for development always use the same USB port.
Therefore, now remove any previous containers that are stopped/running (use docker ps -a to find them) and then create/run a new container that also mounts the /dev path for the usb, like this:
1
docker run -v $(pwd)/shared:/home/stm32/shared -v /dev/bus/usb/001:/dev/bus/usb/001 --privileged -it dimtass/stm32-cde-image:0.1 -c "/bin/bash"
Disconnect the device if it’s already connected and then re-connect. Then to verify that the device is enumerated in the docker container and also the udev rules are properly loaded, run this command:
1
st-info --probe
In my case this returns:
1
2
3
4
5
6
7
8
root@6ebcda502dd5:/# st-info --probe
Found 1 stlink programmers
 serial: 513f6e06493f55564009213f
openocd: "\x51\x3f\x6e\x06\x49\x3f\x55\x56\x40\x09\x21\x3f"
  flash: 65536 (pagesize: 1024)
   sram: 20480
 chipid: 0x0410
  descr: F1 Medium-density device
Great, so the device is enumerated fine on the docker container. Now, let’s clone again the repo, build and flash the firmware. Before proceed to this step, make sure that the stm32f103 (I’m using blue-pill) is connected to the st-link and the st-link is enumerated in the docker container. Then run these commands:
1
2
3
4
5
cd /home/stm32
su stm32
git clone --recursive https://dimtass@bitbucket.org/dimtass/stm32f103-cmake-template.git
cd stm32f103-cmake-template
TOOLCHAIN_DIR=/opt/toolchains/gcc-arm-none-eabi-9-2019-q4-major CLEANBUILD=true USE_STDPERIPH_DRIVER=ON SRC=src_stdperiph ./build.sh
Now that the firmware is built, flash it with this command:
1
st-flash --reset write build-stm32/src_stdperiph/stm32-cmake-template.bin 0x8000000
You should see something like this:
1
2
3
4
5
6
7
8
9
10
11
12
13
stm32@6ebcda502dd5:~/stm32f103-cmake-template$ st-flash --reset write build-stm32/src_stdperiph/stm32-cmake-template.bin 0x8000000
st-flash 1.5.1
2019-12-02T21:18:04 INFO common.c: Loading device parameters....
2019-12-02T21:18:04 INFO common.c: Device connected is: F1 Medium-density device, id 0x20036410
2019-12-02T21:18:04 INFO common.c: SRAM size: 0x5000 bytes (20 KiB), Flash: 0x10000 bytes (64 KiB) in pages of 1024 bytes
2019-12-02T21:18:04 INFO common.c: Attempting to write 15780 (0x3da4) bytes to stm32 address: 134217728 (0x8000000)
Flash page at addr: 0x08003c00 erased
2019-12-02T21:18:04 INFO common.c: Finished erasing 16 pages of 1024 (0x400) bytes
2019-12-02T21:18:04 INFO common.c: Starting Flash write for VL/F0/F3/F1_XL core id
2019-12-02T21:18:04 INFO flash_loader.c: Successfully loaded flash loader in sram
 16/16 pages written
2019-12-02T21:18:05 INFO common.c: Starting verification of write complete
2019-12-02T21:18:05 INFO common.c: Flash written and verified! jolly good!
What just happened is that you run a docker container on your machine, which may not have any of the tools that are needed to build and flash the firmware and managed to build the firmware and flash it. The same way, any other developer in the team in the building or from home, can build the same firmware the same way, get the same binary and flash it with the same programmer version. This means that you’ve just ruled out a great part of the development chain that can cause weird issues and therefore delays to your development process.
Now every developer that has access to this image can build and flash the same firmware in the same way. Why somebody wouldn’t like that?
I understand that maybe some embedded engineers find this process cumbersome, but it’s not really. If you think about it, for the developer the only additional step is to create the container once and just start it once on every boot and then just develop the same way like before. In case you were using automations before, like pressing a button in the IDE and build and flash, then that’s not a big issue. There are ways to overcome this and all new IDEs support to create custom commands and buttons or run scripts, so you can use those to achieve the same functionality.
Using gitlab-ci for CI/CD
Until now, I’ve explained how you can use the CDE image to build your source the code as a developer, but in embedded projects it’s also important to have a CI/CD pipeline that builds the code and runs some scripts or tests automatically. For example, in your pipeline you might also want to run a style formating tool (e.g. clang-format), or anything else you like, then run your tests and if everything passes then get a successful build.
There are many CI/CD services like Jenkins, Travis-CI, gitlab-ci, buildbot, bamboo and many others, just to name a few. Each one of them has its pros and cons. I haven’t used all of them, so I can’t really comment on what are their differences. I’ve only used gitab-ci, jenkins, buildbot and bamboo, but again not in great depth. Bamboo is mainly used in companies that are using Atlassian’s tools widely in their organisation, but you need to buy a license and it’s closed source. Jenkins is the most famous of all, it’s free, open-source and has a ton of plug-ins. Buildbot is used for Yocto projects, which means that it can handle complexity. Gitlab-CI is used in the gitlab platform and it’s also free to use.
From all the above, I personally prefer gitlab-ci as it’s the most simple and straight forward service to create pipelines, easily and without much complexity. For example, I find Jenkins pipelines to be very cumbersome and hard to maintain; it feels like the pipeline interface doesn’t fit well in the rest of the platform. Of course, there are people who prefer Jenkins or whatever else compared to GitLab-CI. Anyway, there’s no right or wrong here, it has to do with your current infrastructure, needs and expertise. In my case, I find gitlab-ci to be dead simple to use and create a pipeline in no time.
To use gitlab-ci, you need to host your project to gitlab or install gitlab to your own server. In this example, I’m hosting the stm32f103-cmake-template project in bitbucket, github and gitlab at the same time and all these repos are mirror repos (I’ll explain in another post how I do this, but I can share the script that I’ve wrote here to do this). Therefore, the same project can be found in all these repos:
- https://bitbucket.org/dimtass/stm32f103-cmake-template/src/master/
- https://gitlab.com/dimtass/stm32f103-cmake-template
- https://github.com/dimtass/stm32f103-cmake-template
For now, we care only for the gitlab repo. In your case, you need to either fork this repo, or create a new one with your code and follow the guide. Therefore, from now on, it doesn’t matter if I refer to the stm32f103-cmake-template project as this can be any project.
To use gitlab-ci, you only need a template file in your repo which is called .gitlab-ci.yml. This is a simple YAML file that configures the CI/CD of your project. To get more information and details on this, you need to read the documentation here. In this example, I’ll only use simple and basic stuff, so it’s easy to follow, but you can do much more complex things than what I’m doing in this post.
For our example, we’re going to use this repo here:
https://gitlab.com/dimtass/stm32f103-cmake-template
I’ve added a .gitlab-ci.yml file in the repo, that you can see here:
1
2
3
4
5
6
7
8
9
10
11
12
13
14
15
16
17
18
    image:
      name: dimtass/stm32-cde-image:0.1
      entrypoint: [""]

    variables:
      GIT_SUBMODULE_STRATEGY: recursive

    stages:
      - build
      - test

    build:
      stage: build
      script: TOOLCHAIN_DIR=/opt/toolchains/gcc-arm-none-eabi-9-2019-q4-major CLEANBUILD=true USE_STDPERIPH_DRIVER=ON SRC=src_stdperiph ./build.sh

    test:
      stage: test
      script: echo "Dummy tests are done..."
First thing you notice, is the image entry. This points to the docker image that I’ve built with packer and pushed to the docker hub registry. This entry will force the gitlab-runner instance to download the image and then run a container and inside that container will run the given stages. Also, the entrypoint entry is for handling a problem that some images built with Packer have, which is the container can’t find the /bin/sh path. You can see more about issue here. This already raises the flag that not all solutions are handled the same in the end, but depending the tools you’re using and the way you’re using them, there might be some differences in the way that you need to handle specific cases.
Lastly, there are two stages, build and test. Test stage, doesn’t do anything in this case and it’s empty, but the build stage will run the build command(s) and if any step of these stages fails, then the pipeline will fail.
After commit and pushing the .gitlab-ci.yml file in the repo then the prjects CI/CD service will automatically pick up the the job and it will use any available shared runner from the stack and use it to run the pipeline. This is an important information, by default the shared gitlab runners are using a docker image, which will fail to build your specific project and that’s the reason why you need to declare to the gitlab-ci that it needs to pull your custom docker image (dimtass/stm32-cde-image in this case).
After picking the job, the runner will start executing the yaml file steps. See, how simple and easy is to create this file. This is an important difference of gitlab-ci, compared to other CI/CD services. I’ll post a couple of pictures here from that build here:

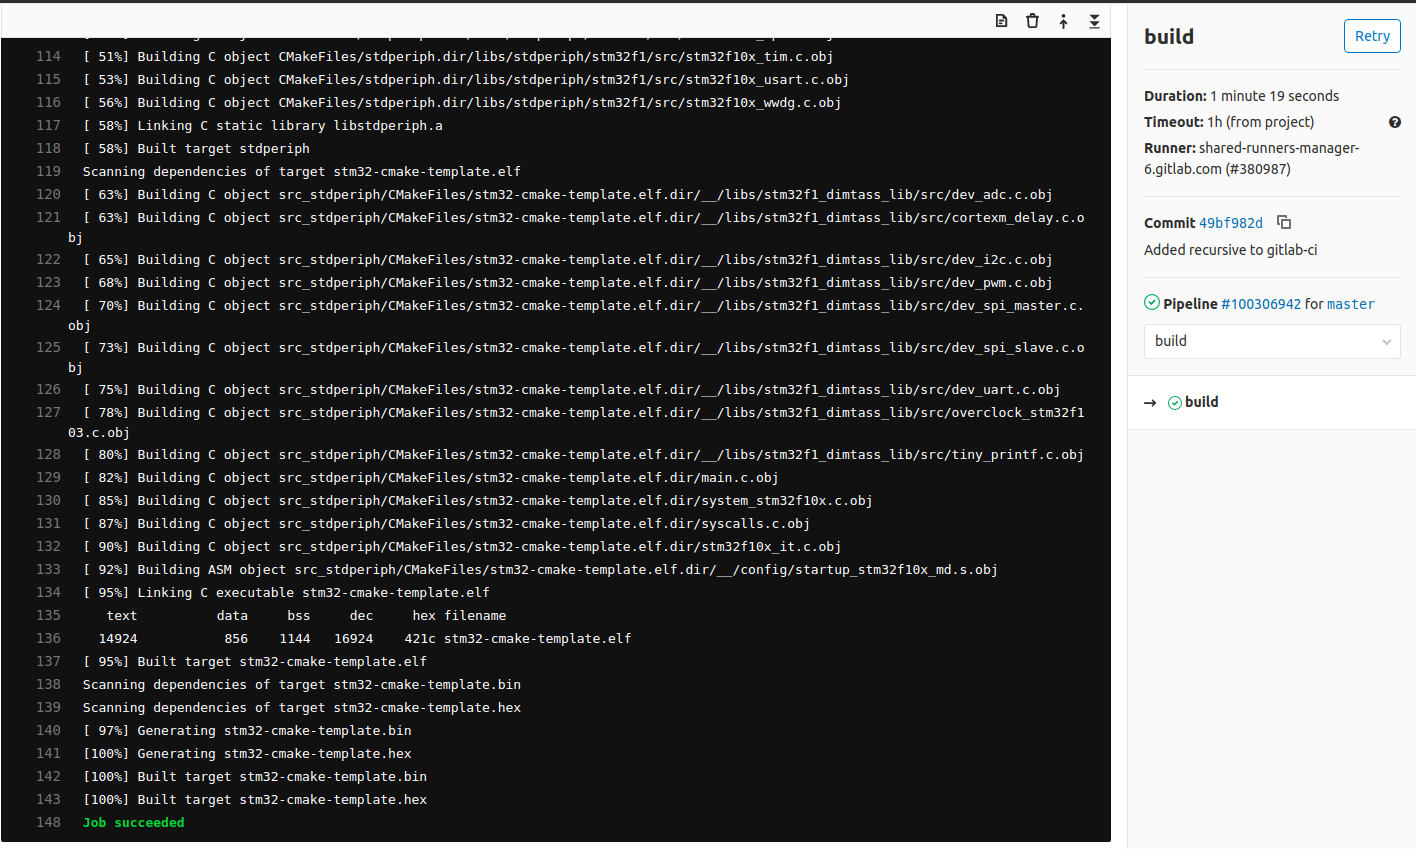

In the first picture, you see the output of the runner and that it’s pulling the dimtass/stm32-cde-image and then fetches the git submodules. In the next image you can see that the build was successful and finally in the third image you see that both build and test stages completed successfully.
A few notes now. As you can imagine, there are no produced artifacts, meaning that the firmware is built and then gone. If you need to keep the artifact, then you need to push/upload the artifact to some kind of registry that you can download. Recently, though, gitlab supports to host the build artifact for a specific time, so let’s use this! I’ve changed my .gitlab-ci.yml to this one:
1
2
3
4
5
6
7
8
9
10
11
12
13
14
15
16
17
18
19
20
21
22
23
---
image:
    name: dimtass/stm32-cde-image:0.1
    entrypoint: [""]

variables:
    GIT_SUBMODULE_STRATEGY: recursive

stages:
    - build
    - test

build:
    stage: build
    script: TOOLCHAIN_DIR=/opt/toolchains/gcc-arm-none-eabi-9-2019-q4-major CLEANBUILD=true USE_STDPERIPH_DRIVER=ON SRC=src_stdperiph ./build.sh
    artifacts:
        paths:
        - build-stm32/src_stdperiph/stm32-cmake-template.bin
        expire_in: 1 week

test:
    stage: test
    script: echo "Dummy tests are done..."
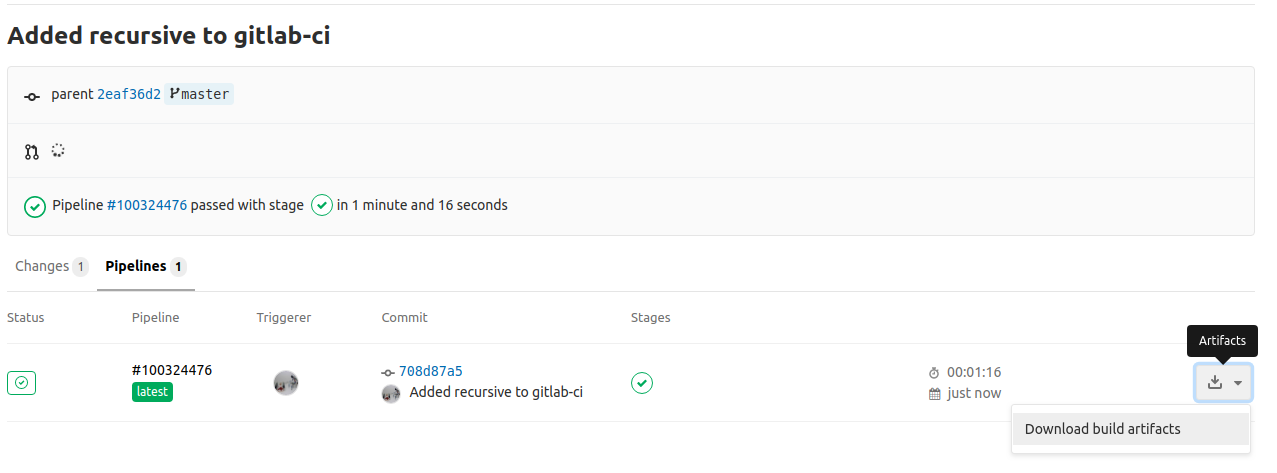
The above yml script will now also create an artifact that you can download, flash and test to your target. To download the artifact, click to your project’s CI/CD -> Pipelines and from the list click the drop-down menu in the last build and download the .zip file that contains the artifact. This is shown here:
Another thing, you may notice during the pipeline execution is that each stage is running after the previous is cleaned. Therefore, the test stage will download again the docker image, git clone the submodules again and then run the test stage. That doesn’t sound what we really want, right? Don’t get me wrong, the default behavior is totally right and seems very logical for each stage to run in a clean environment, it’s just that in some cases you don’t want this to happen. In that case you can run your tests in the the build stage.
Finally, what’s useful in gitlab is the cache. This is useful, because when you run a stage then you can cache a specific folder or file and tag it with a key. You can do this for several files/folders. Then on another stage, you can use the cache key and have access to this files/folders and run whatever actions you like. To do this, let’s change our .gitlab-ci.yml file into this:
1
2
3
4
5
6
7
8
9
10
11
12
13
14
15
16
17
18
19
20
21
22
23
24
25
26
27
28
29
---
image:
    name: dimtass/stm32-cde-image:0.1
    entrypoint: [""]

variables:
    GIT_SUBMODULE_STRATEGY: recursive

stages:
    - build
    - test

build:
    stage: build
    script: TOOLCHAIN_DIR=/opt/toolchains/gcc-arm-none-eabi-9-2019-q4-major CLEANBUILD=true USE_STDPERIPH_DRIVER=ON SRC=src_stdperiph ./build.sh
    cache:
        key: build-cache
        paths:
        - build-stm32/src_stdperiph
    artifacts:
        paths:
        - build-stm32/src_stdperiph/stm32-cmake-template.bin
        expire_in: 1 week

test:
    stage: test
    script: file build-stm32/src_stdperiph/stm32-cmake-template.bin
    cache:
        key: build-cache
As you can see in the above file, the build-cache will store the content of the build-stm32/src_stdperiph folder during the build stage and then in the test stage will run the file command on this file, which is going to be fetched from the cache. This is the output of this in gitlab:
1
2
3
4
5
Downloading artifacts for build (368146185)...
Downloading artifacts from coordinator... ok        id=368146185 responseStatus=200 OK token=jeC2trFF
$ file build-stm32/src_stdperiph/stm32-cmake-template.bin
build-stm32/src_stdperiph/stm32-cmake-template.bin: data
Job succeeded
Just beautiful. Simple done and useful in many ways.
Conclusions
In this first post of the DevOps for embedded series, I’ve covered the creation of a docker image that can be used from developers as a CDE (common development environment) and CI/CD services as a pipeline image. I’ve used Packer to create the image and Ansible to provision and configure it. Packer is useful because you can use it to create almost similar images with the same configuration file, for different providers like docker, AWS, e.t.c. Also Ansible is preferred instead of using another provisioner because it supports also many different providers and also it configures the image remotely and it doesn’t have to run locally on the image.
Then I’ve tested the CDE image to build a template firmware locally on my host OS and also was able to flash the firmware on the target MCU using the st-flash tool from the image, but for this step I had to share part of the /dev/bus/… with the docker image, which some may argue that’s not optimal. Personally, I think it is just fine if you are targeting a specific port rather your whole /dev directory.
Finally, I’ve used the same CDE image with gitlab-ci and created a CI/CD pipeline that runs a build and a test stage. I’ve also shown how you can use the artifact and cache capability of gitlab-ci. Although, there are many different CI/CD services, I’ve chosen gitlab, because I find it simple and straight-forward to use and the documentation is very good, too. If you want or have to use another CI/CD service, then the procedure details will be different, but what you need to do is the same.
In the next post, I’ll show how you can use an AWS EC2 AMI instance (and the AWS tools in general) to do the same thing. Until then…
Have fun!
Comments powered by Disqus.