NanoPi-Neo4 Yocto meta layer
Intro
Embedded Linux & GPU 3D acceleration… Say no more. When you get those words together then hell brakes loose. Well, it depends, though. If you’re using Yocto or Buildroot and choose a BSP that has all the pieces already connected, then you’re good to go. Just build, flash the image and you’re done. It’s even easier if you use a distro like Armbian, Raspbian or others, just download the image, flash it and you’re done. But what happens when you need to build up from the scratch? In this case you need to connect the pieces together yourself and then you realize that it’s a bit more complicated. The Linux graphics stack is a huge pool of buzzwords, abbreviations, tons of code and APIs. It’s really huge. Let’s play with numbers a little. I got the git repo of the linux-stable and I’ve used cloc to extract some numbers.
1
2
3
4
git clone git://git.kernel.org/pub/scm/linux/kernel/git/stable/linux-stable.git
cd inux-stable
git checkout v5.0.4
cloc .
Cloc, will do its magic and will return some metrics like this:
1
2
3
4
5
6
7
8
9
10
11
12
13
14
15
16
17
18
19
20
21
22
23
24
25
26
27
28
29
30
31
32
33
34
35
36
37
38
39
40
41
42
43
68143 text files.
67266 unique files.
19991 files ignored.


github.com/AlDanial/cloc v 1.74  T=245.01 s (206.9 files/s, 99334.7 lines/s)
---------------------------------------------------------------------------------------
Language                             files          blank        comment           code
---------------------------------------------------------------------------------------
C                                    26664        2638425        2520654       13228800
C/C++ Header                         19213         499711         920704        3754569
Assembly                              1328          47549         106234         275703
JSON                                   213              0              0         137286
make                                  2442           8986           9604          39369
Bourne Shell                           454           8586           7078          35343
Perl                                    54           5413           4000          27388
Python                                 116           3691           4060          19920
HTML                                     5            656              0           5440
yacc                                     9            697            376           4616
DOS Batch                               69            115              0           3540
PO File                                  5            791            918           3061
lex                                      8            330            321           2004
C++                                      8            290             82           1853
YAML                                    22            316            242           1849
Bourne Again Shell                      51            352            318           1722
awk                                     11            170            155           1386
TeX                                      1            108              3            915
Glade                                    1             58              0            603
NAnt script                              2            143              0            540
Markdown                                 2            133              0            423
Cucumber                                 1             28             49            166
Windows Module Definition                2             14              0            102
m4                                       1             15              1             95
CSS                                      1             27             28             72
XSLT                                     5             13             26             61
vim script                               1              3             12             27
Ruby                                     1              4              0             25
D                                        2              0              0             11
INI                                      1              1              0              6
sed                                      1              2              5              5
---------------------------------------------------------------------------------------
SUM:                                 50694        3216627        3574870       17546900
---------------------------------------------------------------------------------------
From the above you see that the Linux kernel is composed by 17.5 million text lines from which the 13.2 million are plain C code. Now let’s try the same at the same in the drivers/gpu folder:
1
2
3
4
5
6
7
8
9
10
11
12
13
14
15
16
$ cloc drivers/gpu
    4219 text files.
    4204 unique files.
     328 files ignored.

github.com/AlDanial/cloc v 1.74  T=16.51 s (236.9 files/s, 170553.5 lines/s)
-------------------------------------------------------------------------------
Language                     files          blank        comment           code
-------------------------------------------------------------------------------
C/C++ Header                  1616          50271         146151        1320487
C                             2195         190710         166995         936436
Assembly                         2            454            354           1566
make                            98            382            937           1399
-------------------------------------------------------------------------------
SUM:                          3911         241817         314437        2259888
-------------------------------------------------------------------------------
So, the gpu drivers are approx 2.2 million code lines. That’s 12.5% of the whole Linux kernel and that’s a lot. The whole arch/ folder is 1.6 million code lines (including asm lines), which is much less and contains all the supported kernel architectures.
So now that you realize the size of the graphics stack in the Linux kernel, you can safely guess that the deeper you get into the graphics stack, the more complex and difficult things are getting. Well, ok… I mean pretty much all the Linux kernel subsystems are another world, but if you’re an electronic engineer (like I do) then most of subsystems do make sense, but geez… graphics is another beast.
Anyway, this time the stupid project was to make a Yocto layer for the incredible NanoPi-Neo4 board. Why incredible? Well, because it’s an RK3399 board in a very small factor that only costs 50$. Can’t get better that this.
So, this idea was spinning in my head for some time now, but I couldn’t justify that is stupid enough to be promoted to a stupid project. But then I’ve decided to lower my standards and just accept the challenge.
Components
NanoPi-Neo4
Meet NanoPi-Neo4
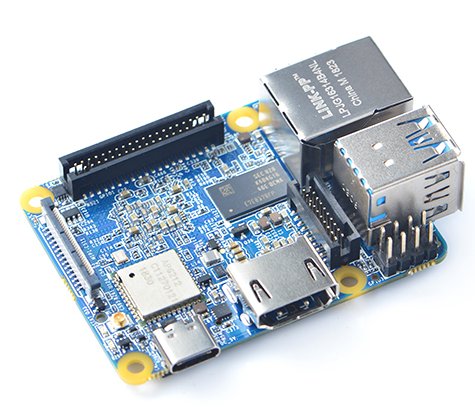
You can read the specs of the board here, but I’ll also list the highlights which are:
- Dual Cortex-A72 + Quad Core Cortex-A53
Quad Core Mali T864 (GL ES 3.1/3.0/2.0) - 1GB DDR3
- GbE
- WiFi + BT 4.0
- CSI
- HDMI
- 1x USB3.0
- 1x USB2.0
- 1x USB2.0 (pin header)
Yep, only 1GB RAM, but come on for testing code on this CPU and do evaluation without pay a lot is more than enough.
LCD Display
Well, it’s all about 3D graphics, so you need an LCD display. I have a small cheap 7 “ LCD (1024x600) that I’ve bought from ebay for something like 30 EUR. Although it seems a bit expensive for its specs, on the other hand it has a controller that has HDMI, VGA and RCA output, is powered from a USB port and it has this nice stand.

Project
There isn’t much to say about the project, except that it took some time to connect the pieces. Also, although I’ve finished the yocto meta layer and everything worked fine I’ve realized that I had left a lot of blur points in the back of my head. Sometimes, most of us (engineers) we just connect pieces together and usually we monkey see, monkey do, because of reasons (especially time constraint reasons). This might be fine when something works, even on the professional level, but when that happens to me it means sleepless nights, knowing that I’ve done something without having the full knowledge why that eventually worked. So I’ve struggled a bit to find information how things are really connected and working in the lower level. In my quest for the truth, I’ve met Myy in the Armbian forum and I want to thank him here, because he was really helpful to clarify a lot of things. I consider Miouyouyou being a great person not only because his contribution to open source but also for his willing to share his knowledge. Thanks mate!
Pretty much, what I’ve done was to use parts of the Armbian distro that supports the NanoPi-Neo4 (like u-boot and kernel patches), then use some parts from the meta-rockchip meta layer and then make the glue that connects everything together and also add some extra features. Why do this? Well, because the Armbian distro has a much more updated kernel and patches and a boot script setup that I really like and prefer to use a similar one in my layers. On the other hand, the meta-rockchip layer had the recipes for the various components for the RK chips, which are not updated though, so I had to also update those, too.
Although, I’ve created images for console, X11, Wayland, XWayland and Qt, I’ve only tried and tested the Wayland image, so be aware of that, in case you’re here and reading how to use the layer for X11 or Qt. If Wayland works then I guess also the QtWayland would work just fine, too. But sorry, there’s no much free time to test everything.
A few things about the graphics stack
The main components for the graphics support are the Mali blobs and the Mali DRM driver. DRM is the Direct Rendering Manager and it’s a Linux subsystem. It’s actually a Linux kernel API that run in the kernel space and exposes a set of functions that user-space applications can send commands and data to the GPU. This meant to be a generic API that can be used from applications without care what’s the underlying hardware, so the application doesn’t care if you have an nvidia, amd, intel or mali GPU.
So now that the kernel provide us with the DRM, how do we access it? Here is where the hardware specific libdrm comes into the game. The next image shows where the libdrm stands in the chain (image taken from here).
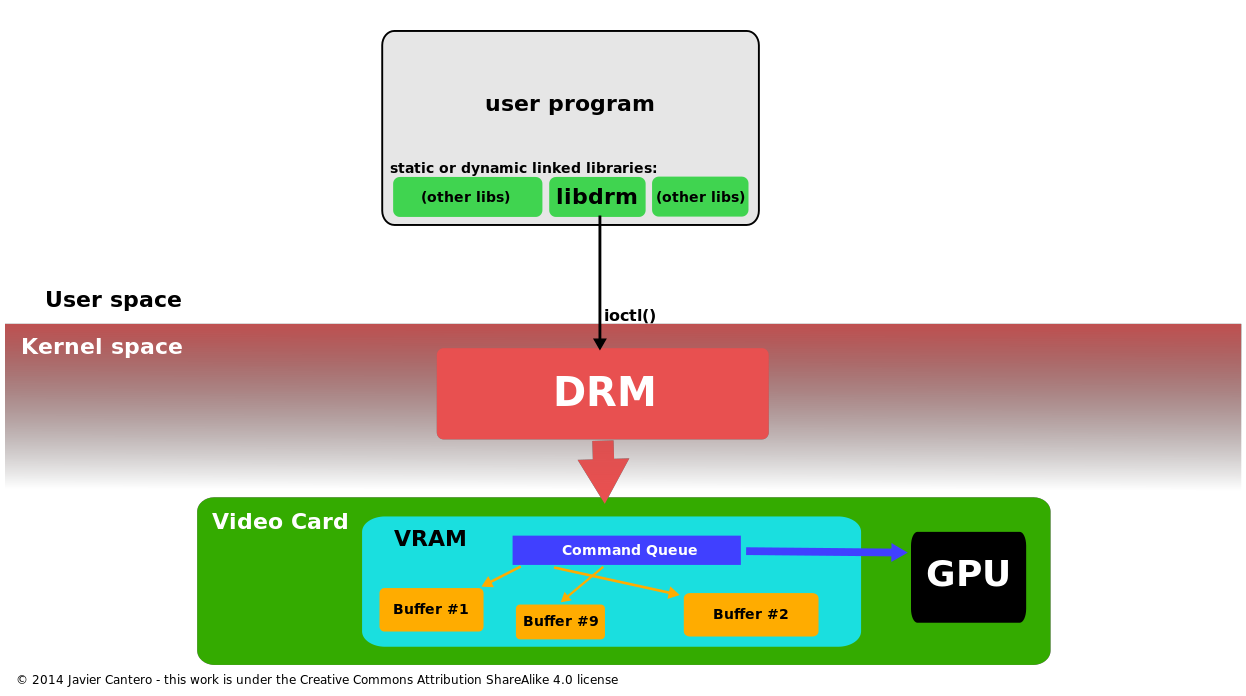
In the above image you see that the DRM is the kernel subsystem and it provides an API (via ioctl() commands) that any user app can use. Of course, when you write a graphics application, you don’t want to call ioctl functions. Also, there’s another problem. Although there are some common ioctl functions which are generic and hardware Independent, at the same time each vendor supports ioctl functions that are specific to its hardware. And this is where the trouble starts, because now every vendor needs to supply these specific functions, so you need an additional hardware specific driver. Therefore, the libdrm is composed by two different things, the libdrm core, which is hardware independent and the libdrm driver which is specific to the underlying hardware.
In case of RK3399, Rockchip provides this Mali specific libdrm driver that contains those hardware specific functions and you need to build and use this driver. Have in mind that if the vendor doesn’t do regular updates to the libdrm then you might end up in a situation that your window manager (e.g. Wayland) doesn’t support an older API version anymore and that’s really a bad thing, because then you’re stuck to an old version and maybe also in an old kernel, depending the dependencies of the various software layers.
So the conclusion is that libdrm is just a wrapper that simplifies the ioctl calls to the DRM kernel subsystem and provides a C API that is easier to use and also contains all the hardware specific functions.
Now that you have your way to send commands and data to the GPU you can do 3D graphics! Well… sure but it’s not that simple. With the DRM driver you can get a buffer and start drawing stuff, but that doesn’t really mean anything. Why? Because, acceleration. Let’s try to put it simple. I don’t know if my example succeeds to do this, but I’ll try anyways.
Have you ever used any paint software on your computer? If you haven’t stop here, go to extend your skillset by learning MS-Paint and then come back again. Let’s think the most simple drawing program that you only have a brush of a fixed 1-pixel size, you can select the color and if you press the click button it only paints one pixel, so no drag and draw. Now, you need to create a black fill rectangle, how do you do it if you only have this brush tool? Well, you start paint pixels to create the four sides for the rectangle and then start clicking inside the rectangle on every pixel until you make it all black. How much time did that take? A lot. We’re lucky though, because in the next version there’s a rectangle tool and also you can chose to draw a rectangle that is already color filled. How long did that take? 1-click and just a few milliseconds needed to drag the mouse to select the size. This is the acceleration. It doesn’t matter if it’s 2D or 3D, there are tools that make things faster. Therefore, for 3D graphics there are APIs that accelerate the 3D graphics creation in so many ways that are beyond of my understanding and involve tons of math and algorithms.
So, now it should be clear that although you have the libdrm and a way to have access to a buffer and draw stuff on your display that’s not enough. You need a way to accelerate these graphics creation and this where several tools are coming in to the game. There are plenty of tools (= APIs, libraries). For example there’s the Mesa 3D library. Mesa is actually a set of different 3D acceleration libraries and includes libraries like OpenGL, Direct3D, Vulkan, OpenCL and others. Each of these libraries maybe have other subsets, e.g. the OpenGL|ES in the OpenGL. Pretty much is chaos in there. Tons of code and APIs, it’s a nightmare for the embedded engineers. What all those libraries do, is to accelerate the 3D graphics creation. But how do they do that? This is done in software algorithms, of course, but that’s not enough. If that was all that’s happening then all the GPUs would have the same rendering performance. And not only that, but they would have the same rendering performance with any software renderer. Actually, OpenGL has its own software renderer (which is the default one and is used as a reference) and does all the rendering in pure software aand CPU cycles.
And here is the point where the competition between GPU vendors starts. Every vendor implements this acceleration in their silicon, so the GPU can implement let’s say the whole color rectangle creation in hardware with a simple ioctl call. So there is a specific hardware unit in the GPU that you can send a command and do that very fast. This is a very simplified example, of course. But that also means that each vendor implements the acceleration API in a different and hardware specific way. Therefore, every vendor provides it’s own implementation of these acceleration libraries and also the vendors like to provide only the pre-compiled blobs that do this in order to protect their intellectual property.
The Mali GPU that the RK3399 uses is no different from the other vendors, so in order to really use 3D acceleration and support these 3D acceleration libraries you need to get these pre-compiled blob files from Rockchip and use them in place of the software renderers (like in case of OpenGL). Here is libmali. Libmali is those blob libraries from Mali (and Rockchip) that contain the hardware specific code. What it actually does is that exposes the various API functions of the acceleration libraries to the user and internally it converts those API calls to the GPU specific ioctl calls. So there’s some code in there, which is pre-compiled in order to hide the implementation and you just get the binary. In this case, the libmali supports the OpenGL, OpenCL and GBM all in one, at the same time and in order to use it you need to build mesa, add the build files in your rootfs and then replace some Mesa libraries with the libmali blob. In this case, the same blob exports the API functions for multiple different *.so libraries from Mesa (e.g. libEGL, libEGLES, libOpenCL, libgdm and libwayland). Anyway, you don’t really need to get into the details of those things, you just need to remember that the vendor’s blob library file contains the APIs from different libraries in the same binary, whichcan replace all those libs by just create a symbolic link of those libraries to the same blob.
I’ll come back to this with an example later, after I describe how to build the images.
Build the image
The meta layer for the NanoPi-Neo4 is located here:
https://github.com/dimtass/meta-nanopi-neo4
There’s a quite thorough README file in the repo, so please read that first, because I’ll skip this step in here, in order to update only one place regarding the procedure. Pretty much you need to git clone the needed meta layers and then run the script to setup the environment and build the image you want. In this case, I’ll build and test the rk-image-testing for the rk-wayland, so my setup environment command is:
1
MACHINE=nanopi-neo4 DISTRO=rk-wayland source ./setup-environment.sh buil
And to build the image I’ve run:
1
bitbake rk-image-testing
Hopefully, you won’t get any errors. After that step I’ve flashed the image on an SD card and booted Linux.
Now, let’s see something interesting… Remember that I’ve told you that we’ve replaced some mesa libs with the mali blobs? Let’s see that. In your /usr/lib folder you can find the libraries that mesa builds. These are for example:
- /usr/lib/libEGL.so
- /usr/lib/libGLESv1_CM.so
- /usr/lib/libGLESv2.so
- /usr/lib/libOpenCL.so
- /usr/lib/libgbm.so
- /usr/lib/libwayland-egl.so
All these are different libraries that target a different API. But see what happens next.
1
2
3
4
5
6
7
8
9
10
11
12
13
14
root:~# ll /usr/lib/ | grep libMali.so
lrwxrwxrwx  1 root root       10 Mar 23  2019 libEGL.so -> libMali.so*
lrwxrwxrwx  1 root root       10 Mar 23  2019 libEGL.so.1 -> libMali.so*
lrwxrwxrwx  1 root root       10 Mar 23  2019 libGLESv1_CM.so -> libMali.so*
lrwxrwxrwx  1 root root       10 Mar 23  2019 libGLESv1_CM.so.1 -> libMali.so*
lrwxrwxrwx  1 root root       10 Mar 23  2019 libGLESv2.so -> libMali.so*
lrwxrwxrwx  1 root root       10 Mar 23  2019 libGLESv2.so.2 -> libMali.so*
-rwxr-xr-x  1 root root 26306696 Mar 23  2019 libMali.so*
lrwxrwxrwx  1 root root       10 Mar 23  2019 libOpenCL.so -> libMali.so*
lrwxrwxrwx  1 root root       10 Mar 23  2019 libOpenCL.so.1 -> libMali.so*
lrwxrwxrwx  1 root root       10 Mar 23  2019 libgbm.so -> libMali.so*
lrwxrwxrwx  1 root root       10 Mar 23  2019 libgbm.so.1 -> libMali.so*
lrwxrwxrwx  1 root root       10 Mar 23  2019 libwayland-egl.so -> libMali.so*
lrwxrwxrwx  1 root root       10 Mar 23  2019 libwayland-egl.so.1 -> libMali.so*
You see here? All the above libs are a symbolic link to the libMali.so blob that the meta-nanopi-neo4/recipes-graphics/libgles/rockchip-mali_rk.bbappend yocto recipe added into the image. Furthermore, you can list the symbol table (= API calls) that this blob exports and get all the different API functions from all the different acceleration libraries. To do that, run this command:
1
readelf -s /usr/lib/libMali.so
This will return the symbol table of the libMali.so, which is a huge list of API calls. There you will find gl, egl_, gbm_* and cl* calls, all mixed up together in the same libary. So the libMali.so blob is a buffed up library that knows how to handle all these library calls, but the implementation is hidden in the binary blob and it’s specific for that GPU hardware and family.
So to wrap up things, the libMali.so is the super-lib that provides the 3D acceleration APIs (and hides the implementation) and that lib is able to send commands and data to the Mali specific libdrm driver, which provides the connection between the kernel DRM subsystem and the user-space. The result of the libdrm driver a DRI device which is located in /dev/dri
1
2
root:~# ll /dev/dri/card0
crw-rw---- 1 root video 226, 0 Mar 22 20:31 /dev/dri/card0
So, any user-space application that needs to use the GPU, has to open the /dev/dri/card0 device and start sending commands and data. Therefore, if an application uses 3D acceleration, needs to make calls in the renderer API (libMali.so) to create the graphics on a buffer and then send the result to the /dev/dri/card0 using the proper DRM api.
This is how the most important things are connected Linux graphics stack in case of RK3399. Of course, there are a lot of other different implementations in the stack in the various layers and other vendors may have a different approach and APIs. For example, there is the FBdev, Xorg e.t.c. If you like buzzwords, abbreviations and complexity then the Linux graphics stack will be your best friend. If you just want to scratch the surface and be able to do simple stuff like setting up an image that supports 3D acceleration, I think the above things are enough. This provides the minimum knowledge (in my opinion) that you need to setup the graphics for a BSP. You can of course, just copy paste stuff from other implementations and monkey see, monkey do, this will probably also work, but this won’t help you much if something brakes and you need to debug.
One thing that I left out is that from all the above things there’s also another important piece missing and this is the hardware specific DRM driver. Although the DRM is part of the kernel is not really generic, only a part of this driver is generic. Hence Mali has it’s own driver. This driver in the kernel (for Mali and Rockchip) is the midgard_kbase and is located in drivers/gpu/arm/midgard/. In this folder in mali_kbase_core_linux.c file you’ll find the kbase_dt_ids structure which is this one here:
1
2
3
4
5
6
static const struct of_device_id kbase_dt_ids[] = {
    { .compatible = "arm,malit7xx" },
    { .compatible = "arm,mali-midgard" },
    { /* sentinel */ }
};
MODULE_DEVICE_TABLE(of, kbase_dt_ids);
Also in arch/arm64/boot/dts/rockchip/rk3399.dti, which is included from the NanoPi-Neo4 device tree you’ll find this entry here:
1
2
3
4
5
gpu: gpu@ff9a0000 {
    compatible = "arm,malit860",
             "arm,malit86x",
             "arm,malit8xx",
             "arm,mali-midgard";
This means that during the kernel boot when the device-tree is parsed the kernel will find this device-tree entry and will load the proper driver. You can also retrieve the version like this:
1
2
root:~# cat /sys/module/midgard_kbase/version
r18p0-01rel0 (UK version 10.6)
Benchmarks
To test the 3D graphics acceleration I’ve used the glmark2-es2-drm tool. First I’ve run it like that to enjoy the benchmark on the screen.
1
root:~# glmark2-es2-drm
But this will limit the framerate to the vsync and you’ll only get 60fps. In order to test the raw performance of the GPU you need to run the benchmark and render to an off-screen surface with this command:
1
glmark2-es2-drm --off-screen
By running the previous command this is the output that I’m getting.
1
2
3
4
5
6
7
8
9
10
11
12
13
14
15
16
17
18
19
20
21
22
23
24
25
26
27
28
29
30
31
32
33
34
35
36
37
38
39
40
41
42
43
44
45
46
47
48
49
root:~# glmark2-es2-drm --off-screen
=======================================================
    glmark2 2017.07
=======================================================
    OpenGL Information
    GL_VENDOR:     ARM
    GL_RENDERER:   Mali-T860
    GL_VERSION:    OpenGL ES 3.2 v1.r14p0-01rel0-git(966ed26).1adba2a645140567eac3a1adfc8dc25d
=======================================================
[build] use-vbo=false: FPS: 118 FrameTime: 8.475 ms
[build] use-vbo=true: FPS: 134 FrameTime: 7.463 ms
[texture] texture-filter=nearest: FPS: 145 FrameTime: 6.897 ms
[texture] texture-filter=linear: FPS: 144 FrameTime: 6.944 ms
[texture] texture-filter=mipmap: FPS: 143 FrameTime: 6.993 ms
[shading] shading=gouraud: FPS: 122 FrameTime: 8.197 ms
[shading] shading=blinn-phong-inf: FPS: 114 FrameTime: 8.772 ms
[shading] shading=phong: FPS: 101 FrameTime: 9.901 ms
[shading] shading=cel: FPS: 98 FrameTime: 10.204 ms
[bump] bump-render=high-poly: FPS: 90 FrameTime: 11.111 ms
[bump] bump-render=normals: FPS: 125 FrameTime: 8.000 ms
[bump] bump-render=height: FPS: 125 FrameTime: 8.000 ms
libpng warning: iCCP: known incorrect sRGB profile
[effect2d] kernel=0,1,0;1,-4,1;0,1,0;: FPS: 57 FrameTime: 17.544 ms
libpng warning: iCCP: known incorrect sRGB profile
[effect2d] kernel=1,1,1,1,1;1,1,1,1,1;1,1,1,1,1;: FPS: 22 FrameTime: 45.455 ms
[pulsar] light=false:quads=5:texture=false: FPS: 138 FrameTime: 7.246 ms
libpng warning: iCCP: known incorrect sRGB profile
[desktop] blur-radius=5:effect=blur:passes=1:separable=true:windows=4: FPS: 25 FrameTime: 40.000 ms
libpng warning: iCCP: known incorrect sRGB profile
[desktop] effect=shadow:windows=4: FPS: 107 FrameTime: 9.346 ms
[buffer] columns=200:interleave=false:update-dispersion=0.9:update-fraction=0.5:update-method=map: FPS: 35 FrameTime: 28.571 ms
[buffer] columns=200:interleave=false:update-dispersion=0.9:update-fraction=0.5:update-method=subdata: FPS: 35 FrameTime: 28.571 ms
[buffer] columns=200:interleave=true:update-dispersion=0.9:update-fraction=0.5:update-method=map: FPS: 38 FrameTime: 26.316 ms
[ideas] speed=duration: FPS: 68 FrameTime: 14.706 ms
[jellyfish] <default>: FPS: 75 FrameTime: 13.333 ms
[terrain] <default>: FPS: 5 FrameTime: 200.000 ms
[shadow] <default>: FPS: 50 FrameTime: 20.000 ms
[refract] <default>: FPS: 28 FrameTime: 35.714 ms
[conditionals] fragment-steps=0:vertex-steps=0: FPS: 132 FrameTime: 7.576 ms
[conditionals] fragment-steps=5:vertex-steps=0: FPS: 73 FrameTime: 13.699 ms
[conditionals] fragment-steps=0:vertex-steps=5: FPS: 131 FrameTime: 7.634 ms
[function] fragment-complexity=low:fragment-steps=5: FPS: 97 FrameTime: 10.309 ms
[function] fragment-complexity=medium:fragment-steps=5: FPS: 65 FrameTime: 15.385 ms
[loop] fragment-loop=false:fragment-steps=5:vertex-steps=5: FPS: 97 FrameTime: 10.309 ms
[loop] fragment-steps=5:fragment-uniform=false:vertex-steps=5: FPS: 96 FrameTime: 10.417 ms
[loop] fragment-steps=5:fragment-uniform=true:vertex-steps=5: FPS: 71 FrameTime: 14.085 ms
=======================================================
                                  glmark2 Score: 88
=======================================================
The important thing from the above output is that the GL_VENDOR, GL_RENDERER and GL_VERSION are the expected. So the Mali-T860 GPU does the rendering and the version if the OpenGL|ES 3.2 (and the driver version is r14p0). This is great, we have all the greatest and latest stuff (the date that this post is written) and we’re ready to use the 3D hardware acceleration.
This is also a small video with the glmark2 rendering to the LCD screen.
Conclusion
Well, that was an interesting project. It started with just creating a Yocto meta layer for the NanoPi-Neo4 with 3D support. That actually worked quite fast, but then I’ve realized that although I had some background on the Linux graphics stack, I wasn’t sure why it worked and then I’ve realized that it was a bit more complex and start getting deeper. I also got a lot of valuable input from Myy, who was kind to share a lot of insights on the subject and without his explanations it would take me much more time to unravel this.
I hope this Yocto is layer is useful, but also have in mind that is not fully tested and it might not get very frequent updates as I’m also maintaining other stuff in my (much less now) free time.
I promise the next project will be really stupid. I already know what it will be.
Have fun!
Comments powered by Disqus.