Machine Learning on Embedded (Part 4)
Intro
Note: This post is the fourth in the series. Here you can find part 1, part 2, part 3, part 5.
For this post I’ve used the same MNIST model that I’ve trained for TensorFlow Lite for Microcontrollers (tflite-micro) and I’ve implemented the firmware on the 32F746GDISCOVERY by using the ST’s X-CUBE-AI framework. But before dive into this let’s do a recap and repeat some key points from the previous articles.
In part 1, I’ve implemented a naive implementation of a single neuron with 3-inputs and 1-output. Naive means that the inference was just C code, without any accelerations from the hardware. I’ve run those tests on a various different MCUs and it was fun seeing even an arduino nano running this thing. Also I’ve overclocked a few MCUs to see how the frequency increment scales with the inference performance.
In part 2, I’ve implemented another naive implementation of a NN with 3-input, 32-hidden, 1-output. The result was that as expected, which means that as the NN complexity increases the performance drops. Therefore, not all MCUs can provide the performance to run more complex in real-time. The real-time part now is something objective, because real-time can be from a few ns up to several hours depending on the project. That means that if the inference of a deep-er network needs 12 hours to run in your arduino and your data stream is 1 input per 12 hours and 2 minutes, then you’re fine. Anyway, I won’t debate on that I think you know what I mean. But if your input sample is every few ms then you need something faster. Also, in the back of my head was to verify if this simple NN complexity is useful at all and if it can offer something more than lookup tables or algorithms.
In part 3, I was planning to use x-cube-ai from ST, to port a Keras NN and then benchmark the inference, but after the hint I got in the comments from Raukk, I’ve decided to go with the tflite-micro. Tflite-micro at that point seemed very appealing, because it’s a great idea to have a common API between the desktop, the embedded Linux and the MCU worlds. Think about it. It’s really great to be able to share (almost) the same code between those platforms.
Therefore, in this post I’ve implemented the exact same model to do a comparison of the x-cube-ai and tflite-micro. As I’ve mentioned also to the previous posts (and I’m doing this also now), the Machine Learning (ML) on the low embedded (=MCUs) is still a work in progress and there’s a lot of development on the various tools. If you think about it the whole ML is still is changing rapidly for the last years and its introduction to microcontrollers is even more recent. It’s a very hot topic and domain right now. For example, while I was doing the tflite-micro post the repo, it was updated several times; but I had to stop updating and lock to a git version in order to finish the post.
Also, after I’ve finished the post for the x-cube-ai, the same day the new version 4.0.0 released, which pushed back the post release. The new version supports to import tflite models and because I’ve used a Keras model in my first implementation, I had to throw away quite some work that I’ve done… But I couldn’t do otherwise, as now I had the chance to use the exact same tflite model and not the Keras model (the tflite was a port from Keras). Of course, I didn’t expect any differences, but still it’s better to compare the exact same models.
You’ll find all the source code for this project here:
https://github.com/dimtass/stm32f746-x-cube-ai-mnist
So, let’s dive into it.
X-CUBE-AI
ST presents the X-CUBE-AI as an “STM32Cube Expansion Package part of the STM32Cube.AI ecosystem and extending STM32CubeMX capabilities with automatic conversion of pre-trained Neural Network and integration of generated optimized library into the user’s project”. Yeah, I know, fancy words. In plain English that means that it’s just a static library for the STM32 MCUs that uses the cmsis-dsp accelerations and a set of tools that convert various model formats to the format that the library can process. That’s it. And it works really well.
There’s also a very informative video here, that shows the procedure you need to follow in order to create a new x-cube-ai project and that’s the one I’ve also used to create the project in this repo. I believe it’s very straight forward and there’s no reason to explain anything more than that. The only different thing I do always is that I’m just integrating the resulted code from STM32CubeMX to my cmake template.
So the x-cube-ai adds some tools in the CubeMX GUI and you can use them to analyze the model, compress the weight values, and validate the model on both desktop and the target. With x-cube-ai, you can finally create source code for 3 types of projects, which are the SystemPerformance, Validation and ApplicationTemplate. For the first two projects you just compile them, flash and run, so you don’t have to write any code yourself (unless you want to change default behaviour). As you can see on the YouTube link I’ve posted, you can choose the type of project in the Pinout & Configuration tab and then click in the Additional Software. From that list expand the X-CUBE-AI/Application (be careful to select the proper (=latest?) version if you have many) and then in the Selection column, select the type of the project you want to build.
Analyzing the model
I want to mention here that in ST they’ve done a great job on logging and display information for the model. You get many information in CubeMX while preparing your model and you know beforehand the RAM/ROM size with the compression, the complexity, the ROM usage, MACC and also you can derive the complexity by layer. This is an example output I got when I’ve analyzed the MNIST model.
1
2
3
4
5
6
7
8
9
10
11
12
13
14
15
16
17
18
19
20
21
22
23
24
25
26
27
28
29
30
31
32
33
34
35
36
37
38
39
40
41
42
43
44
45
46
47
48
49
50
51
52
53
54
55
56
57
58
59
60
61
62
63
64
65
66
67
68
69
70
71
72
73
74
Analyzingmodel
NeuralNetworkToolsforSTM32v1.0.0(AItoolsv4.0.0)
--Importingmodel
--Importingmodel-done(elapsedtime0.401s)
--Renderingmodel
--Renderingmodel-done(elapsedtime0.156s)

Creatingreportfile/home/dimtass/STM32Cube/Repository/Packs/STMicroelectronics/X-CUBE-AI/4.0.0/Utilities/linux/stm32ai_output/mnistkeras_analyze_report.txt

Exec/reportsummary(analyze0.558serr=0)
------------------------------------------------------------------------------------------------------------------------
modelfile:/rnd/github/machine-learning-for-embedded/code-stm32f746-xcube/mnist.tflite
type:tflite(tflite)
c_name:mnistkeras
compression:4
quantize:None
L2rerror:NOTEVALUATED
workspacedir:/tmp/mxAI_workspace26422621629890969500934879814382
outputdir:/home/dimtass/STM32Cube/Repository/Packs/STMicroelectronics/X-CUBE-AI/4.0.0/Utilities/linux/stm32ai_output

model_name:mnist
model_hash:3be31e1950791ab00299d58cada9dfae
input:input_0(item#=784,size=3.06KiB,fmt=FLOAT32)
input(total):3.06KiB
output:nl_7(item#=10,size=40B,fmt=FLOAT32)
output(total):40B
params#:93,322(364.54KiB)
macc:2,852,598
rom(ro):263,720(257.54KiB)-29.35%
ram(rw):33,664+3,176(32.88KiB+3.10KiB)

------------------------------------------------------------------------------------------------------------------------
idlayer(type)outputshapeparam#connectedtomaccrom
------------------------------------------------------------------------------------------------------------------------
0input_0(Input)(28,28,1)
conv2d_0(Conv2D)(26,26,32)320input_0237,9841,280
nl_0(Nonlinearity)(26,26,32)conv2d_0
------------------------------------------------------------------------------------------------------------------------
1pool_1(Pool)(13,13,32)nl_0
------------------------------------------------------------------------------------------------------------------------
2conv2d_2(Conv2D)(11,11,64)18,496pool_12,244,48073,984
nl_2(Nonlinearity)(11,11,64)conv2d_2
------------------------------------------------------------------------------------------------------------------------
3pool_3(Pool)(5,5,64)nl_2
------------------------------------------------------------------------------------------------------------------------
4conv2d_4(Conv2D)(3,3,64)36,928pool_3332,416147,712
nl_4(Nonlinearity)(3,3,64)conv2d_4
------------------------------------------------------------------------------------------------------------------------
5reshape_5(Reshape)(576,)nl_4
dense_5(Dense)(64,)36,928reshape_536,86438,144(c)
nl_5(Nonlinearity)(64,)dense_564
------------------------------------------------------------------------------------------------------------------------
6dense_6(Dense)(10,)650nl_56402,600
------------------------------------------------------------------------------------------------------------------------
7nl_7(Nonlinearity)(10,)dense_6150
------------------------------------------------------------------------------------------------------------------------
mnistp=93322(364.54KBytes)macc=2852598rom=257.54KBytesram=32.88KBytes-29.35%


Complexitybylayer-macc=2,852,598rom=263,720
------------------------------------------------------------------------------------------------------------------------
idlayer(type)maccrom
------------------------------------------------------------------------------------------------------------------------
0conv2d_0(Conv2D)||||8.3%|0.5%
2conv2d_2(Conv2D)|||||||||||||||||||||||||||||||78.7%||||||||||||||||28.1%
4conv2d_4(Conv2D)|||||11.7%|||||||||||||||||||||||||||||||56.0%
5dense_5(Dense)|1.3%||||||||14.5%
5nl_5(Nonlinearity)|0.0%|0.0%
6dense_6(Dense)|0.0%|1.0%
7nl_7(Nonlinearity)|0.0%|0.0%
------------------------------------------------------------------------------------------------------------------------

UsingTensorFlowbackend.
AnalyzecompleteonAImodel
This is the output that you get by just running the analyze tool on the imported tflite model in CubeMX. Lots of information there, but let’s focus in some really important info. As you can see, you know exactly how much ROM and RAM you need! You couldn’t do that with the tflite-micro. In tflite-micro you need to either calculate this by your own, or you would need to add heap size and try to load the model, if the heap wasn’t enough and the allocator was complaining, then add more heap and repeat. This is not very convenient right? But with x-cube-ai you know exactly how much heap you need at least for the model (and also add more for your app). Great stuff.
Model RAM/ROM usage
So in this case the ROM needed for the model is 263760 bytes. In part 3, that was 375740 bytes (see section 3 in the jupyter notepad. That difference is not because I’ve used quantization, but because of the 4x compression selection I’ve made for the weights in the tool (see in the YouTube video which does the same time=3:21). Therefore, the decrease in the model size in ROM is from that compression. According to the tools that’s -29.35% compared to the original size. In the current project the model binary blob is in the source/src/mnistkeras_data.c file and it’s an C array like the one in the tflite-micro project. The similar file in the tf-lite model was the source/src/inc/model_data.h. Those sizes are without quantization, because I didn’t manage to convert the model to UINT8 as the TFLiteConverter converts the model only to INT8, which is not supported in tflite. I’m still puzzled with that and I can’t figure out why this happening and I couldn’t find any documentation or example how to do that.
Now, let’s go to the RAM usage. With x-cube-ai the RAM needed is only 36840 bytes! In the tflite-micro I needed 151312 bytes (see the table in the Model RAM Usage section here). That’s 4x times less RAM. It’s amazing. The reason for that is that in tflite-micro the micro_allocator expands the layers of the model in the RAM, but in the x-cube-ai that doesn’t happen. From the above report (and from what I’ve seen) it seems that the layers remain in the ROM and it seems that the API only allocates RAM for the needed operations.
As you can imagine those two things (RAM and ROM usage) makes x-cube-ai a much better option even to start with. That makes even possible to run this model in MCUs with less RAM/ROM than the STM32F746, which is considered a buffed MCU. Huge difference in terms of resources.
Framework output project types
As I’ve mentioned previously, with x-cube-ai you can create 3 types of projects (SystemPerformance, Validation, ApplicationTemplate). Let’s see a few more details about those.
Note: for the SystemPerformance and Validation project types, I’ve included the bin files in the extras/folder. You can only flash those on the STM32F746 which comes with the 32F746GDISCOVERY board.
SystemPerformance
As the name clearly implies, you can use this project type in order to benchmark the performance using random inputs. If you think about it, that’s all that I would need for this post. I just need to import the model, build this application and there you go, I have all I need. That’s correct, but… I wanted to do the same that I’ve done in the previous project with tflite-micro and be able to use a comm protocol to upload inputs from hand-drawn digits from the jupyter notebook to the STM32F7, run the inference and get the output back and validate the result. Therefore, although this project type is enough for benchmarking, I still had work to do. But in case you just need to benchmark the MCU running the model inference, just build this. You don’t even have to write a single line of code. This is the serial output when this code runs (this is a loop, but I only post one iteration).
1
2
3
4
5
6
7
8
9
10
Running PerfTest on "mnistkeras" with random inputs (16 iterations)...
................

Results for "mnistkeras", 16 inferences @216MHz/216MHz (complexity: 2852598 MACC)
 duration     : 73.785 ms (average)
 CPU cycles   : 15937636 -1352/+808 (average,-/+)
 CPU Workload : 7%
 cycles/MACC  : 5.58 (average for all layers)
 used stack   : 576 bytes
 used heap    : 0:0 0:0 (req:allocated,req:released) cfg=0
From the above output we can see that @216MHz (default frequency) the inference duration was 73.78 ms (average) and then some other info. Ok, so now let’s push the frequency up a bit @288MHz and see what happens.
1
2
3
4
5
6
7
8
9
10
Running PerfTest on "mnistkeras" with random inputs (16 iterations)...
................

Results for "mnistkeras", 16 inferences @288MHz/288MHz (complexity: 2852598 MACC)
 duration     : 55.339 ms (average)
 CPU cycles   : 15937845 -934/+1145 (average,-/+)
 CPU Workload : 5%
 cycles/MACC  : 5.58 (average for all layers)
 used stack   : 576 bytes
 used heap    : 0:0 0:0 (req:allocated,req:released) cfg=0
55.39 ms! It’s amazing. More about that later.
Validation
The validation project type is the one that you can use if you want to validate your model with different inputs. There is a mode that you can validate on the target with either random or user-defined data. There is a pdf document here, named Getting started with X-CUBE-AI Expansion Package for Artificial Intelligence (AI) and you can find the format of the user input in section 14.2, which is just a csv file with comma separated values.
The default mode, which is the random inputs produces the following output (warning: a lot of text is following).
1
2
3
4
5
6
7
8
9
10
11
12
13
14
15
16
17
18
19
20
21
22
23
24
25
26
27
28
29
30
31
32
33
34
35
36
37
38
39
40
41
42
43
44
45
46
47
48
49
50
51
52
53
54
55
56
57
58
59
60
61
62
63
64
65
66
67
68
69
70
71
72
73
74
75
76
77
78
79
80
81
82
83
84
85
86
87
88
89
90
91
92
93
94
95
96
97
98
99
100
101
102
103
104
105
106
107
108
109
110
111
112
113
114
115
116
117
118
119
120
121
122
123
124
125
126
127
128
129
130
131
132
133
134
135
136
137
138
139
140
141
142
143
144
145
146
147
148
149
150
151
152
153
154
155
156
157
StartingAIvalidationontargetwithrandomdata...
NeuralNetworkToolsforSTM32v1.0.0(AItoolsv4.0.0)
--Importingmodel
--Importingmodel-done(elapsedtime0.403s)
--BuildingX86C-model
--BuildingX86C-model-done(elapsedtime0.519s)
--Settinginputs(andoutputs)data
Usingrandominput,shape=(10,784)
--Settinginputs(andoutputs)data-done(elapsedtime0.691s)
--RunningSTM32C-model

ON-DEVICESTM32execution("mnistkeras",/dev/ttyUSB0,115200)..

<Stm32comid=0x7f8fd8339ef0-CONNECTED(/dev/ttyUSB0/115200)devid=0x449/STM32F74xxxmsg=2.0>
0x449/STM32F74xxx@216MHz/216MHz(FPUispresent)lat=7Core:I$/D$ART:
foundnetwork(s):['mnistkeras']
description:'mnistkeras'(28,28,1)-[7]->(1,1,10)macc=2852598rom=257.54KiBram=32.88KiB
toolsversions:rt=(4,0,0)tool=(4,0,0)/(1,3,0)api=(1,1,0)"FriJul2614:30:062019"

Runningwithinputs=(10,28,28,1)..
.......1/10
.......2/10
.......3/10
.......4/10
.......5/10
.......6/10
.......7/10
.......8/10
.......9/10
.......10/10
RUNStats:batches=10dur=4.912stfx=4.684s6.621KiB/s(wb=30.625KiB,rb=400B)

Resultsfor10inference(s)@216/216MHz(macc:2852598)
duration:78.513ms(average)
CPUcycles:16958877(average)
cycles/MACC:5.95(averageforalllayers)

Inspectorreport(layerbylayer)
n_nodes:7
num_inferences:10

Clayeriddescoshapefmtms
--------------------------------------------------------------------------------
0010011/(MergedConv2d/Pool)(13,13,32)FLOAT3211.289
1210011/(MergedConv2d/Pool)(5,5,64)FLOAT3257.406
2410004/(2DConvolutional)(3,3,64)FLOAT328.768
3510005/(Dense)(1,1,64)FLOAT321.009
4510009/(Nonlinearity)(1,1,64)FLOAT320.006
5610005/(Dense)(1,1,10)FLOAT320.022
6710009/(Nonlinearity)(1,1,10)FLOAT320.015
78.513(total)

--RunningSTM32C-model-done(elapsedtime5.282s)
--Runningoriginalmodel
--Runningoriginalmodel-done(elapsedtime0.100s)

Exec/reportsummary(validate0.000serr=0)
------------------------------------------------------------------------------------------------------------------------
modelfile:/rnd/github/machine-learning-for-embedded/code-stm32f746-xcube/mnist.tflite
type:tflite(tflite)
c_name:mnistkeras
compression:4
quantize:None
L2rerror:2.87924684e-03(expectedtobe<0.01)
workspacedir:/tmp/mxAI_workspace3396387792167015918690437549914931
outputdir:/home/dimtass/.stm32cubemx/stm32ai_output

model_name:mnist
model_hash:3be31e1950791ab00299d58cada9dfae
input:input_0(item#=784,size=3.06KiB,fmt=FLOAT32)
input(total):3.06KiB
output:nl_7(item#=10,size=40B,fmt=FLOAT32)
output(total):40B
params#:93,322(364.54KiB)
macc:2,852,598
rom(ro):263,720(257.54KiB)-29.35%
ram(rw):33,664+3,176(32.88KiB+3.10KiB)

------------------------------------------------------------------------------------------------------------------------
idlayer(type)outputshapeparam#connectedtomaccrom
------------------------------------------------------------------------------------------------------------------------
0input_0(Input)(28,28,1)
conv2d_0(Conv2D)(26,26,32)320input_0237,9841,280
nl_0(Nonlinearity)(26,26,32)conv2d_0
------------------------------------------------------------------------------------------------------------------------
1pool_1(Pool)(13,13,32)nl_0
------------------------------------------------------------------------------------------------------------------------
2conv2d_2(Conv2D)(11,11,64)18,496pool_12,244,48073,984
nl_2(Nonlinearity)(11,11,64)conv2d_2
------------------------------------------------------------------------------------------------------------------------
3pool_3(Pool)(5,5,64)nl_2
------------------------------------------------------------------------------------------------------------------------
4conv2d_4(Conv2D)(3,3,64)36,928pool_3332,416147,712
nl_4(Nonlinearity)(3,3,64)conv2d_4
------------------------------------------------------------------------------------------------------------------------
5reshape_5(Reshape)(576,)nl_4
dense_5(Dense)(64,)36,928reshape_536,86438,144(c)
nl_5(Nonlinearity)(64,)dense_564
------------------------------------------------------------------------------------------------------------------------
6dense_6(Dense)(10,)650nl_56402,600
------------------------------------------------------------------------------------------------------------------------
7nl_7(Nonlinearity)(10,)dense_6150
------------------------------------------------------------------------------------------------------------------------
mnistp=93322(364.54KBytes)macc=2852598rom=257.54KBytesram=32.88KBytes-29.35%


Crossaccuracyreport(referencevsC-model)
----------------------------------------------------------------------------------------------------
NOTE:theoutputofthereferencemodelisusedasgroundtruthvalue

acc=100.00%,rmse=0.0007,mae=0.0003

10classes(10samples)
----------------------------------------------------------
C00.........
C1.0........
C2..2.......
C3...0......
C4....0.....
C5.....1....
C6......0...
C7.......2..
C8........5.
C9.........0

Creating/home/dimtass/.stm32cubemx/stm32ai_output/mnistkeras_val_m_inputs.csv
Creating/home/dimtass/.stm32cubemx/stm32ai_output/mnistkeras_val_c_inputs.csv
Creating/home/dimtass/.stm32cubemx/stm32ai_output/mnistkeras_val_m_outputs.csv
Creating/home/dimtass/.stm32cubemx/stm32ai_output/mnistkeras_val_c_outputs.csv
Creating/home/dimtass/.stm32cubemx/stm32ai_output/mnistkeras_val_io.npz

Evaluationreport(summary)
--------------------------------------------------
Modeaccrmsemae
--------------------------------------------------
X-cross100.0%0.0006720.000304

L2rerror:2.87924684e-03(expectedtobe<0.01)

Creatingreportfile/home/dimtass/.stm32cubemx/stm32ai_output/mnistkeras_validate_report.txt

Complexity/l2rerrorbylayer-macc=2,852,598rom=263,720
------------------------------------------------------------------------------------------------------------------------
idlayer(type)maccroml2rerror
------------------------------------------------------------------------------------------------------------------------
0conv2d_0(Conv2D)|||8.3%|0.5%
2conv2d_2(Conv2D)|||||||||||||||||||||78.7%|||||||||||28.1%
4conv2d_4(Conv2D)|||11.7%|||||||||||||||||||||56.0%
5dense_5(Dense)|1.3%||||||14.5%
5nl_5(Nonlinearity)|0.0%|0.0%
6dense_6(Dense)|0.0%|1.0%
7nl_7(Nonlinearity)|0.0%|0.0%2.87924684e-03*
------------------------------------------------------------------------------------------------------------------------

fatal:notagitrepository(oranyoftheparentdirectories):.git
UsingTensorFlowbackend.
Validationended
I’ve also included a file extras/digit.csv which is the digit 2 (same used in the jupyter notebook) that you can use this to verify the model on the target using the extras/code-stm32f746-xcube-evaluation.bin firmware and CubeMX. You just need to load the digit to the CubeMX input and validate the model on the target. This is part of the output, when validating with that file:
1
2
3
4
5
6
7
8
9
10
11
12
13
14
15
16
17
18
Crossaccuracyreport(referencevsC-model)
----------------------------------------------------------------------------------------------------
NOTE:theoutputofthereferencemodelisusedasgroundtruthvalue

acc=100.00%,rmse=0.0000,mae=0.0000

10classes(1samples)
----------------------------------------------------------
C00.........
C1.0........
C2..1.......
C3...0......
C4....0.....
C5.....0....
C6......0...
C7.......0..
C8........0.
C9.........0
The above output means that the network found the digit 2 with 100% accuracy.
ApplicationTemplate
This is the project you want to build when you develop your own application. In this case CubeMX creates only the necessary code that wraps the x-cube-ai library. These are the app_x-cube-ai.hand app_x-cube-ai.cfiles that are located in the source/srcfolder (and in the inc/ forder in the src). These are just wrappers files around the library and the model. You actually only need to call this function and then you’re ready to run your inference.
1
MX_X_CUBE_AI_Init();
The x-cube-ai static lib
Let’s see a few things about the x-cube-ai library. First and most important, it’s a closed source library, so it’s a proprietary software. You won’t get the code for this, which for people like me is a big negative. I guess that way ST tries to keep the library around their own hardware, which it makes sense; but nevertheless I don’t like it. That means that the only thing you have access are the header files in the source/libs/AI/Inc folder and the static library blob. The only insight you can have in the library is using the elfread tool and extract some information from the blob. I’ve added the output in the extras/elfread_libNetworkRuntime400_CM7_GCC.txt.
From the output I can tell that this was build on a windows machine from the user fauvarqd, lol. Very valuable information. OK seriously now, you can also see the exported calls (which you could see anyways from the header files) and also the name of the object files that are used to build the library. An other trick if you want to get more info is to try to build the project by removing the dsp library. Then the linker will complain that the lib doesn’t find some functions, which means that you can derive some of them. But does it really matter though. No source code, no fun 🙁
I don’t like the fact that I don’t have access in there, but it is what it is, so let’s move on.
Building the project
You can find the C++ cmake project here:
https://github.com/dimtass/stm32f746-x-cube-ai-mnist
In the source/libs folder you’ll find all the necessary libraries which are CMSIS, the STM32F7xx_HAL_Driver, flatbuffers and the x-cube-ai lib. All these are building as static libraries and then the main.cpp app is linked against those static libs. You will find the cmake files for those libs in source/cmake. The README.md file in the repo is quite thorough about the build options and the different builds. To build the code run this command:
1
CLEANBUILD=true ./build.sh
If you want to enable overclocking the you can build like this:
1
CLEANBUILD=true USE_OVERCLOCK=ON ./build.sh
Just be aware to select the value you like for the clock in sources/src/main.cppfile in this line:
1
RCC_OscInitStruct.PLL.PLLN = 288; // Overclock
The default overclocking value is 288MHz, but you can experiment with a higher one (in my case that was the maximum without hard-faults).
Also if you overclock you want to change also the clock dividers on the APB1 and APB2 buses, otherwise the clocks will be too high and you’ll get hard-faults.
1
2
RCC_ClkInitStruct.APB1CLKDivider = RCC_HCLK_DIV4;
RCC_ClkInitStruct.APB2CLKDivider = RCC_HCLK_DIV2;
The build command will build the project in the build-stm32 folder. It’s interesting to see the resulted sizes for all the libs and the binary file. The next array lists the sizes by using the current latest gcc-arm-none-eabi-8-2019-q3-update toolchain from here. By the time you read the article this might already have changed.
| File | Size |
| stm32f7-mnist-x_cube_ai.bin | 339.5 kB |
| libNetworkRuntime400_CM7_GCC.a | 414.4kB |
This is interesting. Let’s see now the differences between the resulted binary and the main AI libs (tflite-micro and x-cube-ai).
| x-cube-ai | tflite-micro | |
|---|---|---|
| binary | 339.5 | 542.7 |
| library | 414.4 | 2867 |
* sizes are in KBs
As you can see from above, both the binary and the library for x-cube-ai are much smaller. Regarding the binary, that’s because the model is smaller as the weights are compressed. Regarding the libs you can’t really say if the size matters are the implementation and the supported layers for tflite-micro are different, but it seems that the x-cube-ai library is much more optimized for this MCU and also it must be more stripped down.
Supported commands in STM32F7 firmware
The code structure of this project in the repo is pretty much the same with the code in the 3rd post. In this case though I’ve only used a single command. I’ll copy-paste the text needed from the previous post.
After you build and flash the firmware on the STM32F7 (read the README.md for more detailed info), you can use a serial port to either send commands via a terminal like cutecom or interact with the jupyter notebook. The firmware supports two UART ports on the STM32F7. In the first case the commands are just ASCII strings, but in the second case it’s a binary flatbuffer schema. You can find the schema in source/schema/schema.fbs if you want to experiment and change stuff. In the firmware code the handing of the received UART commands is done in source/src/main.cpp in function dbg_uart_parser().
The command protocol is plain simple (115200,8,n,1) and its format is:
1
CMD=<ID>
where ID is a number and each number is a different command. So:
CMD=1, runs the inference of the hard-coded hand-drawn digit (see below)
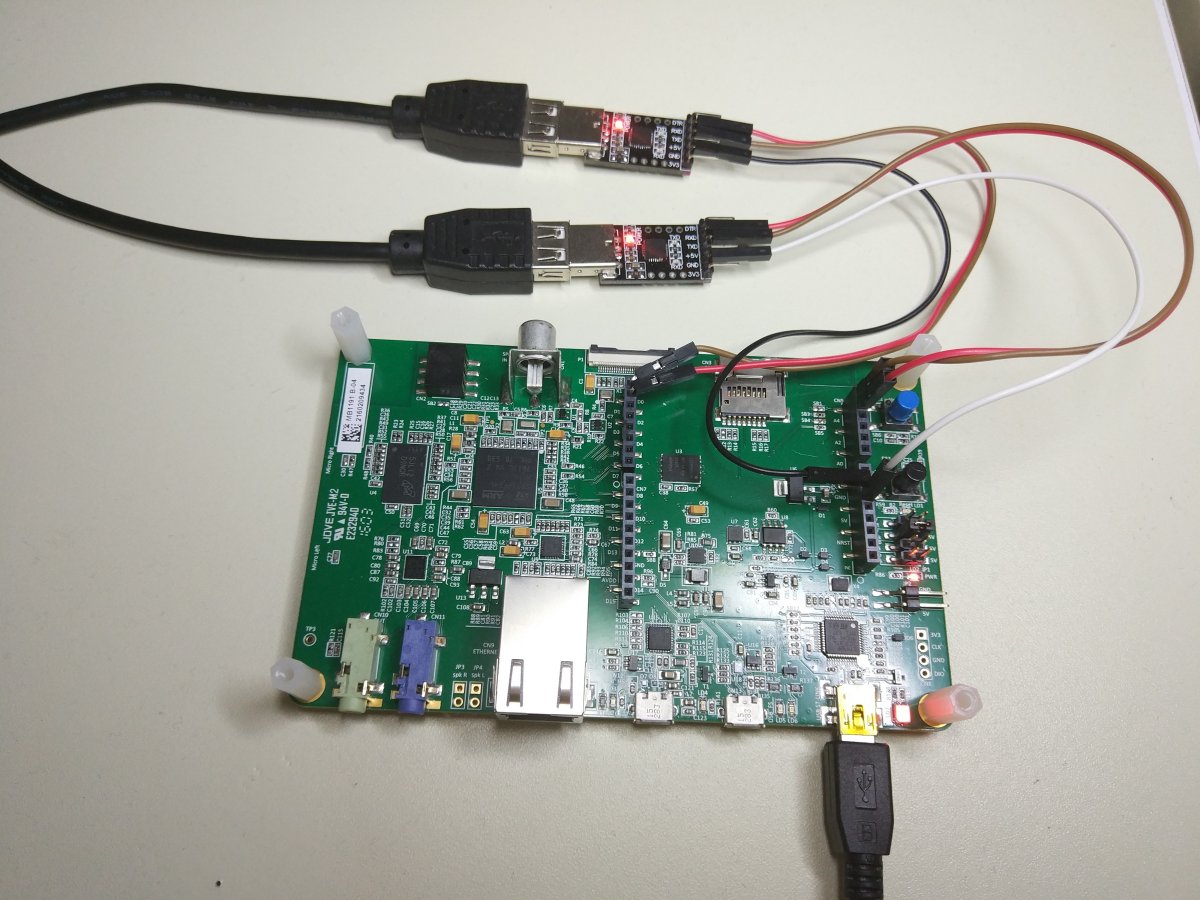
This is how I’ve connected the two UART ports in my case. Also have a look the repo’s README.md file for the exact pins on the connector.
Note: More copy-paste from the previous post is coming, as many things are the same, but I have to add them here for consistency.
Use the Jupyter notebook with STM32F7
In the jupyter notebook here, there’s a description on how to evaluate the model on the STM32F7. There are actually two ways to do that, the first one is to use the digit which is already integrated in the code and the other way is to upload your hand-draw digit to the STM32 for evaluation. In any case this will validate the model and also benchmark the NN. Therefore, all you need to do is to build and upload the firmware, make the proper connections, run the jupyter notebook and follow the steps in 5. Load model and interpreter.
I’ve written two custom Python classes which are used in the notebook. Those classes are located in jupyter_notebook/ folder and each has its own folder.
MnistDigitDraw
The MnistDigitDraw class is using tkinter to create a small window on which you can draw your custom digit using your mouse.
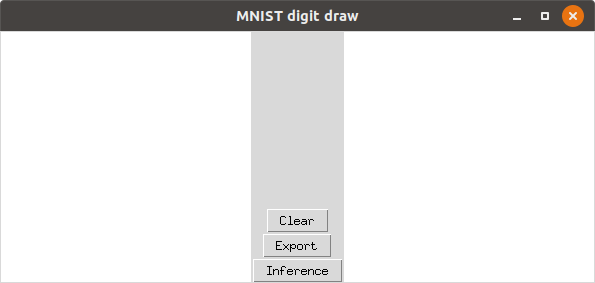
In the left window you can draw your digit by using your mouse. When you’ve done then you can either press the Clear button if you’re not satisfied. If you are then you can press the Inference button which will actually convert the digit to the format that is used for the inference (I know think that this button name in not the best I could use, but anyway). This will also display the converted digit on the right side of the panel. This is an example.

Finally, you need to press the Export button to write the digit into a file, which can be used later in the notepad. Have in mind that jupyter notepad can only execute only one cell at a time. That means that as long as the this window is not terminated then the current cell is running, so you need to first to close the window pressing the [x] button to proceed.
After you export the digit you can validate it in the next cells either in the notepad or the STM32F7.
FbComm
The FbComm class handles the communication between the jupyter notepad and the STM32F7 (or another tool which I’ll explain). The FbComm supports two different communication means. The first is the Serial comms using a serial port and the other is a TCP socket. There is a reason I’ve done this. Normally, the communication of the notepad is using the serial port and send to/receive data from the STM32F7. To develop using this communication is slow as it takes a lot of time to build and flash the firmware on the device every time. Therefore, I’ve written a small C++ tool in jupyter_notebook/FbComm/test_cpp_app/fb_comm_test.cpp. Actually it’s mainlt C code for sockets but wrapped in a C++ file as flatbuffers need C++. Anyway, if you plan on changing stuff in the flatbuffer schema it’s better to use this tool first to validate the protocol and the conversions and when it’s done then just copy-paste the code on the STM32F7 and expect that it should work.
When you switch to the STM32F7 then you can just use the same class but with the proper arguments for using the serial port.
MnistProt
The files in this folder are generated from the flatc compiler, so you shouldn’t change anything in there. If you make any changes in source/schema/schema.fbs, then you need to re-run the flatc compiler to re-create the new files. Have a look in the Flatbuffers section in the README.md file how to do this.
Benchmarking the x-cube-ai
The benchmark procedure was a bit easier with the x-cube-ai compared to the tflite-micro. I’ve just compiled the project w/ and w/o overclocking and run the inference several times from the jupyter notebook. As I’ve mentioned earlier you don’t really have to do that, just use the SystemPerformance project from the CubeMX and just change the frequency, but this is not so cool like uploading your hand-drawn digit, right? Anyway, that’s the table with the results:
| 216 MHz | 288 MHz |
| 76.754 ms | 57.959 ms |
Now let’s do a comparison between the tflite-micro and the x-cube-ai inference run times.
| x-cube-ai (ms) | tflite-micro | (ms) difference | |
|---|---|---|---|
| 216 MHz | 76.754 | 126.31 | 1.64x (48.8%) |
| 288 MHz | 57.959 | 94.957 | 1.64x (48.4%) |
Mistakenly I’ve initially calculated this difference to be 170%, because I’ve build the tflite firmware with the DEBUG flag on and I thought that it really huge. After fixing this, I’ve measured a difference of ~48% which is still significant difference, but it might be acceptable depending the application (or not).
You might noticed that the inference time is a bit higher now compared to the SystemPerformance project binary. I only assume that this is because in the benchmark the outputs are not populated and they are dropped. I’m not sure about this, but it’s my guess as this seems to be a consistent behaviour. Anyway, the difference is 2-3 ms, so I’ll skip ruin my day thinking more about this as the results of my project are actually a bit faster than the default validation project.
Evaluating on the STM32F7
This is an example image of the digit I’ve drawn. The format is the standard grayscale 28x28 px image. That’s an uint8 grayscale image [0, 255], but it’s normalized to a [0, 1] float, as the network input and output is float32.
https://www.stupid-projects.com/wp-content/uploads/2019/07/mnist_x-cube-ai_digit.png 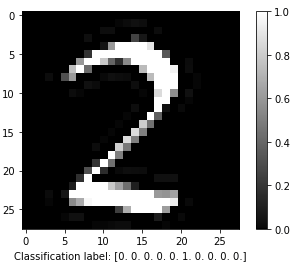
After running the inference on the target we get back this result on the jupyter notebook.
1
2
3
4
5
6
7
8
9
10
11
12
13
14
15
16
Comm initialized
Num of elements: 784
Sending image data
Receive results...
Command: 2
Execution time: 76.754265 msec
Out[9]: 0.000000
Out[8]: 0.000000
Out[7]: 0.000000
Out[6]: 0.000000
Out[5]: 0.000000
Out[4]: 0.000000
Out[3]: 0.000000
Out[2]: 1.000000
Out[1]: 0.000000
Out[0]: 0.000000
The output predicts that the input is number 2 and it’s 100% certain about it. Cool.
Things I liked and didn’t liked about x-cube-ai
From the things that you’ve read above you can pretty much conclude by yourself about the pros of the x-cube-ai, which actually make almost all the cons to seem less important, but I’ll list them anyways. This is not yet a comparison with tflite-micro.
pros:
- It’s lightning fast. The performance of this library is amazing.
- It’s very light and doesn’t use a lot of resources and the result binary is small.
- The tool in the CubeMX is able to compress the weights.
- The x-cube-ai tool is integrated nicely in the CubeMX interface, although it could be better.
- Great analysis reports that helps you make decisions for which MCU you need to use and optimizations before even start coding (regarding ROM and RAM usage).
- Supports importing models from Keras, tflite, Lasagne, Caffe and ConvNetJS. So, you are not limited in one tool and also Keras support is really nice.
- You can build and test the performance and validate your NN without having to write a single line of code. Just import your model and build the SystemPerformance or Validation application and you’re done.
- When you write your own application based on the template then you actually only have to use two functions, one to init the network and a function to run your inference. That’s it.
cons:
- It’s a proprietary library! No source code available. That’s a big, big problem for many reasons. I never had a good experience with closed source libraries, because when you hit a bug, then you’re f*cked. You can’t debug and solve this by yourself and you need to file a report for the bug and then wait. And you might wait forever!
- ST support quite sucks if you’re an individual developer or a really small company. There is a forum, which is based on other developers help, but most of the times you might not get an answer. Sometimes, you see answers from ST stuff, but expect that this won’t happen most of the times. If you’re a big player and you have support from component vendors like Arrow e.t.c. then you can expect all the help you need.
- Lack of documentation. There’s only a pdf document here (UM2526). This has a lot of information, but there are still a lot of information missing. Tbh, after I searched in the x-cube-ai folders which are installed in the CubeMX, I’ve found more info and tools, but there’s no mention about those anywhere! I really didn’t like that. OK, now I know, so if you’re also desperate then in your Linux box, have a look at this path: ~/STM32Cube/Repository/Packs/STMicroelectronics/X-CUBE-AI/4.0.0/Documentation. That’s for the
4.0.0version, so in our case it might be different.
TFLite-micro vs x-cube-ai
Disclaimer: I have nothing to do with ST and I’ve never even got a free sample from them. I had to do this, for what is following…
As you can see the x-cube-ai’s has more pros than cons are more cons compare to the tflite-micro. Tbh, I’ve also enjoyed more working with the x-cube-ai rather the tflite-micro as it was much easier. The only thing from the x-cube-ai that leaves a bitter taste is that it’s a proprietary software. I can’t stress out how much I don’t like this and all the problems that brings along. For example, let’s assume that tomorrow ST decides to pull off the plug from this project, boom, everything is gone. That doesn’t sound very nice when you’re planning for a long commitment to an API or tool. I quite insist on this, because the last 15-16 years I’ve seen this many times in my professional career and you don’t want this to happen to your released product. Of course, if the API serves you well for your current running project and you don’t plan on changing something critical then it’s fine, go for it. But, I really like the fact that tflite-micro is open.
I’m a bit puzzled about tflite. At the this point, the only reason I can think of using tflite-micro over x-cube-ai, is if you want to port your code from a tflite project which already runs on your application CPU (and Linux) to an MCU to test and prototype and decide if it worth switching to an MCU as a cheaper solution. Of course, the impact of tflite in the performance is something that needs consideration and currently there’s no rule of thumb of how much slower is compared to other APIs and on specific hardware. For example in the STM32F7 case (and for the specific model) is 1.64x times slower, but this figure might be different for another MCU. Anyway, you must be aware of these limitations, know what to really expect from tflite-micro and how much room you have for performance enhancement.
There is another nice thing about tflite-micro thought. Because it’s open source you can branch the git repo and then spend time to optimise the code for your specific hardware. Definitely the performance will be much, much better; but I can’t really say how much as it depends on so many things. Have in mind that also tflite-micro is written in C++ and some of its hocus pocus may have negative impact in the performance. But at least it remains a good alternative option for prototyping, experimentation and develop to its core. And that’s the best thing with open source code.
Finally, x-cube-ai limits your options to the STM32 series. Don’t get me wrong this MCU series is great and I use stm32 for many of my projects, but it’s always nice to have an alternative.
Conclusions
The x-cube-ai is fast. It’s also easy to use and develop on it, it has those ready-to-build apps and the template to build your project, everything is in an all-in-one solution (CubeMX). But on the other hand is a black box and don’t expect much support if you’re not a big player.
ST was very active the last year. I also liked the STM32-MP1 SBC they released with Yocto support from day one and mainline kernel support. They are very active and serious. Although I still consider the whole HAL Driver library a bloated library (which it is, as I’ve proven that in previous stupid-projects). I didn’t had any issues; but I’ve also didn’t write much code for these last two projects (I had serious issues when I’ve tried a few years ago).
Generally, the code is focused around the NN libs performance and not the MCU peripheral library performance, but still you need to consider those things when you evaluating platforms to start a new project.
From a brief in the source code though, it seems that you can use the x-cube-ai library without the HAL library, but you would need to port some bits to the LL library to use it with that one. Anyway, that’s me; I guess most people are happy with HAL, so…
In my next post, I will use a jetson-nano to run the same inference using tflite (not micro) and an ESP8266 that will use a REST-API. Also TensorRT, seems nice. I may also try this for the next post, will see.
Update: Next post is available here.
Have fun!
Comments powered by Disqus.