Machine Learning on Embedded (Part 3)
Intro
Note: This post is the part 3 in the series. Here you can find part 1, part 2, part 4 and part 5.
Edit (24.07.2019): I’ve done a stupid mistake and I haven’t used the hard float acceleration of the FPU on the STM32F7. This explains the terrible performance I had. But still with the FPU enabled although the NN is now 3x times faster, it’s still much much slower compared to the x-cube-ai implementation from ST (~13x slower).
Edit (19.04.2020): I’ve found out that the code was build with DEBUG on, thus the large time in running the inference. I’ve updated the tables and conclusions based on the new times.
In the previous post (part 1 and part 2), I’ve done a benchmark of very two simple NN on various different MCUs. That was a naive implementation of a 2-input, 1-output and a 2-input,32-hidden,1-output layers. Of course, as you can imagine this is hardly useful to do anything useful in the ML domain, but it works fine for benchmarking. My plan next was to run a more complicated NN to the STM32F746 MCU. To do that I was about to use the X-CUBE-AI and I’ve started to work on it, but during the process I got fed up with the implementation and the lack of information around the API and some bits and tools that are although there’s a reference on them, they’re nowhere available. I’ve also asked in their forum, but ST forums are not the place to get answers as the company doesn’t provide any help. Only other users do, but the concept is quite new and there are no many users to provide answers. Btw, this is my unanswered post in the ST community forums.
As I’ve mentioned also to the previous post, this domain is quite hot right now. There is a lot of development and many things are changing rapidly, which makes things that I’ve written 1 week ago, to be now obsolete. For example, a few hours ago the new 4.0.0 version of X-CUBE-AI was released, which supports a few things that are now very interesting to test and to benchmarks and comparisons. Anyway, I’ll get to that later.
You’ll find all the source code an files used for this project here:
https://github.com/dimtass/stm32f746-tflite-micro-mnist
So, let’s step into it…
TensorFlow Lite for microcontrollers
In the first post, I had a very interesting chat in the comments sections with Raukk, who provided several suggestions (you can see the comments at the end of part 1 post). At some point he suggest to have a look at the TensorFlow-Lite API for microcontrollers and then after reading the online documentation, I thought that this is what I need. I thought that this would make things easier. Normally, I would provide my findings in the end of the post, but I’ll do a spoiler. Well, it doesn’t! In the current state (unless if I’m doing something so terrible wrong!), the tflite micro API sucks in so many ways, but the most important is the very low performance performance. During the rest of the post I’ll elaborate on my findings.
TensorFlow (TF or tf) has a subset API, which is the TensorFlow Lite (tflite). As the name implies, this is a lighter version of the main API. The idea for this is that small application CPUs (like ARM) to be able to run tf models with less dependencies, low latency and smaller size, which is great for medium/large embedded devices. Note that I’m referring to application CPUs and not MCUs. That seems to be working quite well for small Linux SBCs and also Andoid devices. Especially for the Android there’s support for the NNAPI, but by the time this post is written there are also quite a few issues with various platforms. It’s still like a beta thing.
Anyway, at the same time, tensorflow tries to support even smaller CPUs from the MCU domain. TensorFlow Lite for Microcontrollers (tflite-micro) is an experimental subset of the the tflite that meant to be a baremetal portable API. Portable, of course, means that although the API is baremetal and can be compiled virtually for any MCU, still there are parts like the HW acceleration that needs to be ported depending the architecture. For example, Cortex-M4 and M7 have DSP accelerators (there’s also a new NN library in CMSIS) that can be used to improve the performance. At the same time, tflite also provides other optimizations like quantization that can improve the performance on MCUs that don’t have HW accelerators. As we’ll see next though, because this API is very premature not all of those things are really working out of the box and there are still several bugs.
Nevertheless, this stupid project was quite fan, too; because I’ve put together a jupyter notepad that trains a MNIST model with TF, which then you can convert to tflite and upload it to the STM32F7. You can also use the notepad to hand-draw your own digit and test it with both the notepad and the STM32F7. So the notepad can communicate with the STM32F7 and run inferences, cool stuff.
Therefore, this post will be limited only around TF-Lite for microcontrollers and the next post will be about the new X-CUBE-AI API.
Have in mind that this subset is still new and work in progress. I think it was quite a mistake to dive in it so early, but I had to, as the x-cube-ai initially didn’t met my expectations and I needed to proceed with my work on port a keras model in a MCU. For that reason, I’ve decided to get deeper in tflite-micro as I think it will be also the future API that it will dominate the market (at least in the near future).
Also I’ve spend a few days to make tflite-micro to work in the way I wanted to and it was quite challenging and in the end I was completely disappointed by the procedure and the time that it needs to set it up for use. The reason is that the API is a bit chaotic and under heavy development, but I’ll list in more detail the issues I had later in the post.
Training the MNIST TF model
First you need to train your model. Since I’m not an expert on the domain I’ve chosen to port another Keras model from here to tflite. The procedure was easy and very straight forward, as Keras structure seems to be almost similar to TF. The resulted model is here, so you can compare the two models:
MNIST for TensorFlow-Lite notepad
It’s better if you git clone the repo and open the notepad locally, so you can run the steps if you like. Of course, you definitely need to clone it locally in order to test the code with the STM32F7. In the notepad I’ve tried to put things in a way that makes sense, so first in section 1 I’m creating the model using TF and then I’m doing the training and evaluation. For this project the model in general and also accuracy doesn’t really matter as I want to focus on the model transfer to the STM32F7 and then benchmark the tflite-micro API. So I’ll deal with the low level technical stuff and not how to create the perfect model.
Convert Keras model for use in embedded
After I’ve trained the model, in section 2. This library is actually the coolest thing in tflite that actually works quite well. I’ve also added a script in jupyter_notebook/export-to-tflite.py which does the same thing and you can run it from the repo source path.
Converting the model to tflite was the first major issue I had and I’ve only managed to solve it partially. The problem is that by default all the model weights are float32 numbers, which means two things. First the model size is big as every float32 is 4 bytes and it takes a lot of flash and RAM. Second the execution will be slower compared to UINT8 numbers that tflite is supposed to support. Have a look at this snippet from the notebook:
1
2
3
4
5
6
tflite_mnist_model = 'mnist.tflite'
converter = tf.lite.TFLiteConverter.from_keras_model_file('mnist_keras.h5')
# converter.optimizations = [tf.lite.Optimize.OPTIMIZE_FOR_SIZE]
# converter.optimizations = [tf.lite.Optimize.DEFAULT]
tflite_model = converter.convert()
flatbuffer_size = open(tflite_mnist_model, "wb").write(tflite_model)
There are two lines which are commented out. The important line is the tf.lite.Optimize.OPTIMIZE_FOR_SIZE. This according to the RTFM, will post-quantize the model and reduce the size of weights from 32bits to 8. That’s a 4x times reduction in size. That works fine when converting the model, but it doesn’t work when the model is running on the MCU. If you try to build the code with the OPTIMIZE_FOR_SIZE, then when the model is loaded in the MCU, you’ll get this error:
1
Only float32, int16, int32, int64, uint8, bool, complex64 supported currently.
This error comes from the source/libs/tensorflow/lite/experimental/micro/simple_tensor_allocator.cc which is allocating RAM for each layer and it seems like the converter tools converts some weights in int8 values instead of uint8 and int8 is not supported. At least not yet. Therefore, although quantization seems like a great feature,it just don’t work with the tflite-micro API! The same also stands for the OPTIMIZED_UINT8 option. I’ve also seen another person complaining about this, so we’re either the only ones that tried it or we do the same mistake somewhere in the process.
Anyway, I’ll do a comparison at least of the resulted converted sizes, as I hope in the future this will be fixed. But for now keep in mind that you can only use float32 for all the weights. As I’ve mentioned earlier, this may change even in a few hours or it may take more, who knows.
Even if you use quantization then although there’s a significant compression in the model size, still the size is quite large for most of the small embedded devices. that don’t have enough flash. Post-quantization, though, has large impact in the model size as you’ll see in the next table. Post-quantization means that the quantization happens after training the model, but you can also use quantization during the training (according to the RFTM). Also, there are different types of quantization but let’s have a look in the following table.
| Size (bytes) | Ratio | Saving % | |
|---|---|---|---|
| Original file | 780504 | – | – |
| No quantization | 375740 | 2 | 51.8 |
| OPTIMIZE_FOR_SIZE | 99344 | 7.85 | 87.27 |
| OPTIMIZED_UINT8 | 97424 | 8.01 | 87.51 |
From the above table it seems that the OPTIMIZE_FOR_SIZE or OPTIMIZED_UINT8, make a huge difference compared to no quantization, but doesn’t make any real difference in the produced size between them. Have in mind that if you want to use the OPTIMIZED_UINT8 flag, then you also need make your model quantization aware by adding this before you compile and fit your model. According to the RTFM this is how is done.
1
2
3
4
5
import tensorflow as tf
# Quantization aware training
sess = tf.keras.backend.get_session()
tf.contrib.quantize.create_training_graph(sess.graph)
sess.run(tf.global_variables_initializer())
Finally, if you want to convert those models by your self using the script then these are the commands.
1
2
3
4
5
6
7
8
# Convert keras the keras model to tflite
python3 export-to-tflite.py mnist.h5

# Convert keras the keras model to tflite and optimize with OPTIMIZE_FOR_SIZE
python3 export-to-tflite.py mnist.h5 size

# Convert keras the keras model to tflite and optimize with QUANTIZED_UINT8
python3 export-to-tflite.py mnist.h5 uint8
For this time being, forget about quantization, so you should convert your model to tflite without any optimization. Now that you have your model converted from TF to tflite there’s another step. Now you need to convert this to a C array. To do that you can run the following command:
1
xxd -i jupyter_notebook/mnist.tflite > source/src/inc/model_data.h
This will create a C header file and it will place it (and override any file) in the source code. Here is what you’ll find inside the file:
1
2
3
4
5
6
unsigned char jupyter_notebook_mnist_tflite[] = {
  0x1c, 0x00, 0x00, 0x00, 0x54, 0x46, 0x4c, 0x33, 0x00, 0x00, 0x00, 0x00,
  ...
  ...
};
unsigned int jupyter_notebook_mnist_tflite_len = 375740;
This is the mnist.tflite converted to bytes. Don’t forget that the mnist.tflite is a flatbuffer container. That means that the C++ structured model is serialized into this flatbuffer model in order to be transferred to another platform or architecture. Therefore this C array, will be deserialized at running time. Also note that this array normally it would get in the heap area, but you don’t want to do that. The non-optimized model size is 367KBs which is more than the available RAM on the STM32F747NG. Therefore, you need to force the compiler to store this array in flash, which means that you need to change your table to const like this:
1
2
3
const unsigned char jupyter_notebook_mnist_tflite[] = {
...
};
That’s it! Now you have your model and weights flattened and be ready to use with the tflite API in your microcontroller. As it’s already mentioned in the online documentation here, only a subset of operations are currently supported but the API is flexible to extend or build with more options if you like.
Porting TF-Lite micro to STM32F7 and CMAKE
TF-Lite for microcontrollers doesn’t support cmake. Instead there are some makefiles in the github repo that build specific examples to test. Although, that this may seems ok, it’s not as it’s very hard to re-use those makefiles to make your own projects as they are done in a way that you need to develop your application inside the repo. My preference in general is to keep things simple and separated, this is why I generally prefer cmake. The problem with cmake is that you can achieve the same thing in many different ways and sometimes you may end up with builds that work, but they are also very complicated. Of course, as the project complexity grows cmake also becomes a bit more ugly, but anyway I believe that it’s far easier to maintain and scale and most importantly I always have my STM32 template projects in cmake. Therefore, I had to make tflite-micro to be built with cmake. That task took a while, as the makefile project does some magic in the background like downloading other repos that are not in the source code (e.g. flatbuffers and gemmlowp).
In the end I’ve managed to do so, but the problem is that it’s not easy to update it. The reason is that the header file includes have relative paths to the main repo’s top folder, which is not the tflite folder but the TF API’s folder. For that reason, I had to sed all the source files that includes header files.
Things I liked and didn’t liked about TF-Lite micro
I prefer to write this section here, before the benchmark, because it’s a negative feedback and I prefer to keep the end of the post focused on the results. The whole procedure, was a bit pain and I’m not satisfied with the outcome… I believe (or better, I hope) that in the future the tflite micro API will get better and more easy to use. I mean I expect more from Google. I had several problems when it came to the point to use it, which I will try to address next. Keep in mind that the time this article is written the version of tensorflow is 1.14.0-718503b075d, so in case the post is not updated many things may have changed when you read this.
Pros:
- The renode.io thingy which is used for the automated tests is very interesting! I didn’t know that such thing existed and it seems very promising for future use. You can use it to emulate HW and run your built binaries on it and integrate automated tests to your current CI infrastructure.
- The idea of having a common API that runs on every platform and architecture is really interesting and this is the main reason that I hope that this API gets better. that means that you can (almost) just copy-paste your code from your Jetson nano or RPi and compile it on the STM32F7. That’s really awesome.
- It has Google’s support. Some of you might think why that’s a pro? I think it is because it means that it will get more development effort, but of course that doesn’t mean that the result will be optimal. Only time will show.
Cons:
- Documentation is currently horrible. It’s very difficult to do even simple things, because of that reason. The only way sometimes to really understand what’s going on is to read the source code. You may think that this expected with most APIs, but this API is huge and that takes much more time! A better documentation will definitely help.
- It seems that you can achieve the same thing with many different ways as there are quite a few duplicate implementations. So, when you’re looking for examples you may see completely different API calls that do the same thing. That makes it very difficult to plan your workflow, especially when you’re getting started with TF. I’ve read some people that say that this is a nice feature of the API. No it’s not. An API should be clean and simple to use.
- It’s very slow… Much, much, much slower compared to x-cube-ai. Have in mind that I’ve only managed to benchmark float and not quantized uint8 numbers. But my current rough estimation that tf-lite micro is approx. 38x times slower to run the same inference compared to X-CUBE-AI. That’s a really big number there…
- There are some examples for different microcontrollers, but the build system is a bit bloated and I find it a bit over-engineered and difficult to be able to build your own code.
- The build system is based on the make build automation tool, which I guess is ok, but it was really difficult for me to port to cmake, because the build scripts download other stuff in the background and there are many different pieces of code all over the place. Not that cmake makes things much more better, but anyway…
- Because there are so many different pieces all over the place, the code doesn’t make much sense. While trying to port the build in cmake I’ve realized that it’s a spaghetti of files. The problem is that micro-tflite is subset of tflite which is subset of tensorflow. But all those things are not distinct. At some point it would be nice if the micro tflite was a separate github repo.
- There’s a list of supported platforms here. The problem with that list is that although the example for the stm32f103 (bluepill) is in the github repo and you just call make to build it. But for the stm32f746 you need to download some tarball project files that contain the source files including some unknown tflite version. The problem is that those files are already outdated! Also, why use keil project files in those tarballs? It’s a bit mess…
- Regarding the project files for the stm32f746, that I’ve mention in the previous point, why use Keil? I didn’t expect from Google to enforce the usage of this IDE, because it’s only for Windows and also it doesn’t make any sense to use Keil when so many better and FOSS alternatives exist. Again, my personal opinion is that cmake would make more sense, especially for embedded.
- The tflite-micro code is in C++11. Many will think,
OK, so what?. The problem actually is that most of the low embedded engineers are not familiar with that language. Of course, you can overcome this by just learn it and to be fair the API is relative easy and not much C++11 hocus-pocus is used. My main concern regarding C++ though is that it’s not easy for every microcontroller to setup a C++ project to build. For example for the STM32, the CubeMX tool that is used to setup a project, doesn’t support to create C++ projects from templates. Therefore, you need to spend time to do it by yourself. For that reason, for example, I have my own cmake C++ template, but as I’ve said porting the tflite-micro to cmake was an adventure. - Porting from the tflite build system to cmake isn’t sustainable in the long term. The reason is that there’s a lot of work need to be done. For example, all the header includes have hardcoded paths, which for cmake is not convenient and in my case I had to remove all those hardcoded paths.
- Another annoying issue is that the size optimizations when converting a h5 model to tflite, seems to be incompatible with the tflite-micro. Others also complain for this issue. In the end only the non-optimize model is able to be used, but I guess it’s just a matter of time for that to be fixed.
I know that the cons list is much longer, but the main advantage is the unified API across all those different platforms and architectures. Currently the performance really sucks, but if this gets better then imho TF will become the de-facto tool.
Building the project
You can find the C++ cmake project here:
https://github.com/dimtass/stm32f746-tflite-micro-mnist
In the source/libs folder you’ll find all the necessary libraries which are CMSIS, the STM32F7xx_HAL_Driver, flatbuffers, gemmlowp and tensorflow. All these are building as static libraries and then the main.cpp app is linked against those static libs. You will find the cmake files for those libs in source/cmake. The README.md file in the repo is quite thorough about the build options and the different build, but here I’ll focus only on the accelerated build which is uses the CMSIS-NN API for the STM32F7. To build with this option then run this command:
1
CLEANBUILD=true USE_HAL_DRIVER=ON USE_CORTEX_NN=ON SRC=src ./build.sh
This will build the project in the build-stm32 folder. It’s interesting to see the resulted sizes for all the libs and the binary file. The next array lists the sizes by using the current latest gcc-arm-none-eabi-8-2019-q3-update toolchain from here. By the time you read the article this might already have changed.
| File | Size |
|---|---|
| stm32f7-mnist-tflite.bin | 542.7 kB |
| libSTM32F7_DSP_Lib.a | 5.1 MB |
| libSTM32F7_NN_Lib.a | 598.8 kB |
| libSTM32F7xx_HAL_Driver.a | 814.9 kB |
| libTensorflow_lite_micro.a | 2.8 MB |
Normally you would wonder why do you care about the size of the static libs if only the binary size matters and that’s a good point. But it does it matter because the RTFM of the the tflite-micro mentions that this lib is ~300KB. After testing this the only way to achieve this size is to build a dynamic lib and then strip it and then it gets around 300KB. But this was not mentioned in the RTFM, so let’s say this what they wanted to write in the first place. Btw, you can strip any of the above libs by running this:
1
arm-none-eabi-strip -s libname.a
BUT, you can’t strip static linked libraries because there will not be any symbols left to build against :p . Anyway, so have in mind that the claimed size is only for dynamic linked libs, which of course it doesn’t really matter for MCUs.
Finally, as you can see the binary size is ~half Megabyte in size. This is huge for a MCU. Most of this size comes from the source/src/inc/model_data.h file which is the flatbuffer model of the NN which is already ~340 KB. The binary size with the model after the conversion with the quantization optimizations would be 266 kB, but as I’ve said this won’t work with the tflite-micro API.
Model RAM usage
This table shows the RAM usage per layer when the flatten flatbuffer model is expanded to memory.
| Layer | Size in bytes |
|---|---|
| conv2d_7_input | 3136 |
| dense_4/Softmax | 40 |
| dense_4/BiasAdd | 40 |
| dense_3/Relu | 256 |
| conv2d_9/Relu | 2304 |
| max_pooling2d_6/MaxPool | 6400 |
| conv2d_8/Relu | 30976 |
| max_pooling2d_5/MaxPool | 21632 |
| conv2d_7/Relu | 86528 |
| = 151312 |
Therefore, you see that for this model more that 151KB of RAM are needed. The STM32F746 I’m using has 320KB or RAM which are enough for this model, but still 151KB are quite a lot of RAM for embedded, so you need to keep in mind such limitations!
Supported commands in STM32F7 firmware
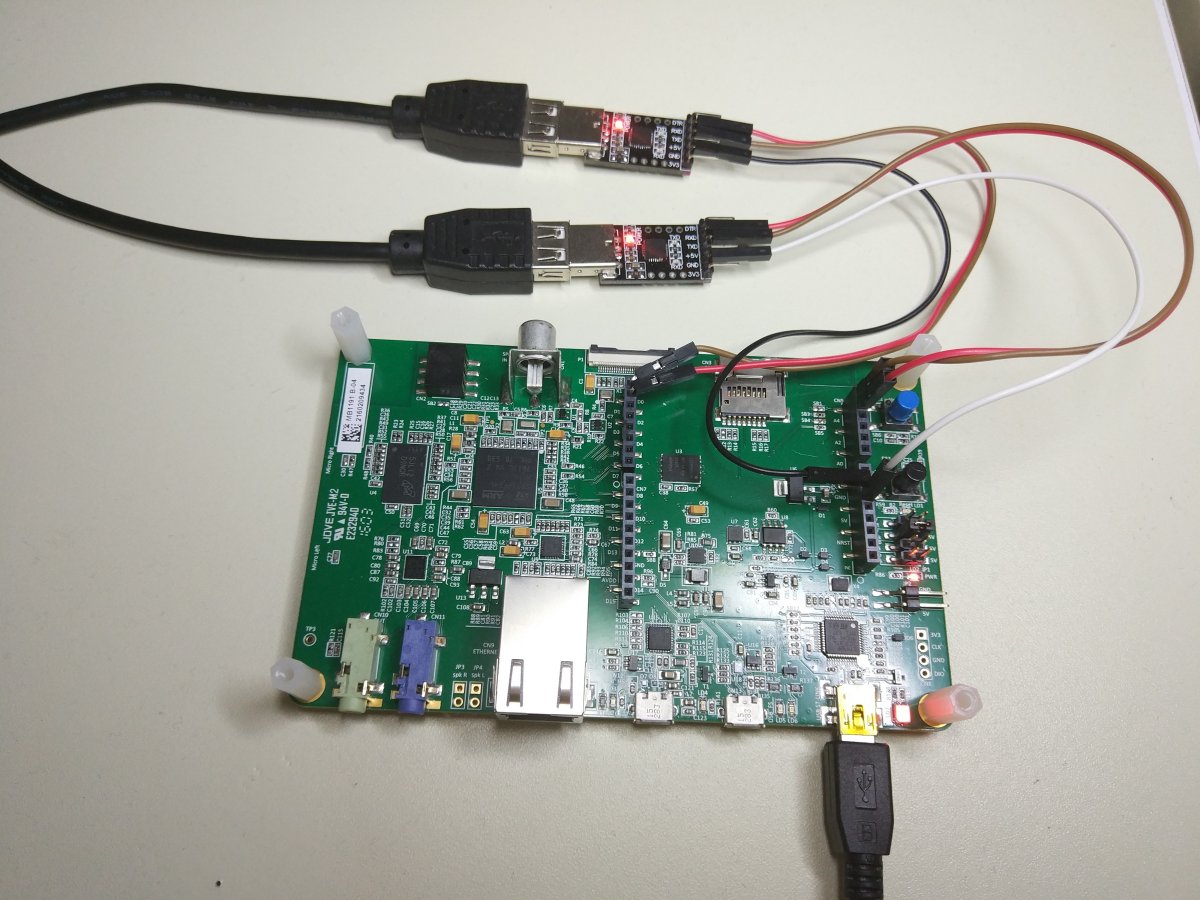
After you build and flash the firmware on the STM32F7 (read the README.md for more detailed info), you can use a serial port to either send commands via a terminal like cutecom or interact with the jupyter notebook. The firmware supports two UART ports on the STM32F7. In the first case the commands are just ASCII strings, but in the second case it’s a binary flatbuffer schema. You can find the schema in source/schema/schema.fbs if you want to experiment and change stuff. In the firmware code the handing of the received UART commands is done in source/src/main.cpp in function dbg_uart_parser().
The command protocol is plain simple (115200,8,n,1) and its format is:
1
CMD=<ID>
where ID is a number and each number is a different command. So:
CMD=1, prints the model viewCMD=2, runs the inference of the hard-coded hand-drawn digit (see below)
This is how I’ve connected the two UART ports in my case. Also have a look the repo’s README.md file for the exact pins on the connector.
Use the Jupyter notebook with STM32F7
In the jupyter notebook here, there’s a description on how to evaluate the model on the STM32F7. There are actually two ways to do that, the first one is to use the digit which is already integrated in the code and the other way is to upload your hand-draw digit to the STM32 for evaluation. In any case this will validate the model and also benchmark the NN. Therefore, all you need to do is to build and upload the firmware, make the proper connections, run the jupyter notebook and follow the steps in 5. Load model and interpreter.
I’ve written two custom Python classes which are used in the notebook. Those classes are located in jupyter_notebook/ folder and each has its own folder.
MnistDigitDraw
The MnistDigitDraw class is using tkinter to create a small window on which you can draw your custom digit using your mouse.
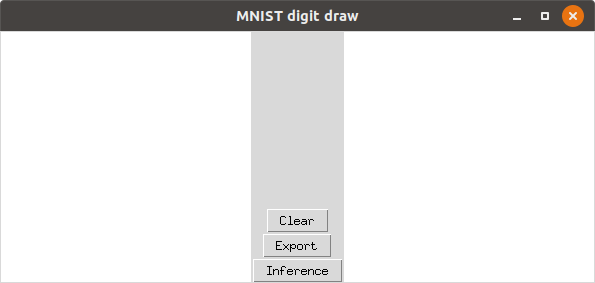
In the left window you can draw your digit by using your mouse. When you’ve done then you can either press the Clearbutton if you’re not satisfied. If you are then you can press the Inferencebutton which will actually convert the digit to the format that is used for the inference (I know think that this button name in not the best I could use, but anyway). This will also display the converted digit on the right side of the panel. This is an example.

Finally, you need to press the Export button to write the digit into a file, which can be used later in the notepad. Have in mind that jupyter notepad can only execute only one cell at a time. That means that as long as the this window is not terminated then the current cell is running, so you need to first to close the window pressing the [x] button to proceed.
In my case, as I’m ambidextrous and I’m using two mouses at the same time on my desk, so I’ve manged to run several tests with drawing digits with both my hands as each of my hands produces a different output. I know it’s weird, but usually in office I prefer to use my left mouse hand and at home both, so I can rest my hands a bit.
After you export the digit you can validate it in the next cells either in the notepad or the STM32F7.
FbComm
The FbComm class handles the communication between the jupyter notepad and the STM32F7 (or another tool which I’ll explain). The FbComm supports two different communication means. The first is the Serial comms using a serial port and the other is a TCP socket. There is a reason I’ve done this. Normally, the communication of the notepad is using the serial port and send to/receive data from the STM32F7. To develop using this communication is slow as it takes a lot of time to build and flash the firmware on the device every time. Therefore, I’ve written a small C++ tool in jupyter_notebook/FbComm/test_cpp_app/fb_comm_test.cpp. Actually it’s mainlt C code for sockets but wrapped in a C++ file as flatbuffers need C++. Anyway, if you plan on changing stuff in the flatbuffer schema it’s better to use this tool first to validate the protocol and the conversions and when it’s done then just copy-paste the code on the STM32F7 and expect that it should work.
When you switch to the STM32F7 then you can just use the same class but with the proper arguments for using the serial port.
MnistProt
The files in this folder are generated from the flatc compiler, so you shouldn’t change anything in there. If you make any changes in source/schema/schema.fbs, then you need to re-run the flatc compiler to re-create the new files. Have a look in the Flatbuffers section in the README.md file how to do this.
Benchmarking the TF-Lite micro firmware
Finally, we got here. But I need to clarify some things first.
I’ve implemented several different tests for the firmware in order to benchmark the various implementations of the tflite micro API. What I mean is that the depthwise_conv layer is implemented in 3 different ways in the API. The default implementation is in the source/libs/tensorflow/lite/experimental/micro/kernels/depthwise_conv.cc file. Then there is another implementation in source/libs/tensorflow/lite/experimental/micro/kernels/portable_optimized/depthwise_conv.cc and finally the /rnd/gihub/stm32f746-tflite-micro-mnist/source/libs/tensorflow/lite/experimental/micro/kernels/cmsis-nn/depthwise_conv.cc. I’ve added detailed instructions how to build each case in the repo’s README file.
In source/src/inc/digit.h I’ve added a custom hand-drawn digit (number 5) that you use to test the firmware and the model without having to send any data to the board. To do that you can by sending the command CMD=2. This will run the inference and at the same time it benchmarks the process for every layer and the total time it takes. Let’s see the results when running the benchmark in various scenarios.
The first column is the layer name and the others are the time in msec of each layer on 6 different cases, which are:
- 1: 216MHz, default depthwise_conv.cc
- 2: 216MHz, portable_optimized/depthwise_conv.cc
- 3: 216MHz, cmsis-nn/depthwise_conv.cc
- 4: 288MHz, default depthwise_conv.cc
- 5: 288MHz, portable_optimized/depthwise_conv.cc
- 6: 288MHz, cmsis-nn/depthwise_conv.cc
Edit (24.07.2019):The following table is with the FPU of the STM32F7 disabled, which was my mistake. Therefore, I just leave it here for reference. The next table is the one that has the FPU enabled.
All times are in msec
| Layer | [1] | [2] | [3] | [4] | [5] | [6] |
|---|---|---|---|---|---|---|
| DEPTHWISE_CONV_2D | 236 | 236 | 235 | 177 | 177 | 176 |
| MAX_POOL_2D | 23 | 23 | 23 | 18 | 17 | 17 |
| CONV_2D | 2347 | 2346 | 2346 | 1760 | 1760 | 1760 |
| MAX_POOL_2D | 7 | 7 | 7 | 5 | 5 | 5 |
| CONV_2D | 348 | 348 | 348 | 261 | 261 | 260 |
| FULLY_CONNECTED | 5 | 5 | 5 | 4 | 4 | 4 |
| FULLY_CONNECTED | 0 | 0 | 0 | 0 | 0 | 0 |
| SOFTMAX | 0 | 0 | 0 | 0 | 0 | 0 |
| TOTAL TIME= | 2966 | 2965 | 2964 | 2225 | 2224 | 2222 |
Edit (24.07.2019): This is the table with the FPU enabled.
All times are in msec
| Layer | [1] | [2] | [3] | [4] | [5] | [6] |
|---|---|---|---|---|---|---|
| DEPTHWISE_CONV_2D | 18.69 | 18.7 | 18.77 | 14.02 | 14.02 | 14.08 |
| MAX_POOL_2D 1.99 | 1.99 | 1.99 | 1.49 | 1.49 | 1.49 | |
| CONV_2D | 91.03 | 91.08 | 90.94 | 68.48 | 68.49 | 68.54 |
| MAX_POOL_2D | 0.56 | 0.56 | 0.56 | 0.42 | 0.42 | 0.42 |
| CONV_2D | 12.52 | 12.51 | 12.49 | 9.41 | 9.39 | 9.39 |
| FULLY_CONNECTED | 1.48 | 1.48 | 1.48 | 1.11 | 1.12 | 1.11 |
| FULLY_CONNECTED | 0.03 | 0.03 | 0.03 | 0.02 | 0.02 | 0.02 |
| SOFTMAX | 0.01 | 0.01 | 0.01 | 0.007 | 0.007 | 0.007 |
| TOTAL TIME= | 126.31 | 126.36 | 126.27 | 94.957 | 94.957 | 95.057 |
From the above table, you can notice that:
- When FPU is enabled then tflite is ~23.48x times faster (oh, really?)
- There’s no really any difference with and without the DSP/NN libs acceleration
- The CPU frequency has a great impact in the execution time (which is expected)
- It’s quite fast, but not that much
- The CPU spends most of the time in the CONV_2D layer.
I’m quite disappointed with the fact that the CMSIS DSP/NN library didn’t make any real difference here. I’ve spent quite some time to integrated in the cmake build and I was hoping for better results.
In case you want to overclock your CPU, have in mind that it may be unstable and the CPU can crash. I’ve managed to run the benchmark @ 288MHz, but when I was using the flatbuffers communication between the jupyter notebook and the STM32F7 then the CPU was crashing at a random point. I’ve used st-link with GDB to verify that this was the case and not a software bug. So, just be aware if you experiment with overclocked CPU.
If you want to use GDB with the code then mind that although the -g flag is set in the cmake, the elf file is stripped. Therefore, in the /rnd/github/stm32f746-tflite-micro-mnist/source/CMakeLists.txt file you need to find this line
1
-s \
and remove the -sfrom that and re-build. Then GDB will be able to find the symbols.
Evaluating on the STM32F7
This is an example image of the digit I’ve drawn. The format is the standard grayscale 28x28 px image. That’s an uint8 grayscale image [0, 255], but it’s normalized to a [0, 1] float, as the network input and output is float32.
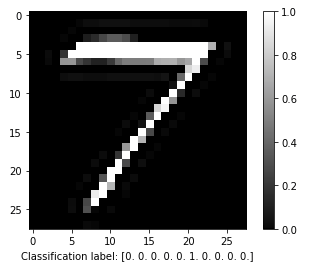
After running the inference on the target we get back this result.
1
2
3
4
5
6
7
8
9
10
11
12
13
14
15
16
Comm initialized
Num of elements: 784
Sending image data
Receive results...
Command: 2
Execution time: 126.329910 msec
Out[9]: 0.000000
Out[8]: 0.000000
Out[7]: 1.000000
Out[6]: 0.000000
Out[5]: 0.000000
Out[4]: 0.000000
Out[3]: 0.000000
Out[2]: 0.000000
Out[1]: 0.000000
Out[0]: 0.000000
From the above output, you can see that the result is an array of 10 float32. Each index of the array represents the prediction of the NN for each digit. Out[0] is the digit 0 and Out[9] is number 9. So from the above output you see that the NN classifies the image as number 7. It’s interesting that Out[1], Out[2], Out[3] are not zero. I think it’s quitvious why the NN made those predictions, because there are parts of 7 that are quite similar to 1, 2, 3. Anyway, in this case I’m getting the same prediction from the notepad notebook as also from the STM32F7. And that was the case for all my tests.
Conclusions (and a spoiler for part 4)
Before I close this post, I will make a spoiler for the next post that follows. I’ve already used the exact same model with the X-CUBE-AI and this is part of the result from an inference (with random input data, which doesn’t matter).
1
2
3
4
5
6
7
8
9
10
Running PerfTest on "mnistkeras" with random inputs (16 iterations)...
................

Results for "mnistkeras", 16 inferences @216MHz/216MHz (complexity: 2852598 MACC)
 duration     : 73.735 ms (average)
 CPU cycles   : 15926760 -458/+945 (average,-/+)
 CPU Workload : 7%
 cycles/MACC  : 5.58 (average for all layers)
 used stack   : 576 bytes
 used heap    : 0:0 0:0 (req:allocated,req:released) cfg=0
Do you notice something in there? The duration for the same model is 73.7 ms instead of 126.31 ms at the same frequency with tflite-micro. That’s ~1.64x times faster!
I guess this difference is because the x-cube-ai uses internally INT8 for all the weights.
In the next post, I’ll do benchmarks with the X-CUBE-AI for the same model on the STM32F7 and then do a comparison.
Update: Part 4 is now available here.
Have fun!
Comments powered by Disqus.