Adding macros to CuteCom
Updated at 30.03.2019: Now I’ve implemented a plugin system that more plugins can be added in
cutecom.
Intro
The last years I’m only using Linux to my workplace and since I’ve also started using only Linux at home, too; I’ve found my self missing some tools that I was using with Windows. That’s pretty much the case with everyone that at some point tries or tried the same thing. Gladly, because many people already do this more and more the last years, there are many alternatives for most of the tools. Alternatives can be either better or worse than the tool you we’re using, of course, but the best thing with FOSS is that you can download the code and implement all the functionality you’re missing yourself. And that’s great.
Anyway, one the tools I’ve really missed isbr@y’s terminal. I assume that every bare metal embedded firmware developer is aware of this amazing tool. It’s everything you need when you develop firmware for a micro-controller. For embedded Linux I prefer putty for serial console, though. Anyway, this great tool is only for Windows and although you can use Wine to run it on Linux, soon you’ll find out that when you develop USB CDC devices then the whole wine/terminal thing doesn’t work well.
CuteCom
There are many alternatives for Linux (console and gui) terminal apps and I’ve used most of those you can find in the first 7 pages of google results. But after using Bray’s terminal for so many years, only one of them seem to be close enough to that; and that’s CuteCom. The nice thing with CuteCom is that it’s written with Qt, so it’s a cross-platform app and also Qt is easy and nice to write code.
Tbh, I’m familiar with Qt since Trolltech era and after the Nokia era. I’ve written a lot of code in Qt, especially for the Nokia n900 phone and Maemo OS. But since Nokia abandoned Maemo and also Meego (former Tizen), I’ve started doing other stuff. I was really disappointed back then, because I believe n900 and Maemo could be the future until everything went wrong and Nokia abandoned everything and adopt Windows for their mobiles. I’ll moan another time for how much Microsoft loves Linux.
Anyway, Qt may also affected my decision to go with CuteCom, but the problem was that the functionality that I was using most from Bray’s terminal wasn’t there. And I mean the macros. Let me explain what macros are. Macros are just predefined data that you can send over the serial port by pressing the corresponding macro button. And also you can use a timer for every macro and send it automatically every xprogrammable intervals in milliseconds. That’s pretty much all you need when you developing a firmware. But this functionality was not implemented yet in CuteCom.
Therefore, I had to implement it myself and also find an excuse to write some Qt again.
Result
I’ve branched CuteCom from github and added the macro functionality in here:
https://github.com/dimtass/CuteCom
I’ve done a pull request, but I can’t tell if it gets merged or not. But anyways if you are a macro lover like myself, then you can download it from the above branch.
Edit: Macros are now merged to the master git branch, thanks to
Meinhard Ritscher.
https://gitlab.com/cutecom/cutecom/
I’ll add here a couple of notes how to build it, because it’s not very clear from the README file. You can either clone the repo and use QtDesigner to load the project and and build it, or you can use cmake. In case you use cmake you need the Qt libs and header (version >= 5) in your system.
If you don’t have Qt installed then you need to do the following (tested on Ubuntu 18.04):
1
2
3
4
5
6
git clone https://gitlab.com/cutecom/cutecom/
cd CuteCom
sudo apt install cmake qtbase5-dev libqt5serialport5-dev
cmake .
make
make install
This build and install cutecom in /usr/local/bin/cutecom. Then you can create a desktop launcher
1
gedit ~/.local/share/applications/CuteCom.desktop
And add the following:
1
2
3
4
5
6
7
8
9
10
11
#!/usr/bin/env xdg-open
[Desktop Entry]
Version=1.0
Type=Application
Terminal=false
Icon[en_US]=cutecom
Name[en_US]=CuteCom
Exec=/usr/local/bin/cutecom
Comment[en_US]=Terminal
Name=CuteCom Comment=Terminal
Icon=cutecom
If you have installed another Qt SDK then you can just point cmake there and build like this:
1
2
3
cmake . -DCMAKE_PREFIX_PATH=/opt/Qt/5.x/gcc_64
make
sudo make install
This will be installed in /usr/local/bin/cutecom (try also which just to be sure…)
1
which cutecom
Finally, you’ll need a desktop icon or a launcher. For Ubuntu you can create a CuteCom.desktop file in your ~/.local/share/applications path and paste the following:
1
2
3
4
5
6
7
8
9
10
11
12
#!/usr/bin/env xdg-open
[Desktop Entry]
Version=1.0
Type=Application
Terminal=false
Icon[en_US]=cutecom
Name[en_US]=CuteCom
Exec=env LD_LIBRARY_PATH=/opt/Qt/5.11.1/gcc_64/lib /usr/local/bin/cutecom
Comment[en_US]=Terminal
Name=CuteCom
Comment=Terminal
Icon=cutecom
Plugins (updated)
When the article was written, I’ve only added the macros area in main Window. Later I’ve decided to write a plugin interface, so more plugins can be added in cutecom and the macros would be just a plugin. Also the plugins should be loaded on demand and not by default. Therefore, this plugin interface was written. Currently there are are 3 plugins supported.
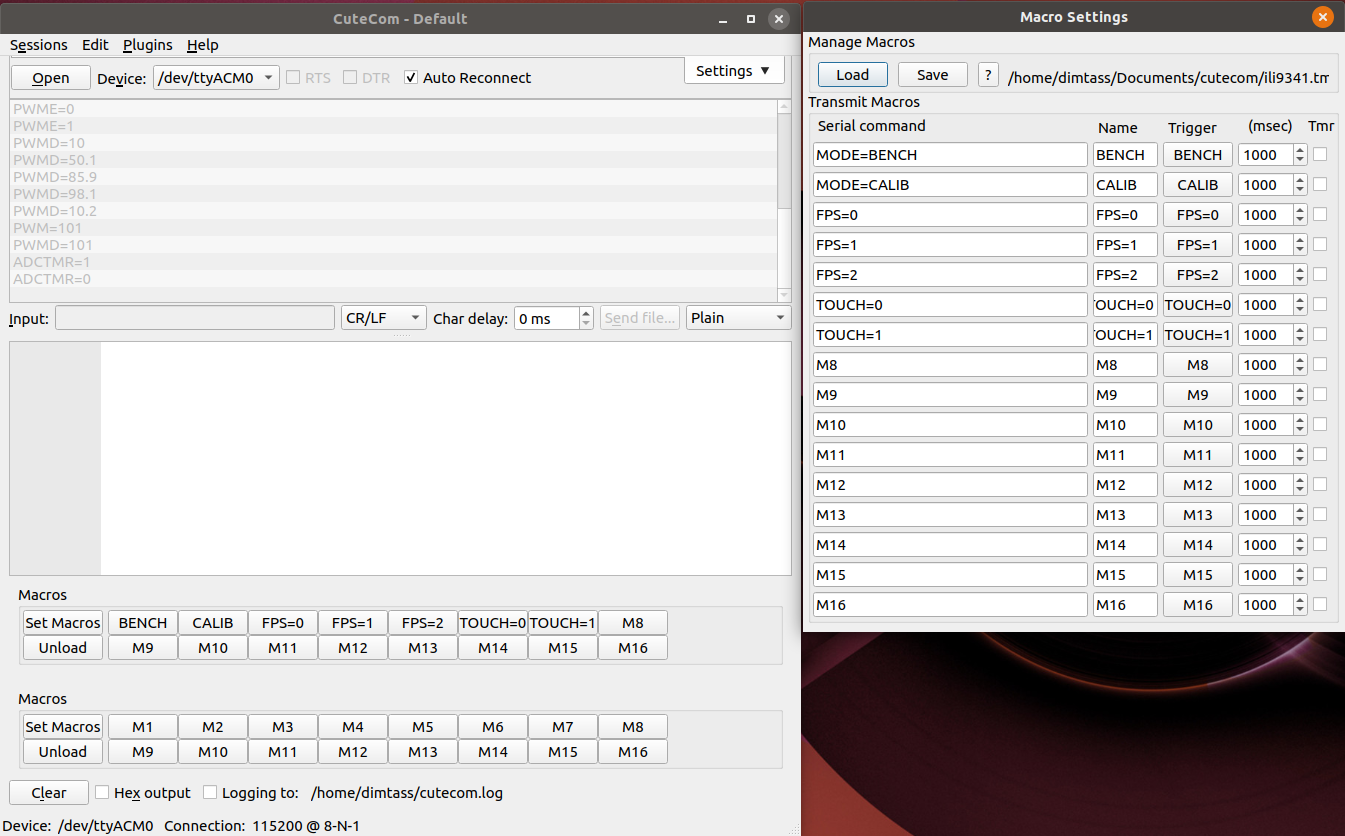
Macros
it’s the same with the br@y's terminal macros. You can add commands on buttons for easy access. To enable them from the main menu, press Plugins and then New macros. The nice thing is that you can as many you like as each macro is an object. Then you can press the Set Macrosbutton and set the macros you like and then from the main window press the button of the macro to send the command. You can also change each macro’s name, which will affect the macro’s button label.
Just for clarification, macros are just pre-defined strings or any supported format that you can send over the serial. So instead of repeat writing a sting, you create a macro button that corresponds to that string and when you press the button the string is sent.
Bellow there’s a screenshot with two macro plugin enabled. Each macro plugin supports up to 16 macros. There’s no really a reason for that limit other than is usually enough for most cases.
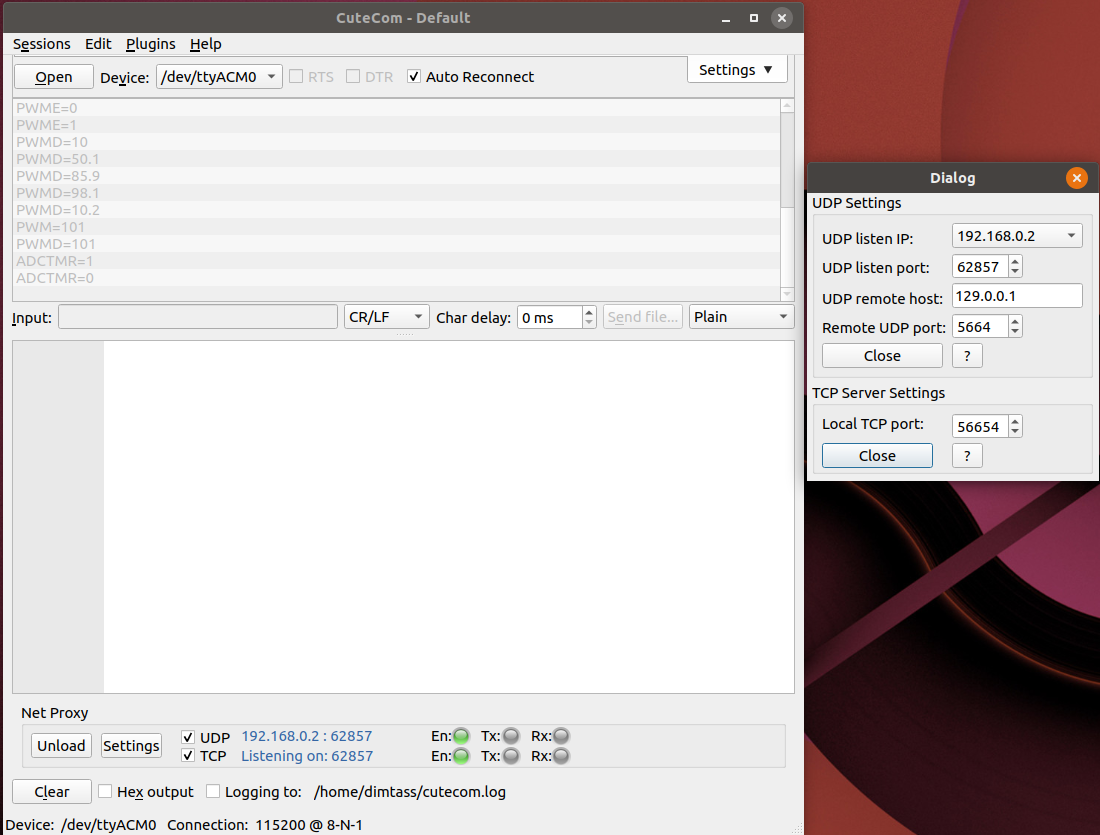
IP proxy
The IP proxy plugin is an interesting one. It’s simple. You can just proxy in both directions data from the RS232 port to a TCP client or a remote UDP port. So cutecom becomes a TCP server that listens to a user-defined port and is also able to bind a user-defined UDP port and send to a specific uses-defined UDP port. These two things can be activated at the same time, so it’s not either one of the other. This plugin is also an object, so you can create as many as you like. Finally, the main window plugin interface has indicators that show the plugin enable state and the TX/RX traffic. This is a screenshot of this plugin enabled.
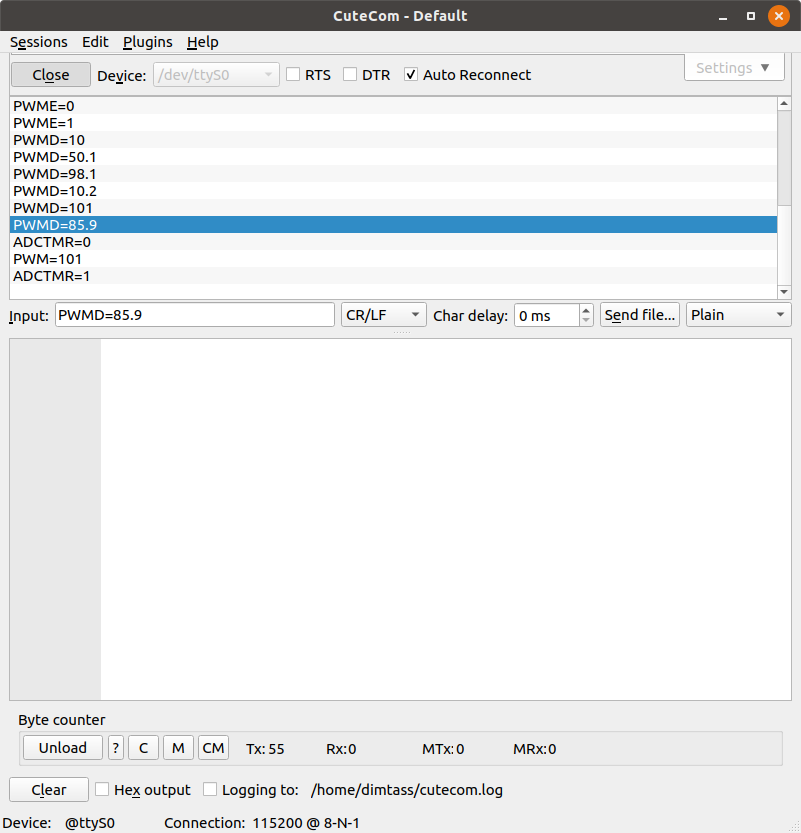
Byte Counter
The byte counter plugin just counts Tx and Rx bytes. If you press the [?]button you get a help on how to use it, but it’s pretty simple. It counts Tx/Rx bytes forever. At some point if you want to save the number of the bytes you press the [M] button and the number of the current Tx bytes will be saved in MTx and the number of Rx to MRx. At any point you can press the [C] button to clear the current byte number and the [CM] to clear the memory bytes number. If you wondering why this is helpful, then I can only say that it was helpful to me some times that I needed to know and compare RS232 transactions and verify that there are no bytes lost. This is a screenshot of this plugin.
Have fun!
Comments powered by Disqus.